Mandarin Matcha Cookies by Molly Brodak

matcha10.JPG

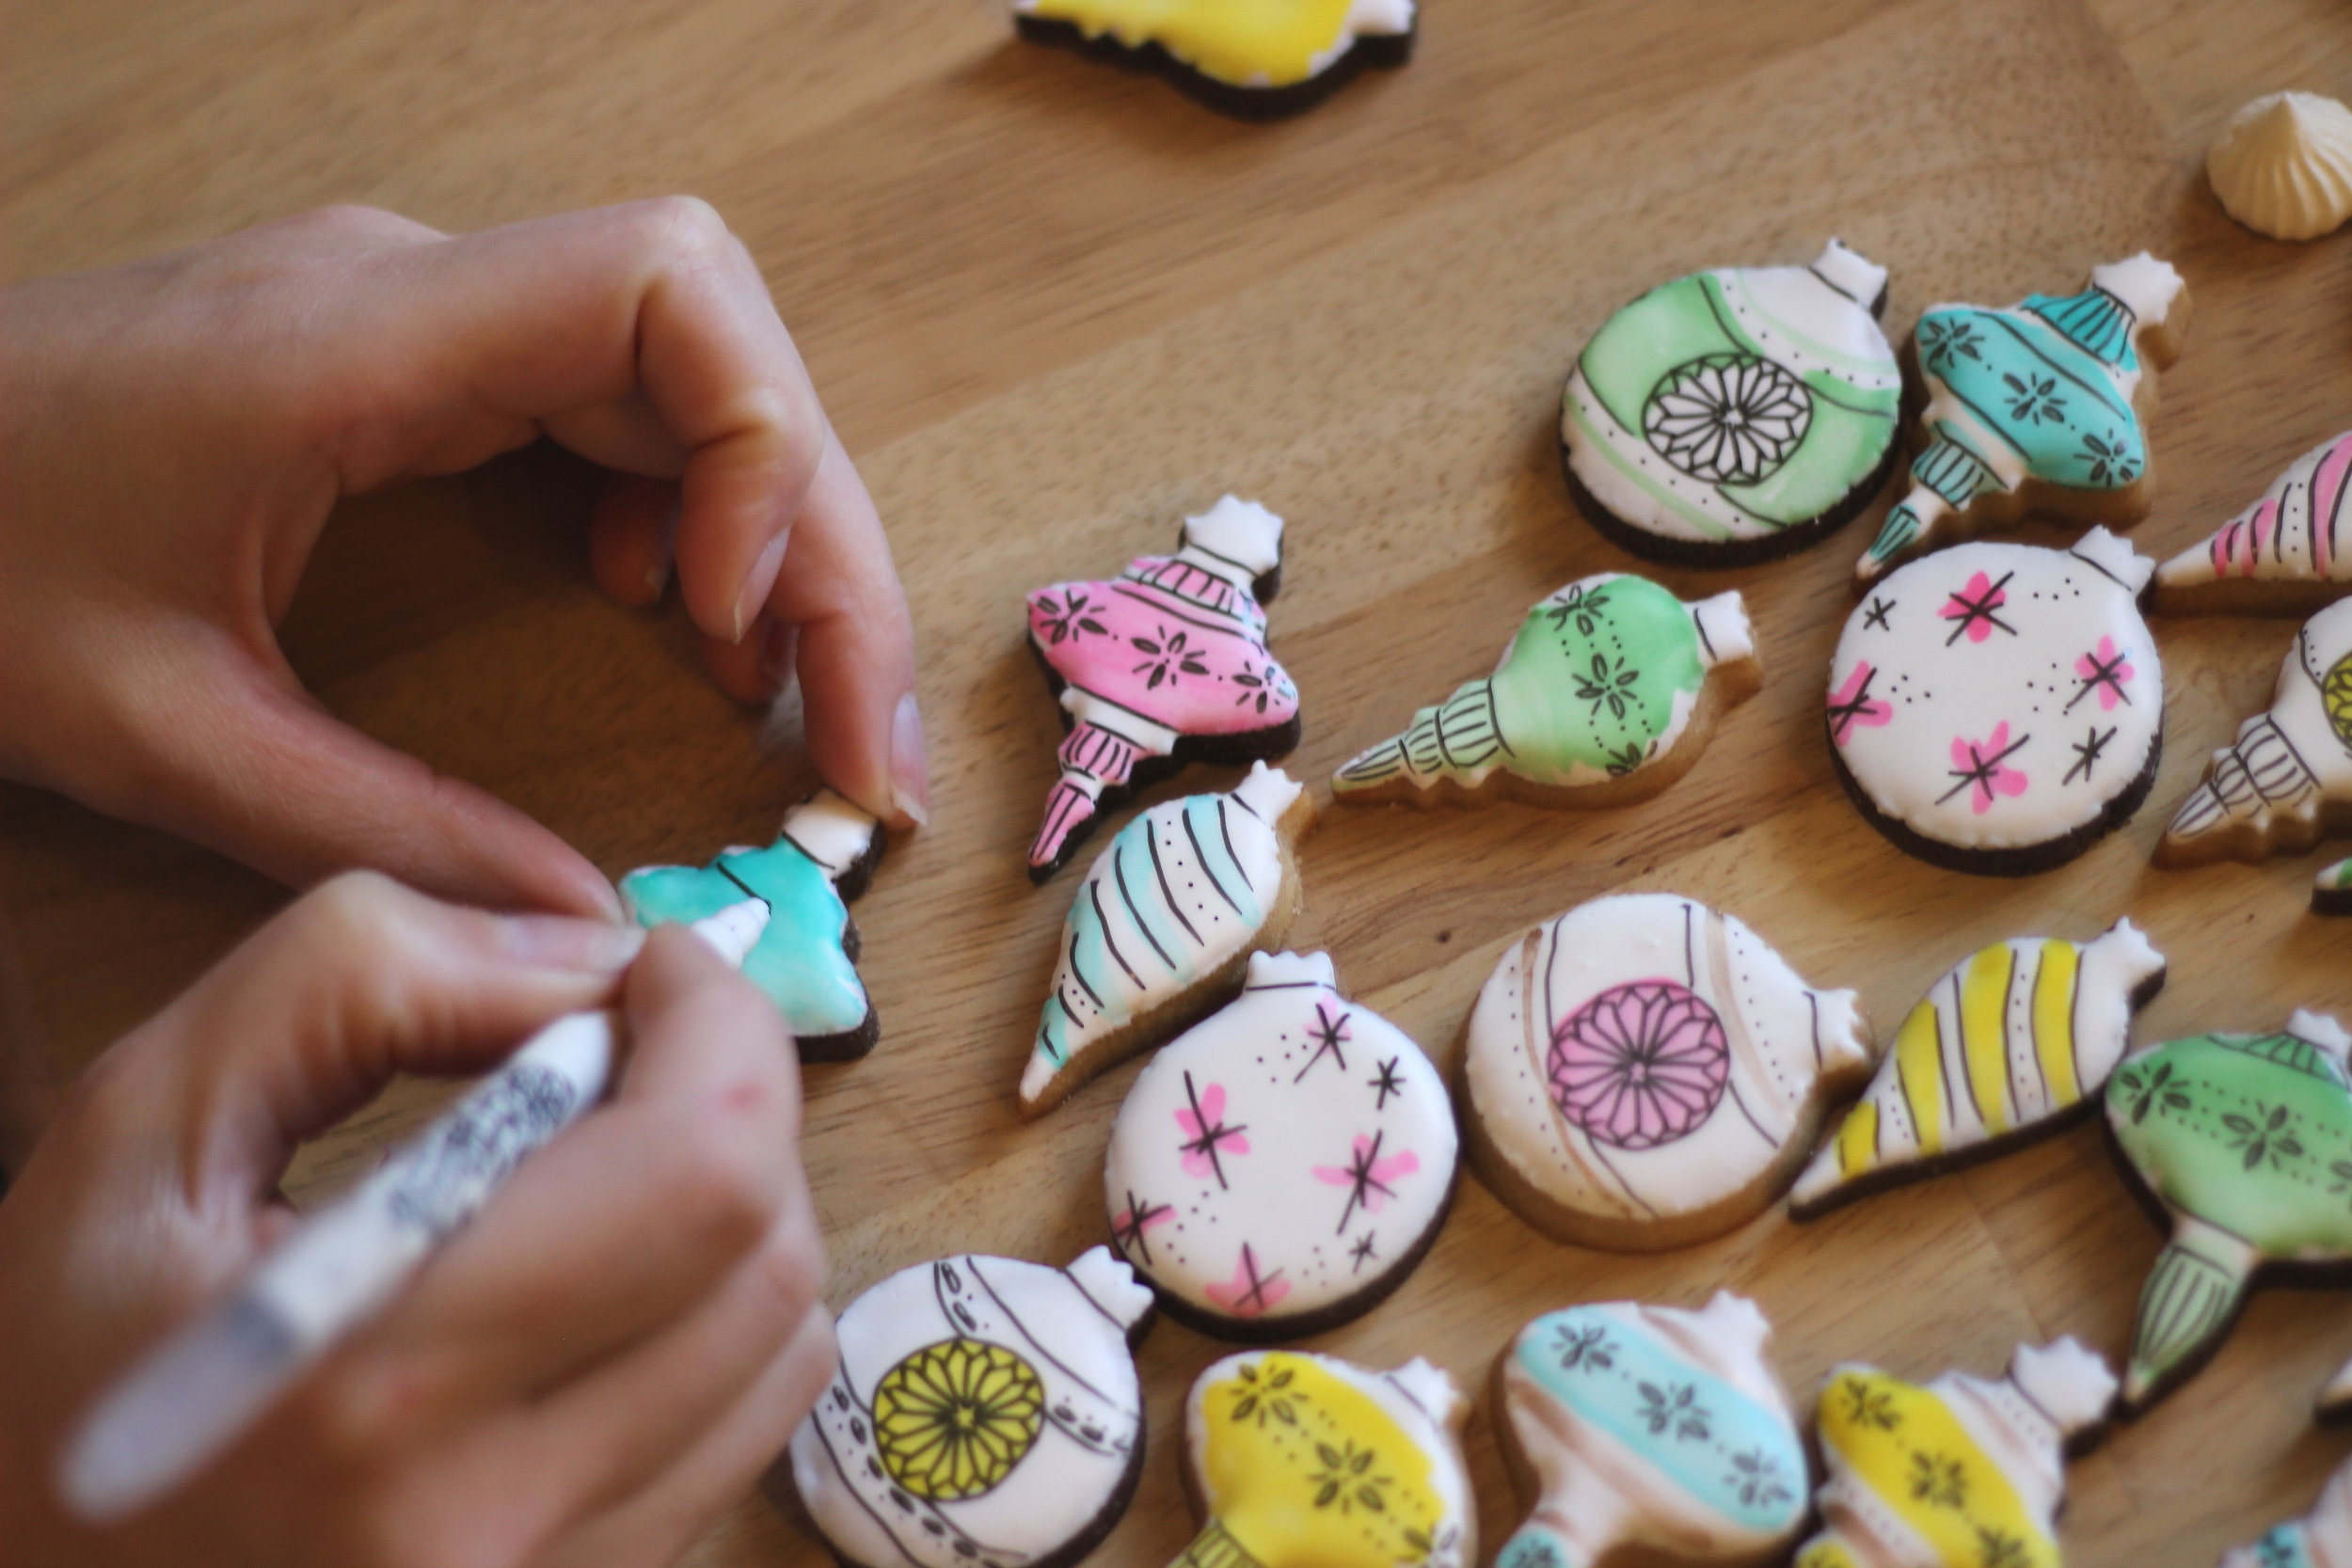
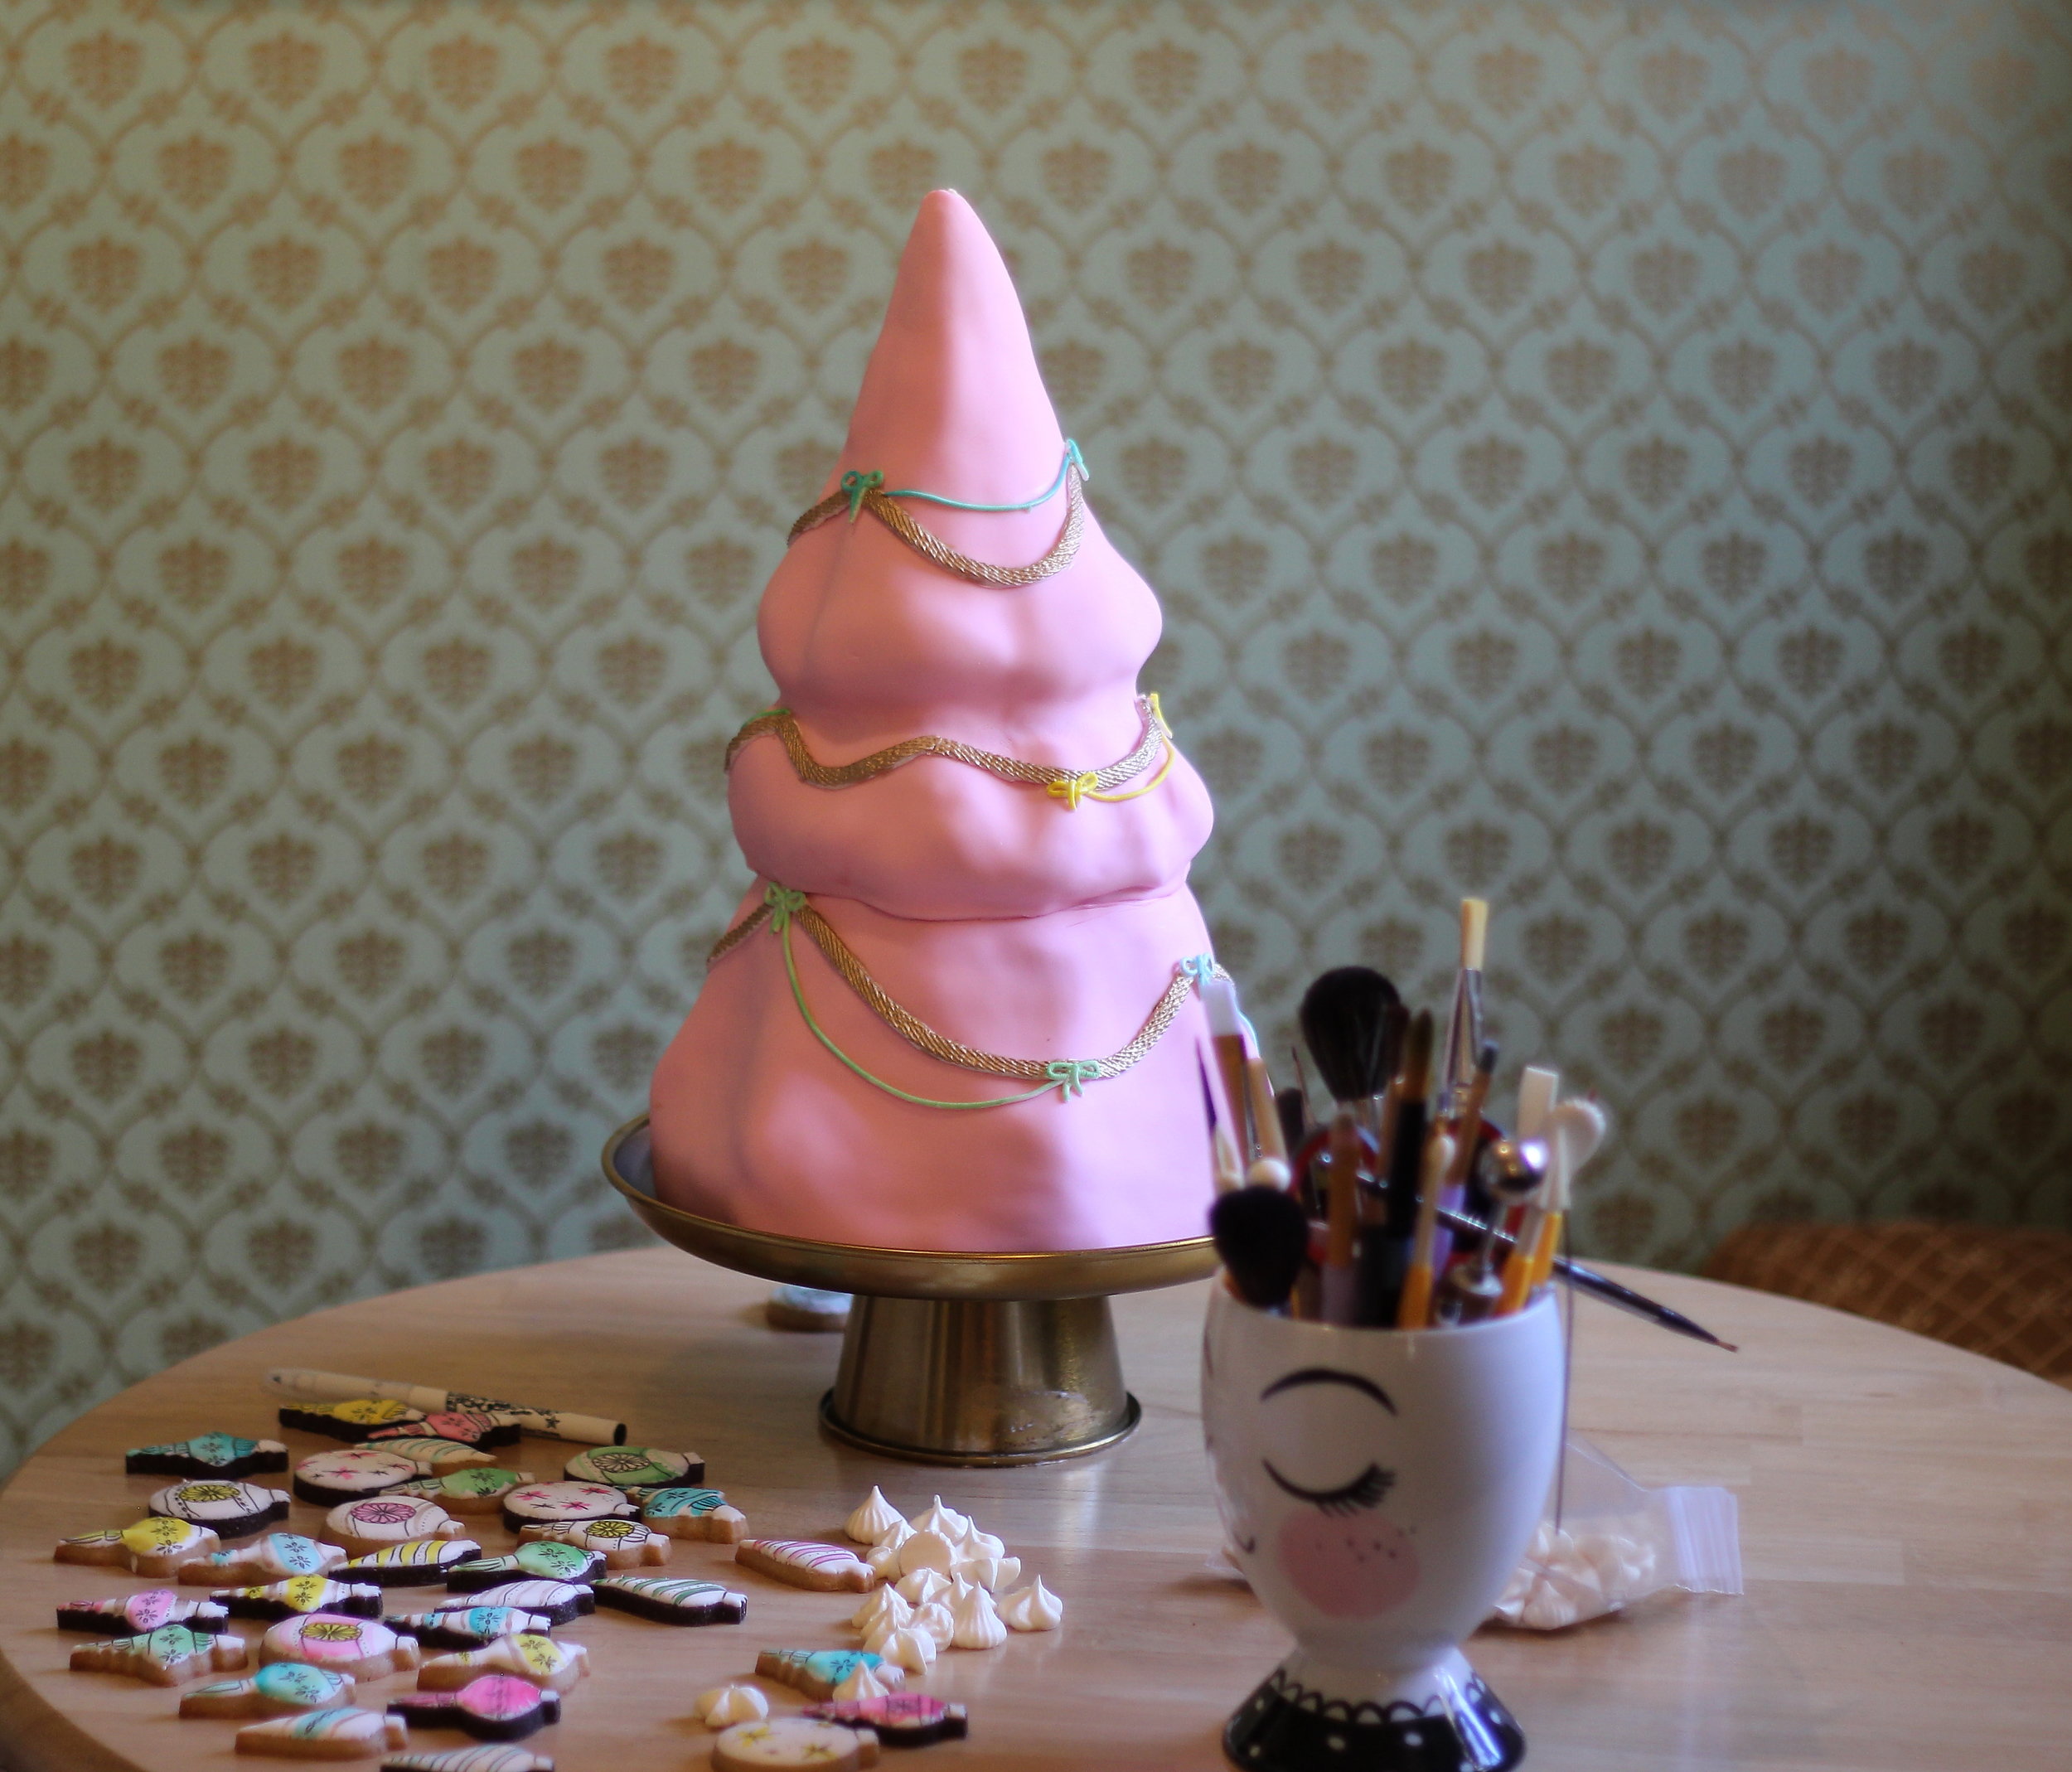
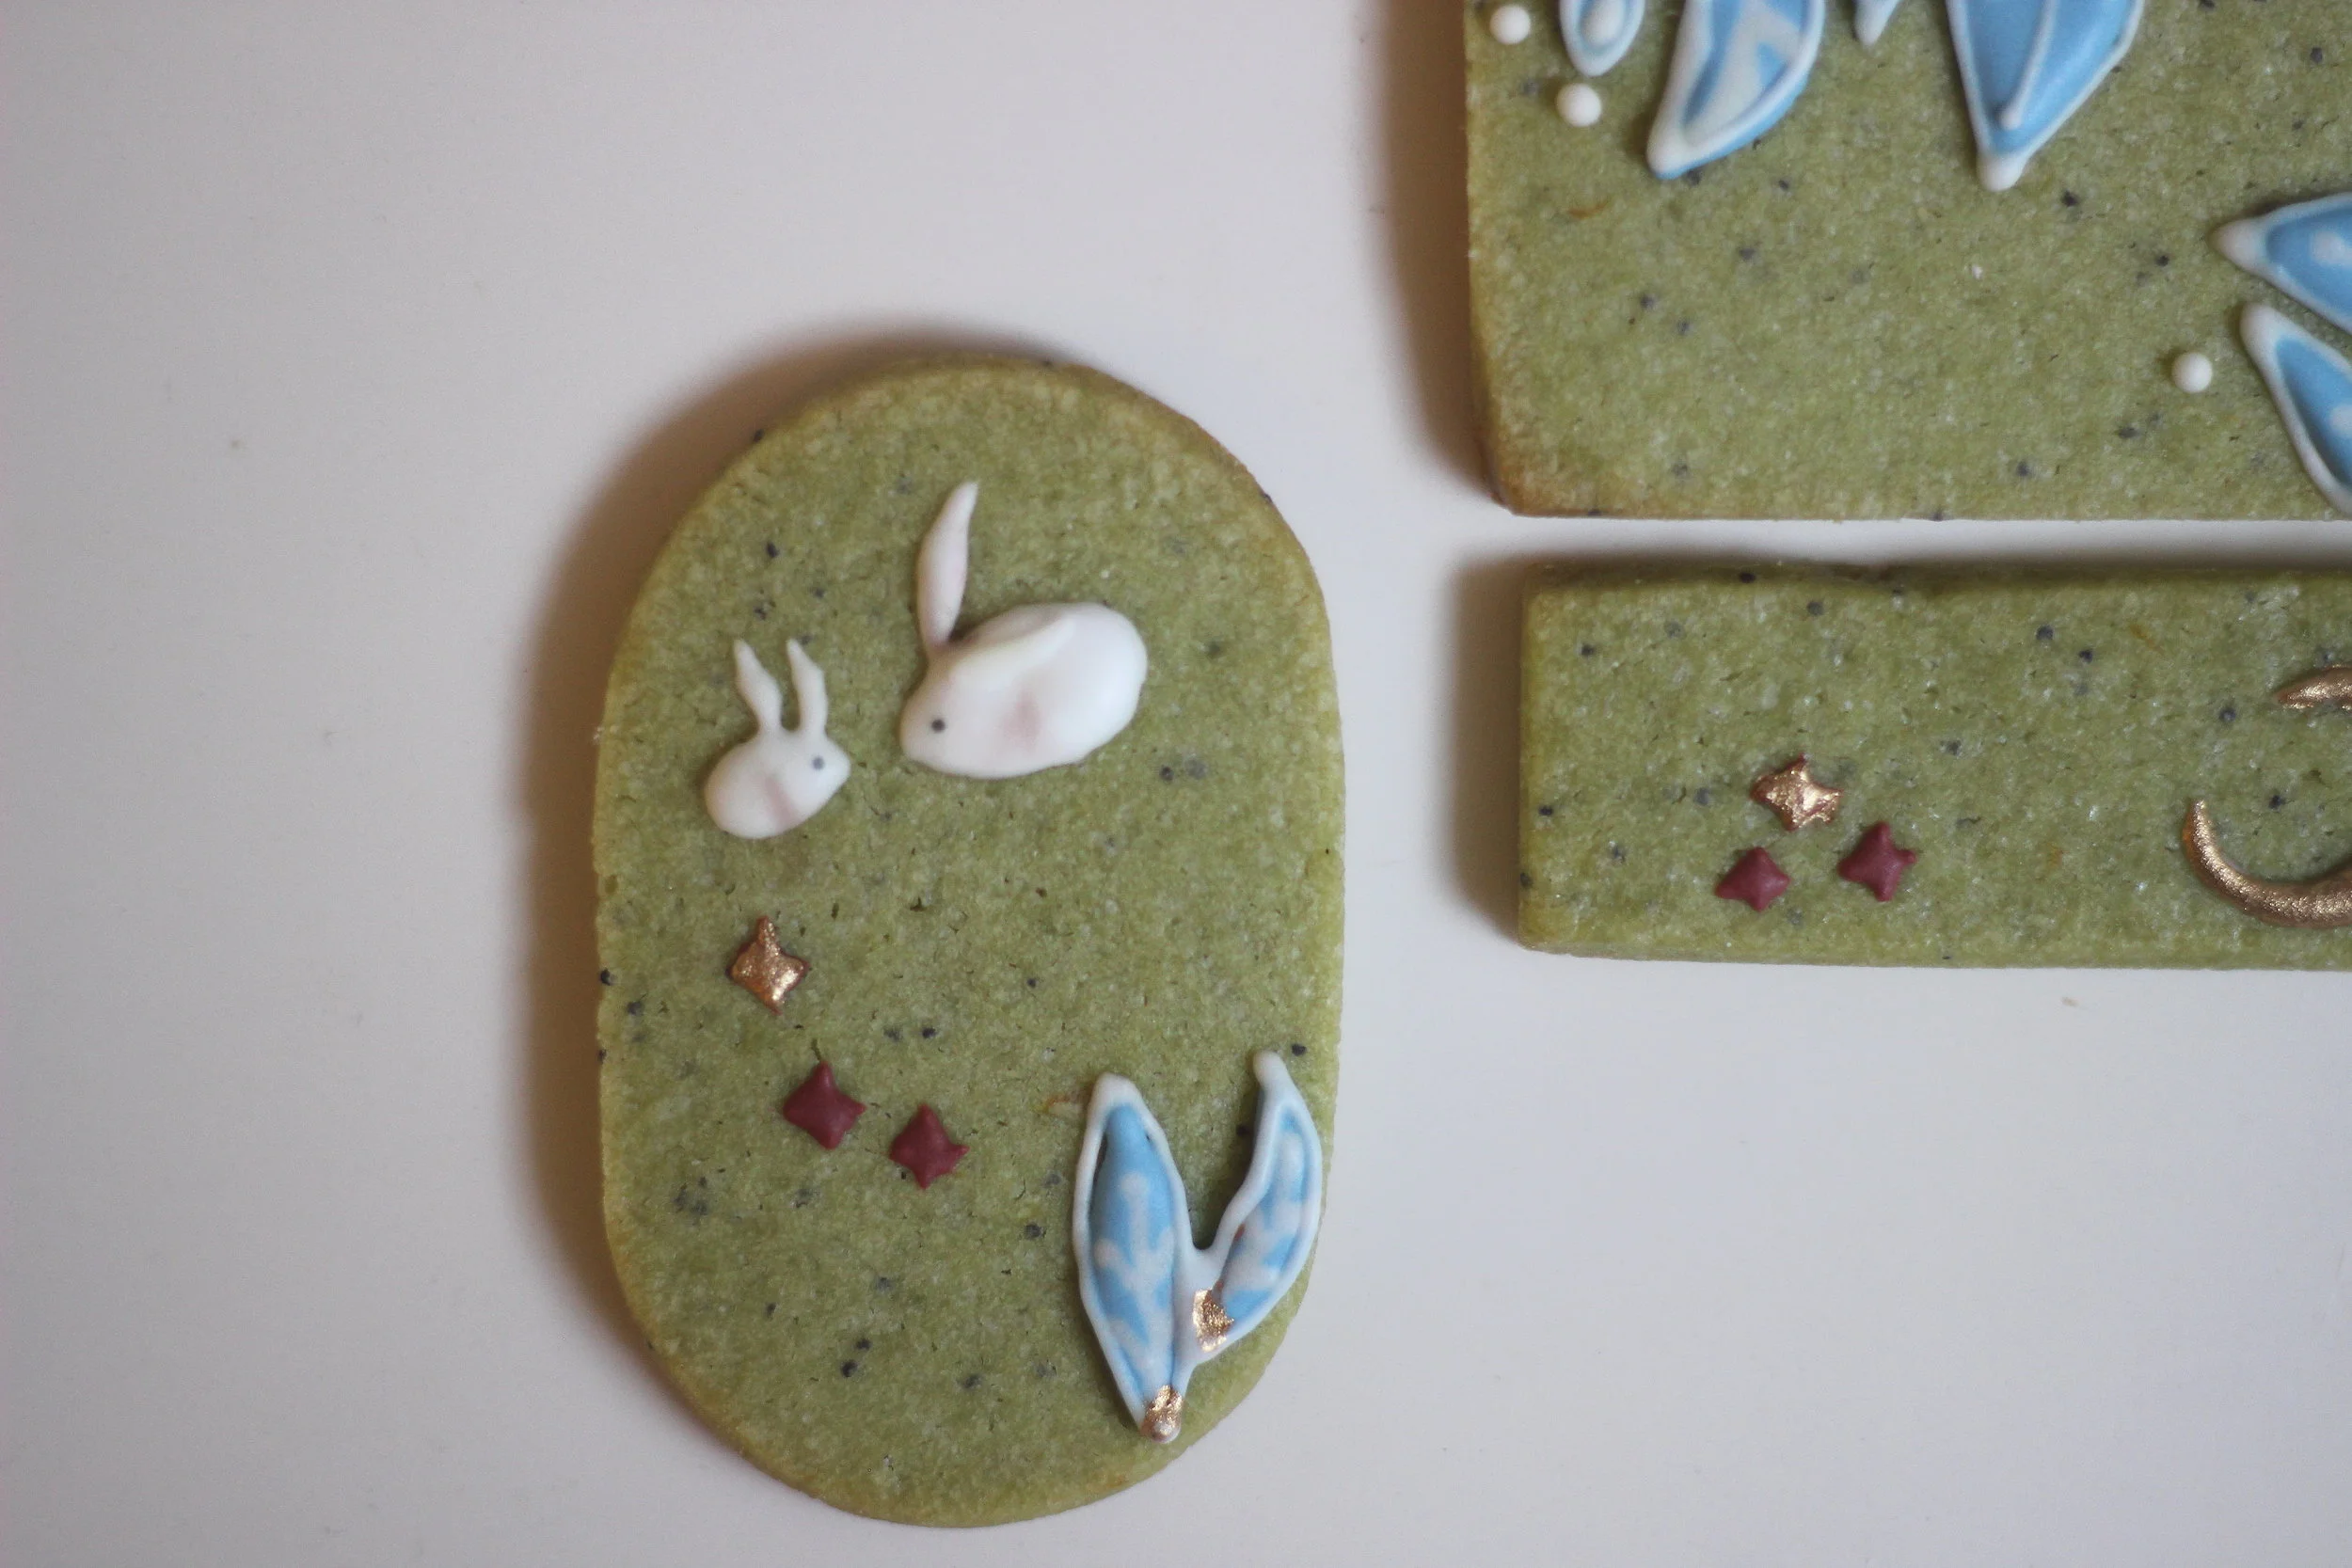
One of my favorite books when I was little was the Runaway Bunny. It's a little sad and creepy now when I look at it again, as the best children's books always are, and it reminds me so much of my mom. I used this book as inspiration for these Mother's Day cookies on sale now here in Atlanta at Youngblood Boutique.

I also am a huge fan of Japanese ceramics, and I think the poppy seeds in this cookie remind me of the subtle textures and imperfection of some Japanese tea cups and plates, the wabi sabi kind, a little imperfect to remind us of our own imperfect, impermanent existence.

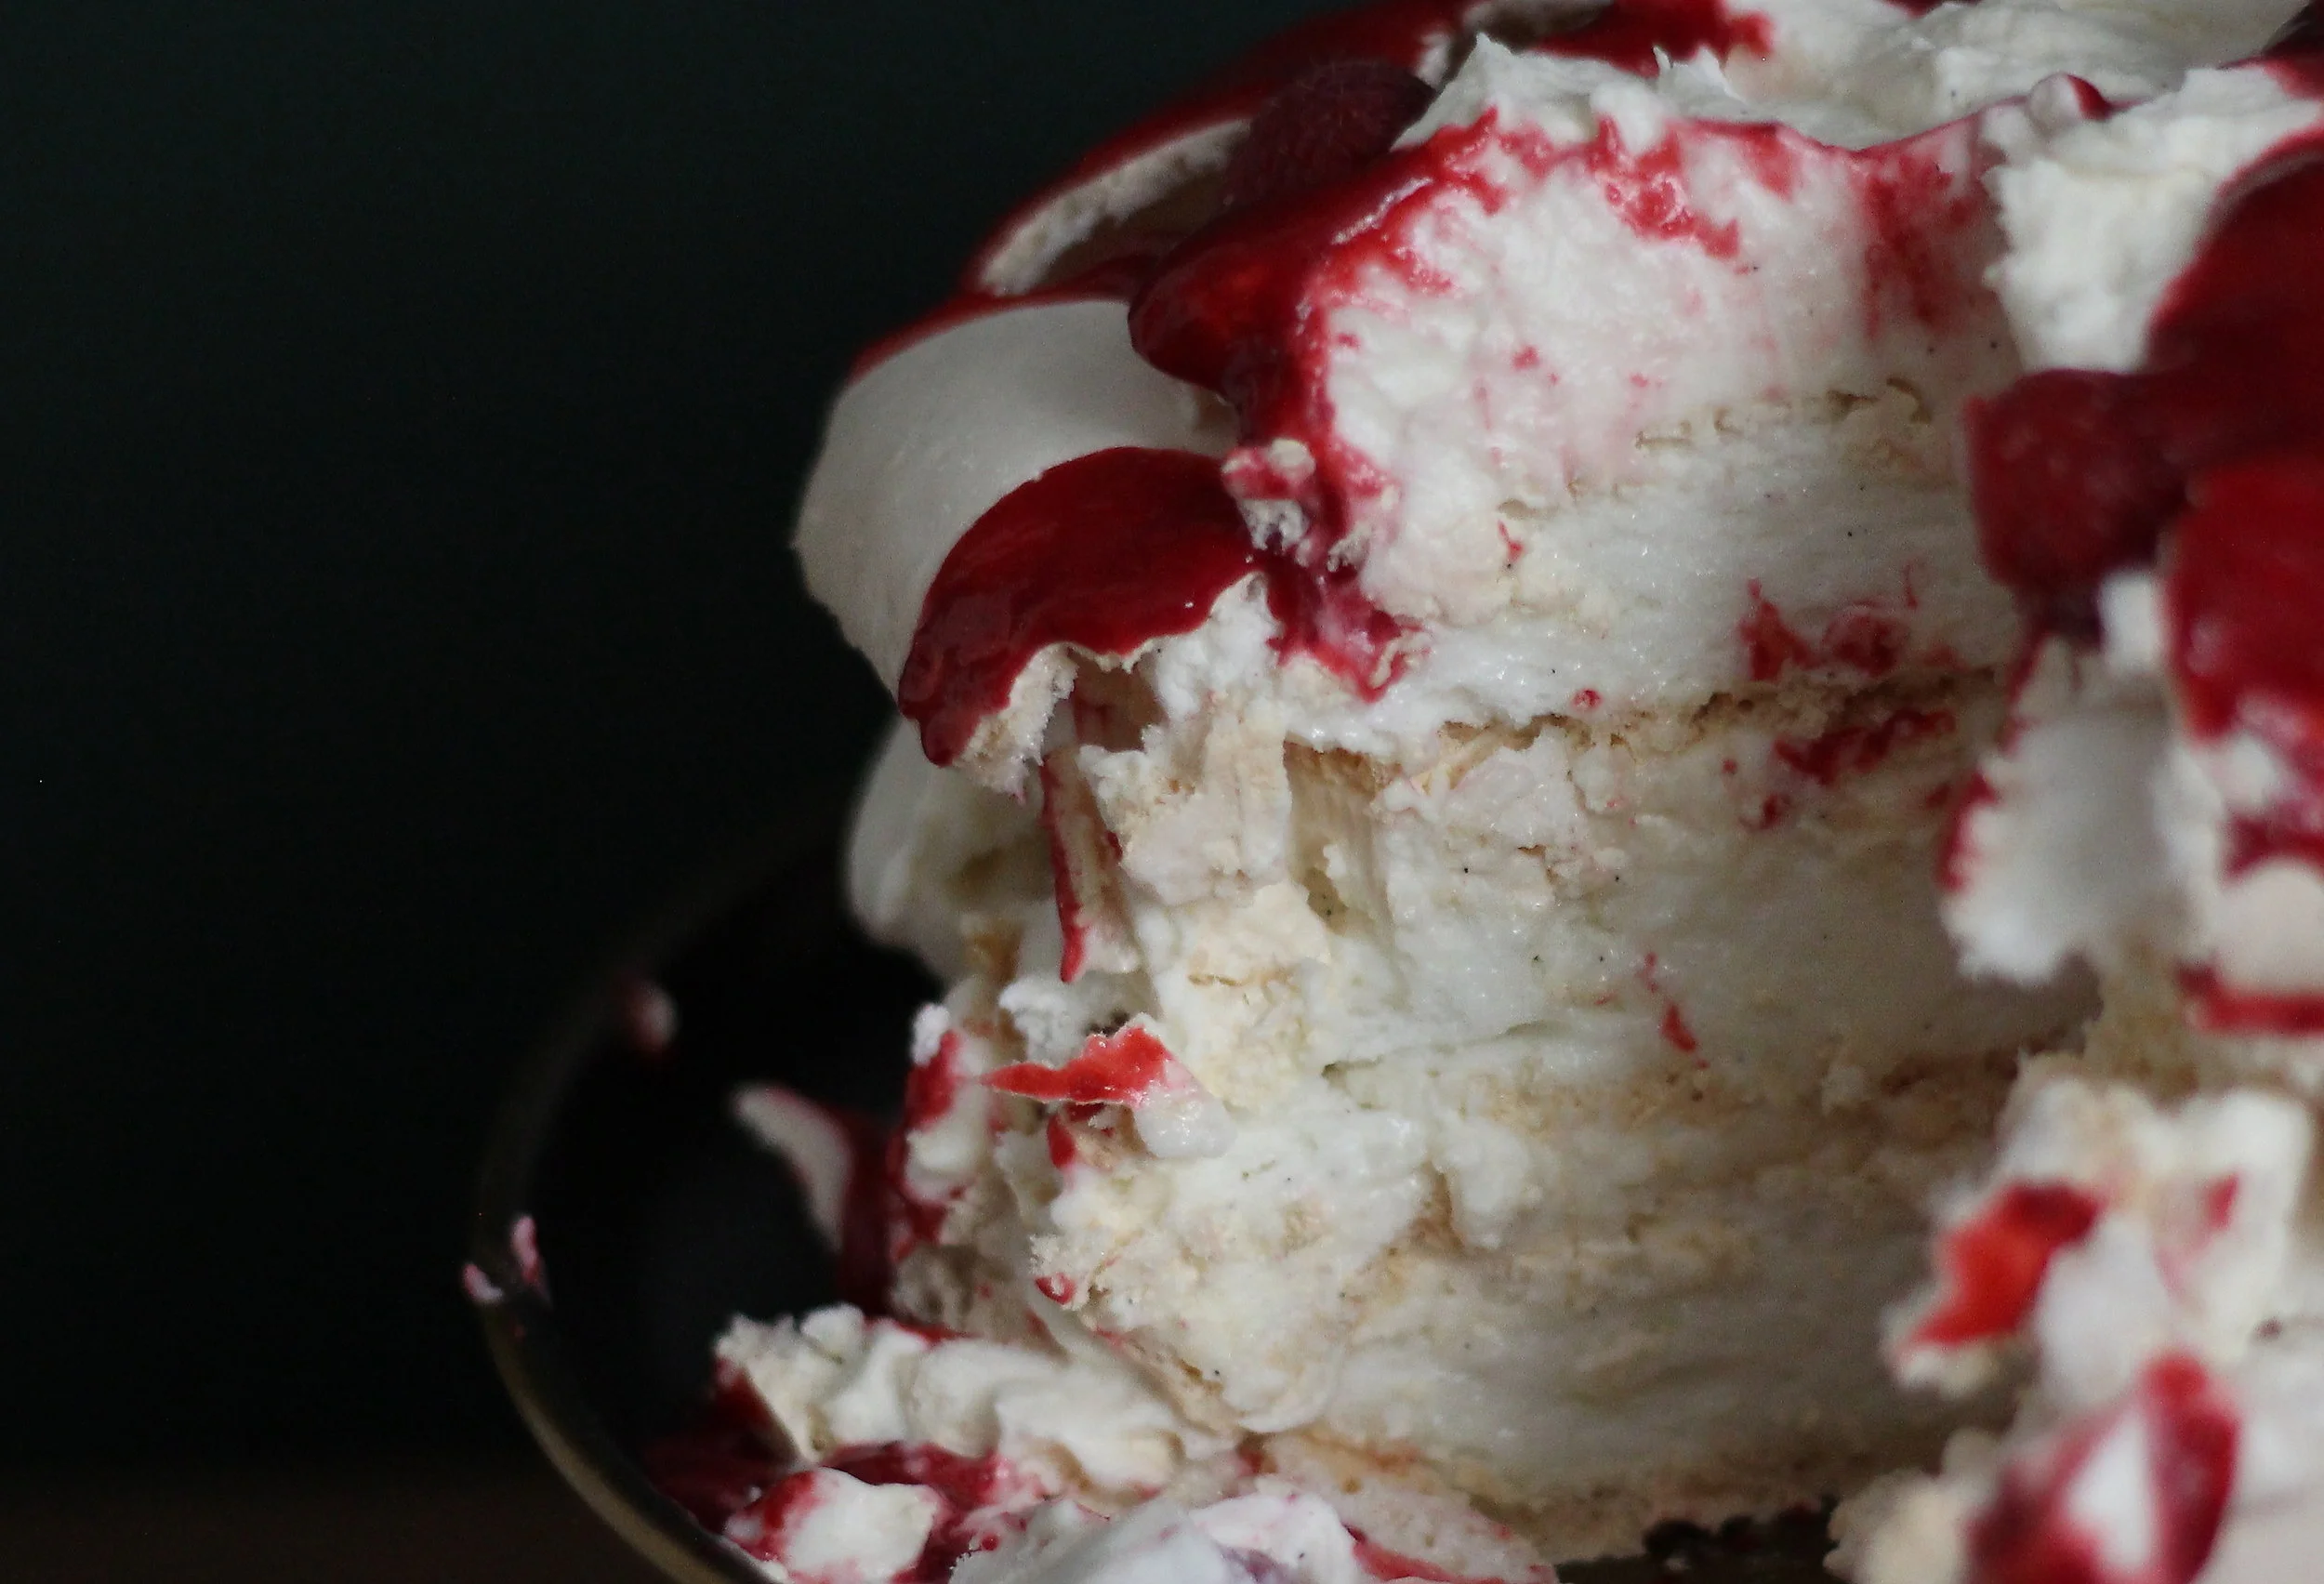
The farmer's market had some lovely mandarins on sale last week, and I thought their flavor would brighten up this matcha cookie I'd been working on for a while. I originally had a matcha ginger flavor, but I much prefer this mandarin version. It's sweeter and friendlier.

I tested this recipe with a regular/low quality green tea powder and a really nice, expensive one from the Asian grocery, and there was a big difference in taste. The low quality matcha made the cookies, well, green, but not very flavorful. The expensive stuff had a beautiful bright, almost neon green color and really tasted like the real deal, so take that info and do what you will with it.

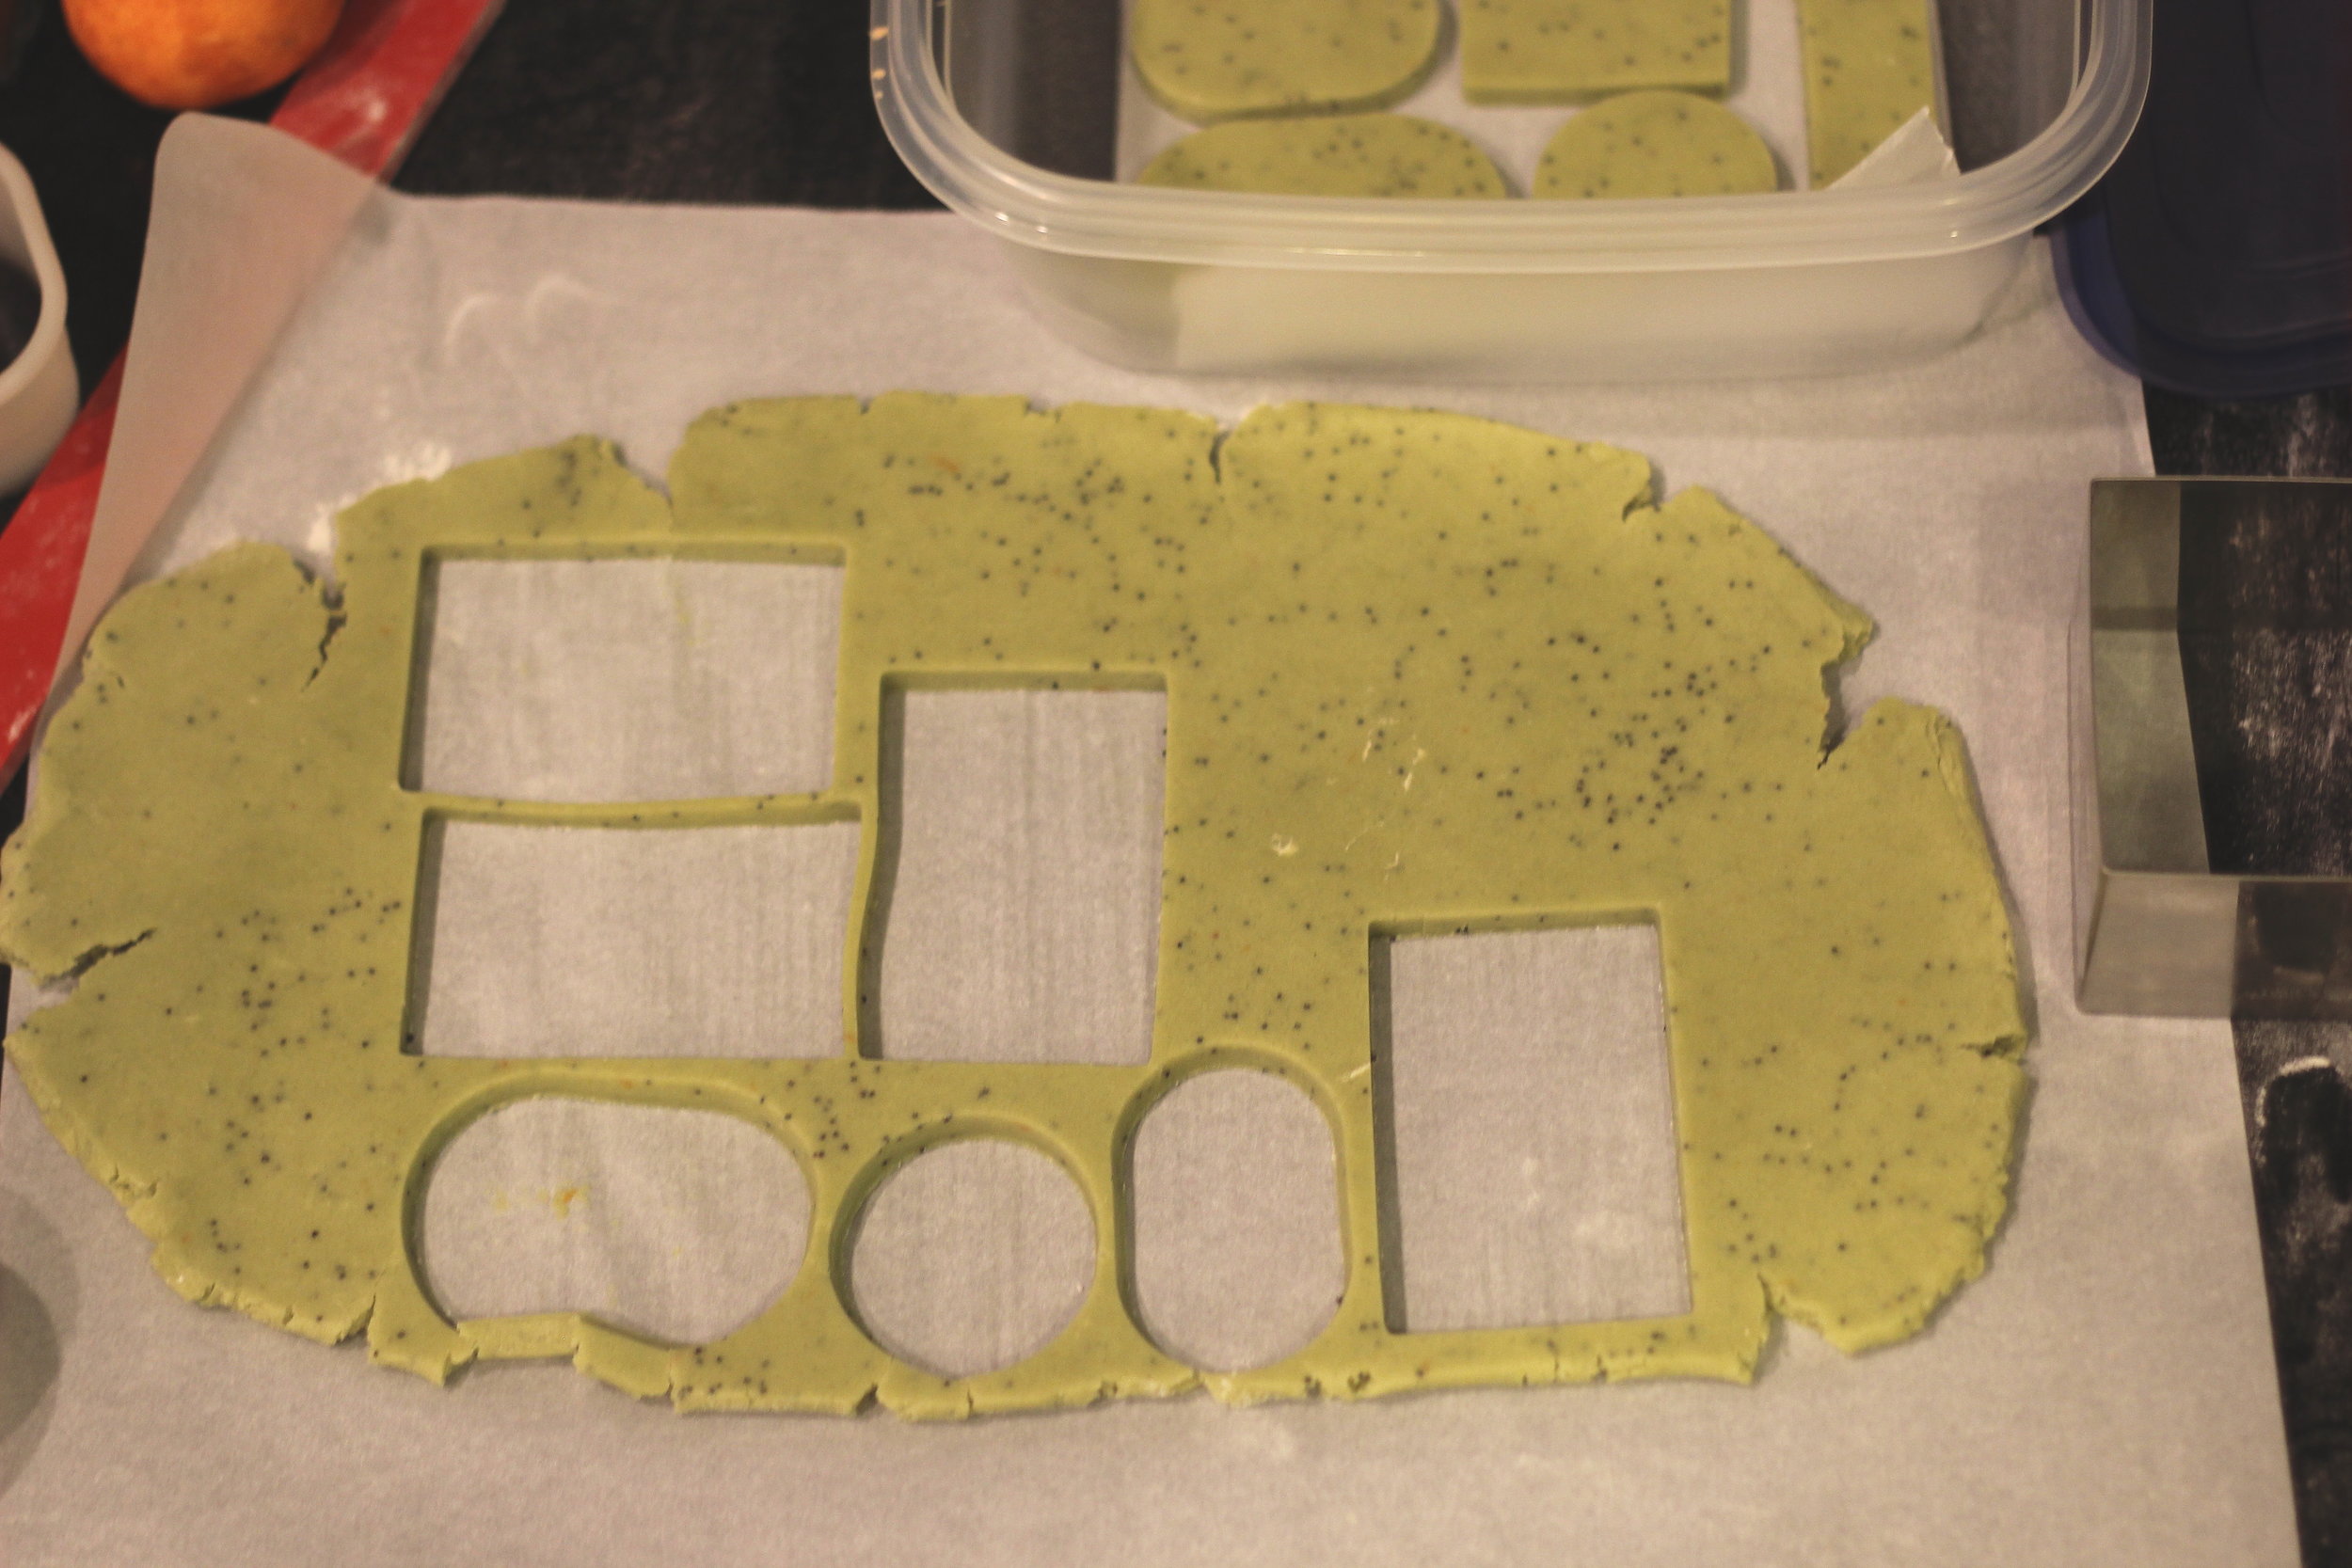
Here's how I do my rolling out--it's a method that causes minimal stress/sticking and less distortion of your cut shapes. Overall the plan here is to just keep the dough on wax or parchment paper (wax is better since it wrinkles less in the freezer) and keep it cold. Not rolling out directly on your work surface also reduces the amount of flour you'll need to roll out, since it is ok that the dough sticks to the paper underneath.

1. Mix dough as described below, shape immediately into three discs and refrigerate for about 30 minutes to an hour, until cold and firm but not rock hard.

2. Place wax or parchment paper cut to the size of your cookie sheet on your working surface. Sprinkle with flour. Place perfection strips on paper, then position dough between them. Using flour as needed, roll out dough to desired thickness (I always use 1/4 inch--the thickest strips) and pick up paper with dough and place on cookie sheet, cover in plastic wrap, then immediately place in freezer. Stack all flattened dough sheets like this. Freeze until solid, at least 2 hours.

3. Remove one dough sheet at a time from the freezer and cut shapes from frozen dough and bake immediately or store in freezer-safe container. Re-roll scraps just once.

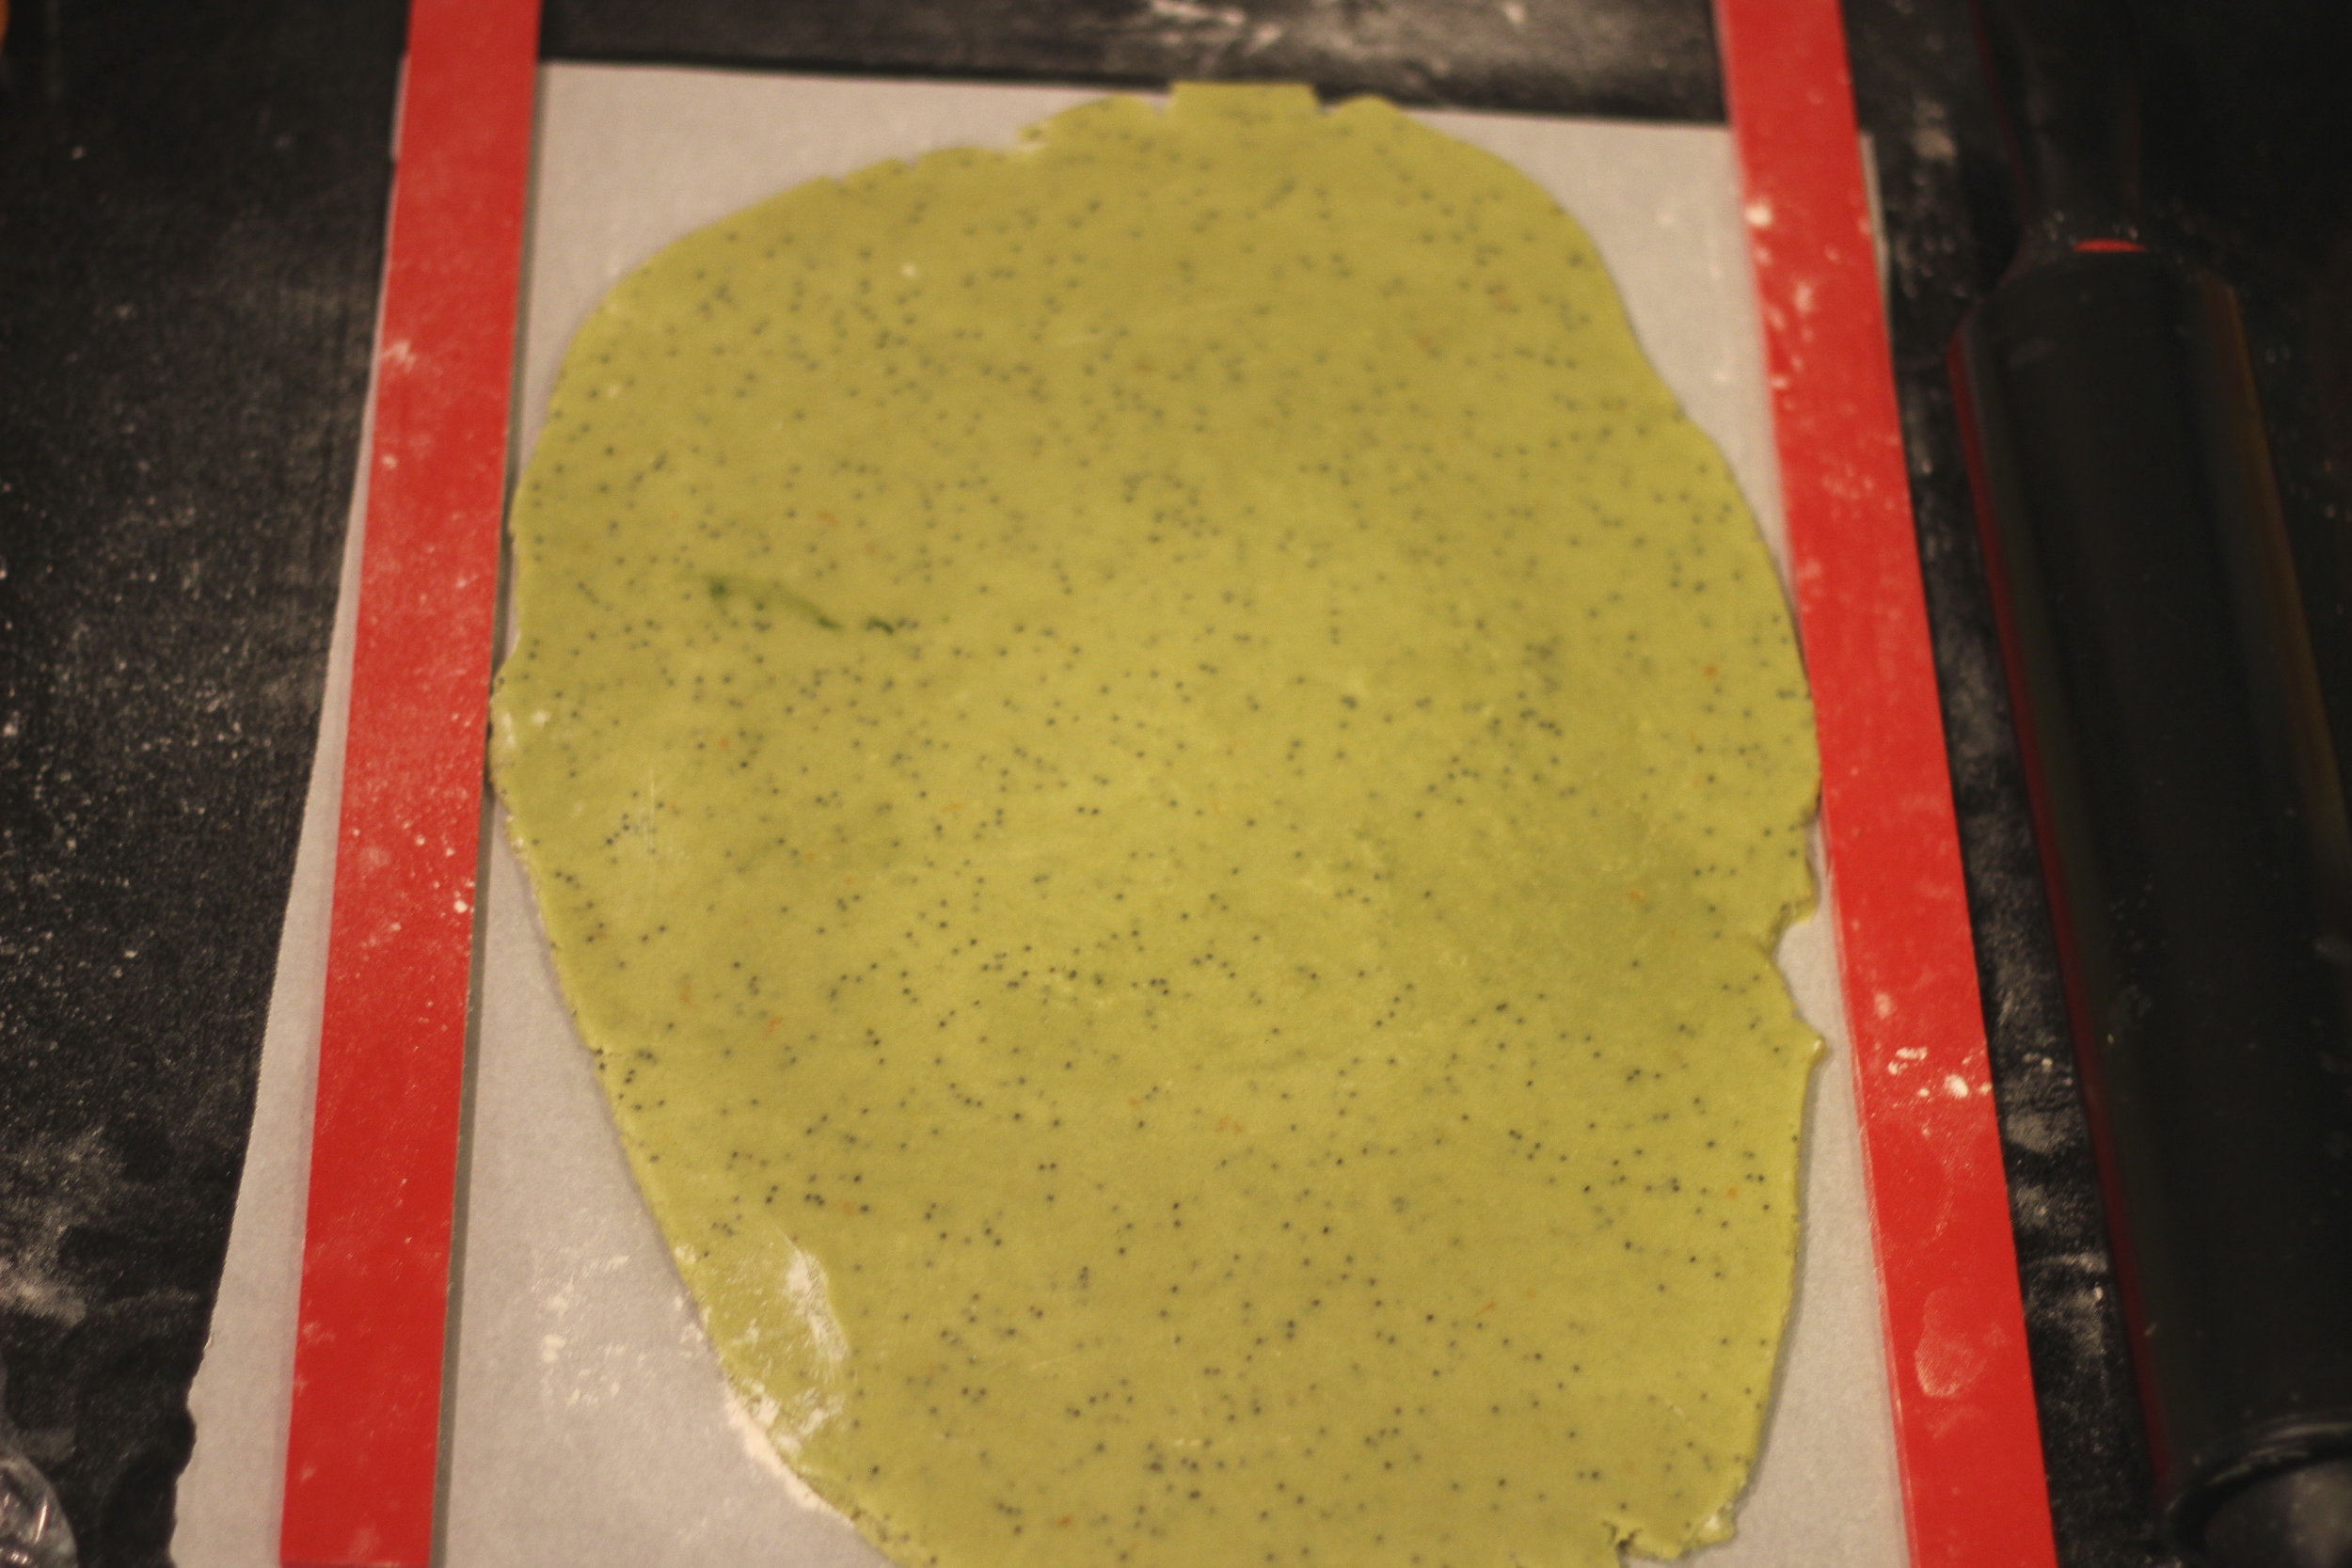
To keep the paper from sliding as you roll your dough, let the paper hang over the edge of your work table and push your tummy solidly up against it to keep it in place as you roll out. It will seem silly at first but it totally works. 

Keeping your dough constantly cold will ensure your cookies don't spread much. These cookies will spread a tiny bit in the oven, which is not a huge deal if you are just eating these, but if you are a maniac like me and want a great trick to fixing spread edges that are a little too wabi sabi for your needs, just use a microplaner on the edges for more even, straight lines.

Admission: of all the cookie doughs I've made, this one is my favorite to eat raw. I know I know, you're not supposed to, but I do it all the time. It is so yummy.

piping party

piping party

I'm not a terribly patient piper, since I am much better with a paint brush than a piping bag, but I really wanted the look  of piping on these cookies with the beautiful textured background. I cannot stop looking at the cute little bunnies on these cookies. A few small swipes of edible color dust defined their shapes really well.

MANDARIN MATCHA COOKIES

makes 15-30 cookies, depending on cutter size 

2 c. unsalted butter, soft but cool 

2 c. (425 g.) granulated sugar

3 mandarin oranges, zested, and one juiced

1 egg, room temperature

1 yolk, room temperature

1 tsp. vanilla extract

3 tsp. matcha green tea powder

1 tsp. sea or kosher salt

5 c. (635 g.) all-purpose flour

3 tsp. poppy seeds

Preheat oven to 350 degrees F. With a hand mixer, beat softened butter, sugar, salt, orange zest until just combined and smooth, about 2 minutes (stop before mixture begins to fluff up). Add eggs, vanilla extract, poppy seeds and matcha and mix for another minute. Add flour and beat just until dough comes together; do not over mix. 

Prepare dough as described above and bake cut out shapes for 9-14 minutes, depending on the size of the cookie shape. Cookies are done when edges just barely begin to brown and center is set (do not allow to brown too much). Be sure to bake the same size cookies together, and allow at least 2 inches space around each cookie. Once cooled, frost with royal icing if desired and store in an air-tight container.

happy Mother's Day to all the moms out there, mine especially

happy Mother's Day to all the moms out there, mine especially

Vegan Chocolate Cake by Molly Brodak

Happy Birthday to me! 

I visited my mom and sister recently back home in Michigan and mom made for me my favorite birthday cake she used to make when I was little: wacky cake.

Wacky cake is apparently a recipe created in the 40s when home bakers were rationing on account of World War II. It requires no eggs, no butter, and no milk. It's "wacky" because the recipe traditionally calls for you to make three wells in the dry mix--one for vanilla extract, one for oil, and the last for vinegar. Then you cover the whole thing with water, stir with a fork, and bake. 

Now, to be honest there's no real science behind this method, it seems to me just a clever way to make a recipe memorable. It really makes no difference to the outcome of the cake if you make the three little wells or not, as wacky-cake pros like my mom know.

Essentially, this is a great vegan cake, and with this inspiration in mind, I created a recipe for a very similar chocolate vegan cake. It's extremely soft, with a loose, wiggly crumb and incredible lightness. I like this even better than non-vegan chocolate cake, plus it brings back memories of home.

yes I am eating it with my hands

yes I am eating it with my hands

Now, the fact that wacky cake is usually baked as a sheet cake tells you something. This cake is SO tender that it is hard to work with...it's a terrible candidate for carving, and is so delicate it is hard to slice and tort, or even move the layers around unless you are very deft with cake-moving. I recommend baking this cake, too, in a 8x8 pan or as cupcakes. It doesn't have much structure because of the low protein content in this recipe. This recipe can easily be doubled for a 9x13 or similar larger pan.

painting with buttercream!

painting with buttercream!

Of course, thinking about what can be done with a sheet cake without having to carve it or slice it, I thought about a painting. I created this Spring-inspired "oil" painting using vegan margarine-based buttercream and created a fondant frame for it out of a mold I made from a fantastic old framed mirror in my bedroom. 

I painted the frame with edible gold coloring and dusted it with cocoa powder to antique it slightly. 

most of the frame was held up with rolled foil (you can see it in this pic) since I didn't want to waste a ton of fondant

most of the frame was held up with rolled foil (you can see it in this pic) since I didn't want to waste a ton of fondant

I altered the basic wacky cake recipe to boost flavor and add richness. I promise the addition of coffee will not impart any coffee flavor to the cake, just deepen the chocolate taste (trust me, I'm not a big coffee fan so I wouldn't do this if the coffee flavor was detectable). Starbucks (and lots of other retailers) now make fantastic microground instant coffee that is miles away from those horrible crystals your parents used to drink--these are perfect for this recipe. Any cocoa powder will do--my favorite grocery store cocoa powder is Hershey's Special Dark, but feel free to use your fancy high quality cocoa powder if you have it. Dutch-process cocoa is better in this recipe than natural cocoa because it will make a richer, darker cake and the acidity of natural cocoa is not needed since we have plenty of other acidic ingredients here, but natural (such as regular Hershey's cocoa powder) will substitute ok.

Bonus: all you need for this recipe is a whisk!

Vegan Chocolate Cake

1 c. unsweetened soy or nut milk of your choice

1 packet microground instant coffee or espresso (to make one cup)

1 tsp. apple cider vinegar

3/4 c. (160 g.) sugar

1/2 tsp. salt

1/3 c. vegetable or canola oil

1 tsp. vanilla extract

1 c. (133 g.) all-purpose flour

1/3 c. (34 g.) Dutched cocoa powder (Hershey’s Special Dark or KAF Black Cocoa work great)

3/4 tsp. (4 g.) baking soda

1/2 tsp. (2 g.) baking powder

Preheat oven to 350 degrees F and lightly grease and flour 8x8 baking pan or line cupcake pan with liners. Heat nondairy milk until warm in microwave; stir in coffee powder until dissolved. Add vinegar and set aside. Whisk flour, cocoa, baking soda, and baking powder in a small bowl until thoroughly mixed. In a larger bowl, combine milk mixture with sugar, oil, vanilla, and salt, and whisk until lightly frothy. Add dry mixture in two batches, and whisk. Mixture can have small lumps. Pour into prepared pans and bake for about 18-22 minutes or until center is set. Allow to cool completely before icing with your favorite frosting.

art saved my life. thanks for another year!

art saved my life. thanks for another year!

A Better Bundt by Molly Brodak

Poundcake is the shortbread of the cake world. But despite its apparent simplicity, it's not necessarily easy to master. Both are best plain, without any bits or babs mucking things up because, all in all, both are really just an excuse to eat butter.

Bundt cake is poundcake, btw, just baked in a bundt pan. True poundcake is made into loafs, but that is the only difference. I use the terms interchangeably.

While I am bestowing the priceless gift of my secretest bundt cake recipe upon you, I'm also offering up some of the amazing photos of a bundt cake shoot I participated in with local Atlanta brilliants: Haley Sheffield, photography; Kristine Cholakian Cooke, stylist; and Caroline Worth-Bruno, floral designer and heavenly gem.

photo by Haley Sheffield, styling by Kristine Cholakian Cooke

photo by Haley Sheffield, styling by Kristine Cholakian Cooke

Survey the world of pound/bundt cake recipes online and you will find the classic quatre quarts recipe--basically just butter, sugar, eggs, and flour--and you will also find recipes that resemble regular cake recipes. I say "regular" because they include a chemical leavener like baking powder or baking soda. And that is a huge mistake.

Have you ever had a bundt cake stick to the pan, break apart when you try to remove it, or have a pitted, unsmooth crust? If so, blame your baking soda.

Let me explain. Baking soda (and baking powder is just baking soda with some added neutralizers to slow baking soda's frantic and immediate bubbling) causes the air pockets in your batter to expand. Once the bubbly structure is created, the batter network cures, trapping the air and creating the soft, tender texture of cake. As the batter expands, it falls all over itself in your pan chaotically, pressing itself into the sides of your pan, forcing its mass up like a slow-mo volcano.

photo by Haley Sheffield, styling by Kristine Cholakian Cooke, flowers by Caroline Worth-Bruno

photo by Haley Sheffield, styling by Kristine Cholakian Cooke, flowers by Caroline Worth-Bruno

Pound cake batter, on the other hand, is a lazy batter. These cakes take much longer to bake than regular cakes because this batter is just sort of gently sitting there, lazily basking in your oven...

Without a chemical leavener, pound cake expands just a little only due to the steam escaping from the finer air bubbles in your batter. The batter that is touching your pan forms an even, smooth crust because it's not expanding very energetically against the pan. If you have the right recipe, your bundt should never break upon removal from the pan, but fall out smoothly with an even, golden crust. 

Unless you are using a pan from the dark ages, you shouldn't need any grease or flour in your pan either. In fact, those things can just cause an interference. Any normal nonstick bundt pan should be fine on its own. You should also not need to pry any instrument into your pan to get your bundt baby out. A few taps, a few gentle shakes, and it should plop out easily when inverted.

That being said, I do spray my older pans with a light flash from Baker's Joy, just for the extra assurance. I have made bundts with and without it, and it really makes no discernable difference except in my very old aluminum antique pans.

Bundt is done when the top cracks and the dough inside the crack looks just barely set.

Now, being "plain" as it is, a bit of acid in poundcake is always a good idea. That's why lemon or citrus poundcake is always the most popular variety, but blueberry and strawberry are also great. I love lemon poundcake with strawberry icing (just puree some fresh or frozen strawberries, strain, and add the juice to the icing recipe below), and I really really love orange poundcake. 

If you want really good, tangy lemon icing, you're going to need a pinch of citric acid, which can be found in the canning section of your grocery store. Lemon juice alone will only take you so far. Make it as thick or as thin as you like, but don't sub water for the heavy cream or milk--that bit of dairy really helps give the icing substance.

photo by Haley Sheffield, styling by Kristine Cholakian Cooke

photo by Haley Sheffield, styling by Kristine Cholakian Cooke

And if you really really want to gild the lily, you can brush your warm poundcake with simple syrup and it will be even more ridiculously moist, edging up to a pudding-like texture, if that's your kind of thing. Either way, this cake is better the next day, once the crust softens.

I tested the basic triad of poundcake recipes--all butter, butter and cream cheese, and butter and sour cream, and a combo of both. As expected, the sour cream and cream cheese (which has been my go-to poundcake recipe for years) was the best. The acid of the sour cream works a little like buttermilk, keeping the dough tender, and the moisture of the cream cheese keeps the cake tender enough to not really need a sugar syrup soak.

The texture of this cake should be velvety and dense.

Take your time creaming this batter, since there are no chemical leaveners, this mechanical whipping process is the only source of bubbles/rise for your cake--don't hurry through it.

This recipe makes an ample amount of batter, about 7 cups, enough for two 8" loafs or one large bundt pan. It can be halved if using a smaller pan. Because the pan size doesn't matter as much with pound cake in terms of how the batter will perform, you can put as much or as little of this batter in your pans and it should all come out basically the same, just be sure to adjust your time down for smaller amounts of batter or smaller pans.

For chocolate poundcake, just add 1/2 c. of good quality cocoa powder. photo by Haley Sheffield, styling by Kristine Cholakian Cooke

For chocolate poundcake, just add 1/2 c. of good quality cocoa powder. photo by Haley Sheffield, styling by Kristine Cholakian Cooke

PERFECT POUNDCAKE

1 1/2c. (3 sticks) very soft room-temperature unsalted butter

8 oz. very soft cream cheese

3 c. (600 g.) sugar

6 large eggs, room temperature

2 tsp. sea or kosher salt

1 Tbsp. vanilla extract

3 c. (375 g.) all-purpose flour 

1/2 c. (114 g.) sour cream (not reduced fat)

1 lemon, orange, or two limes, zested and juiced

For the icing:

1 c. powdered sugar

2 Tbsp. heavy cream or whole milk

1 tsp. vanilla extract or other flavor

3 Tbsp. fresh lemon juice

1/8 tsp. citric acid

Preheat oven to 350 degrees F. Spray large bundt pan or two loaf pans with Baker's Joy if desired. 

Mix butter and cream cheese with a hand mixer or in a stand mixer until completely combined and no chunks of cream cheese remain. Add sugar, salt, and finely grated rind of citrus fruit(s) and cream on medium high speed for about 4 minutes, until mixture is fully combined and fluffy. Add eggs, one at a time, beating thoroughly on high speed and scraping bottom. Once the last egg is added, whip for an additional 4 minutes until batter is pale and fluffy, scraping sides and bottom consistently.

Add 1/2 of the flour and mix on low until just combined. Add sour cream and extracts and juice and mix again on low until just combined. Add the remaining flour and mix until just combined.

Scoop batter into pan(s) and bake for about 60 minutes, or until tops are split. Allow to cool in pan for five minutes, remove, then level bottoms if desired, and allow to cool completely before icing. 

To make the icing, add the liquids to the powdered sugar and mix until smooth. Pour over cakes and allow to set before slicing. Store cakes under a glass dome or an overturned bowl.

photo by Haley Sheffield, styling by Kristine Cholakian Cooke, flowers by Caroline Worth-Bruno

photo by Haley Sheffield, styling by Kristine Cholakian Cooke, flowers by Caroline Worth-Bruno

Chamomile Lime Swan Cake with Honey Swiss Meringue Buttercream by Molly Brodak

chamom14.JPG

My birthday cake has come early this year.

Oh man, this cake makes my heart explode! Confetti shreds of heart all over everything!

I was inspired by those 50's style swan planters you used to see everywhere, and thinking about a very pastel palette since I've got wedding brain right now. Flavorwise, I'm ready as hell for Spring right now, and I wanted to make a cake that tasted like Spring.

gah!

gah!

I'm an enormous fan of tea, as you might realize from this post, but chamomile has never been my favorite...for the central reason that it is not actually tea, but a herbal infusion. That being said, chamomile is such a wonderful flavor, light and fresh and floral without being perfume-y like rose. Lime adds a nice balance to the sweetness, and the honey Swiss meringue buttercream triangulates the Spring attitude of this cake.

I don't expect you'll make your chamomile-lime cake into a swan as I have done, but in case you're interested in how I made it happen I've shown a bit more behind-the-scenes type pics in this post than usual.

You'll start by making a very strong tea by letting six tea bags infuse in a cup of hot water for 10 minutes. There's no danger of it turning bitter since, ahem, this is not actually tea. Be sure to use a brand that is composed of 100% chamomile flowers, or just buy them in bulk at your health food store.

This cake is a sturdy, somewhat coarse-crumbed cake but is made very moist by the sour cream and the tea soak that comes after baking. Its flavors are very subtle and light, and would be delicious plain or with a simple whipped cream topping instead of the admittedly elaborate Swiss meringue buttercream I used.

Speaking of that, let's start there. Let me first say, I don't really like Swiss meringue buttercream all that much. For some bakers, it is the only kind of buttercream they use. It's supposed to be more sophisticated and refined than regular old American buttercream (the kind with just butter and powered sugar) but to me this idea is sort of, I don't know, elitist and untrue. I've got this and this meringue-free buttercream to prove it. Logically, making meringue then cramming a pound of butter into it while it deflates just doesn't make sense to me in any case.

BUT still, I thought I'd give it a whirl. With the honey addition, this buttercream whips up a bit more stable and rich, plus the honey flavor is amazing.

Honey Swiss Meringue Buttercream

4 large egg whites

1 c. (213 g.) sugar

1 lb. (4 sticks) very soft unsalted butter

1/2 tsp. fine sea salt or kosher salt

1/3 c. (60 g.) honey

1 tsp. vanilla extract

Wipe bowls and beaters with white vinegar. Combine egg whites and sugar in a glass or metal bowl and set over a saucepan of simmering water. Cook, stirring constantly, until sugar is dissolved and temperature on a candy thermometer reaches 140 degrees F (warm, not hot).

Remove from heat and transfer to a large glass or metal bowl. Using a stand mixer or a hand mixer, whip mixture until very stiff peaks are reached and the bowl feels neutral to the touch (no longer warm). Add chunks of softened butter in small amounts and whip until fully incorporated. If mixture becomes soupy/warm, refrigerate for a few minutes and whip again until it comes together.

Add salt, honey, and vanilla, whip until combined.

Oh, this cake is so good, so fragrant right out of the oven. You might be tempted to add more lime to this cake, because it doesn't seem like enough, but trust me, you don't want to lose the delicate chamomile flavor under the power of lime. The tea soak at the end of this recipe is crucial to keeping the balance of flavors in order.

For my cake, I carved the body of the swan from cake and added a wired gumpaste head/neck, all of which was covered in fondant. This is actually not the best cake for carving because of its open crumb, so if you're looking to make a swan cake like mine I would suggest this cake recipe instead, which is very fine-crumbed and ideal carving material.

 no template, I was JUST WINGING IT -.-

 no template, I was JUST WINGING IT -.-

I picked some peonies and roses from my box of leftover sugar flowers and made a bunch of dusty miller to match the pastel palette I had in mind. The wings were attached with sugar glue, and I let them firm up with some saran wrap stuffed behind them so they'd stick up a bit.

this is the fun part

this is the fun part

I loved making this cake, and I loved eating it just as much. Sometimes people ask me if I have a hard time cutting into these creations I spend hours and hours making. Not at all. It might actually be the best part. Cakes are ephemera, after all, just like all good things are.


Chamomile Lime Cake

1 3/4 c. (201 g.) cake flour (White Lily)

1 3/4 tsp. (8 g.) aluminum-free baking powder

1 1/2 c. (298 g.) sugar

1 c. strongly-brewed chamomile tea (6 teabags, steep for 10 minutes)

3/4 tsp. fine sea salt or kosher salt

2 large eggs, room temperature

2 large egg yolks, room temperature

1/3 c. canola or vegetable oil

1/3 c. sour cream

1 tsp. vanilla extract or 1/2 vanilla bean, scraped

Zest and juice of one lime

Preheat oven to 350 degrees F. Grease and flour two 8" pans and line bottoms with parchment.

Whisk flour and baking powder together thoroughly in a small bowl and set aside.  

Place sugar, salt, and 1/3 c. of tea (reserve the rest for later use) in a small saucepan and heat until sugar is mostly melted--do not allow to boil. Pour sugar mixture into a large bowl. Zest lime and squeeze juice into the sugar mixture. Add oil, vanilla, sour cream, and beat until smooth, about 2 minutes. 

Add 1/3 of the flour mixture and beat until smooth and lump-free. Repeat with the remaining 2/3rds, scraping the bottom of the bowl and making sure no flour lumps remain. By hand, mix in eggs, then yolks, one at a time until fully combined. 

Divide batter between pans and tap on the counter to remove large air bubbles. Bake for 20 minutes or so until centers are fully set and spring back when pressed. Allow to cool for 10 minutes, then invert cakes onto cooling rack.

Prepare tea simple syrup soak by mixing the remaining strong tea with 1/3 c. of sugar in a microwavable container and microwave for about a minute or until the sugar is completely dissolved.

Level cakes by slicing off their crown and brush or drizzle with tea soak. Allow cakes to cool and rest, then fill, and frost.

Yuzu S'mores Cake by Molly Brodak

It's January, which means two things: it's citrus season (yay!) and it's Kookie House's birthday (yay!!!!!). This cake is here to celebrate both, and it is so so so good. I can't handle how delicious this cake is. To which the copious exclamation points above attest.

There are a lot of s'mores cake recipes out there, but this one is unique--the intensely tangy yuzu juice takes the s'mores flavor combo out of sickly sweet territory and into transcendently delicious territory. This cake is unexpectedly addictive.

Yuzu is a grapefruity-lemon-like fruit from Japan and it's just starting to get popular in the States. Word on the street is you might see a lot of Yuzu in the near future since it was recently discovered it grows well in the Pacific Northwest and growers are starting to invest in it.

In the meantime, you can find some very good fresh bottled Yuzu juice from Japan. I found this bottle above at my local Asian mart. You can also buy it online of course, although it can get pricey that way. If you don't live near a cool Asian food mart and you don't feel like shelling out the bucks for an online order, you can easily swap in regular fresh lemon juice in this cake and it will be just as tasty.

This cake is rich and moist and serves to seal in the graham crackers which keeps them miraculously crispy even though they are baked into the cake. The ganache I use here is even easier to make than buttercream, so don't be intimated. Make the ganache first so it can set up a bit.

GANACHE

This is my basic ganache recipe I use for filling or frosting cakes. If you want a lighter, more buttercream-like texture, whip with whisk beaters for ONE minute (don't over-whip or it can separate). Feel free to double or triple this recipe for bigger batches--this makes just enough to fill this cake.

10.5 oz. chopped dark or semisweet chocolate (chips will work, but finely chopped chocolate is better)

5 fl. oz. heavy whipping cream

Place chopped chocolate into a heat-safe bowl. Microwave or heat cream on stovetop until just barely simmering around the edges. Pour slowly and evenly over chocolate. Twist bowl back and forth gently so the cream covers the chocolate completely. Allow to sit for 30 seconds, then begin stirring with spatula or whisk. Mix until completely smooth and no lumps remain. Allow to cool for at least 30 minutes before using. If it sets up solidly before using, microwave for a few seconds until it softens to peanut-butter like consistency. 

Now, a lot of "marshmallow" frosting recipes are really just meringue--egg whites, sugar, lots of tiny bubbles. And yeah, you can cover your cake with light and foamy meringue and toast it, and that's nice. But if you want something really marshmallowy, you need to get some gelatin involved. 

It seemed most logical here to use actual marshmallows in the recipe than deal with gelatin, since the marshmallows will offer up their gelatin to us AND their marshmallowy flavor. This marshmallow frosting is ridiculously delicious and its simple, I promise. I could eat gobs of it alone. You can just glob it on your cake or pipe it--either way it looks beautiful. And toasted?? Even better. I used my kitchen blowtorch which is one of those kitchen tools you don't use all of the time, but when you need it you really need it.

yasss

yasss

MARSHMALLOW FROSTING

3 large egg whites, cold

1/2 c. cold water

1 1/2 c. (325 g.) sugar

1 1/2 tsp. (12 g.) corn syrup

1 c. mini marshmallows

1 tsp. fresh lemon juice

1 tsp. vanilla extract

Prepare piping bag if using. Mix all ingredients except marshmallows, vanilla and lemon juice in a large metal or glass bowl. Place over a pot of simmering water (do not let the bowl touch the water). Using electric beaters, beat steadily on medium high speed for about 7 minutes or until mixture holds stiff peaks. Remove from heat and add remaining ingredients, beat until marshmallows are completely melted. Scoop immediately into prepared piping bag or swirl onto cake quickly, as this frosting will set up as it cools.

Now onto the main event. This is my new go-to winter cake. 

omg

omg

YUZU S'MORES CAKE

3 c. (350 g.) cake flour (White Lily)

3 tsp. (10 g.) aluminum-free baking powder

3 large eggs

2 large egg whites

2 c. (400 g.) sugar

1/3 c. yuzu juice

1 tsp. fine sea salt or kosher salt

1 c. sour cream

1 Tbsp. vanilla extract or one vanilla bean, scraped

2/3 c. canola or vegetable oil

18 graham crackers (2 packages) broken into large pieces


Preheat oven to 350 degrees F.

Whisk flour and baking powder together thoroughly in a large bowl and set aside. Cover bottoms of greased and floured 8" or 9" pans with broken graham crackers. Beat eggs, egg whites, sugar, salt, vanilla and yuzu juice for one minute (use a timer) on medium high until mixture is thick. Continue to beat while adding in sour cream in spoonfuls, and beat until smooth for 30 seconds.

Add oil to the flour mixture and beat until a dough forms. Add 1/3 of the liquid mixture and beat until smooth and lump-free. Repeat with the remaining 2/3rds, scraping the bottom of the bowl and making sure no lumps remain.

Divide batter among pans and tap on the counter to remove large air bubbles. Bake for 35 minutes or so until centers are fully set and spring back when pressed. Allow to cool for 10 minutes, then invert cakes onto cooling rack. Allow cakes to cool completely before filling with ganache and covering with marshmallow frosting. Toast with blowtorch.

Christmas Gingerbread Cake with White Chocolate Ermine Buttercream by Molly Brodak

It's been a tough year. I know I'm not alone in feeling this. Maybe that's why I decided this year to saturate myself in Christmas cheer--a holiday I usually feel pretty neutral about.

Last year at this time my Mom and I were in Iceland, and there was something so much more special about holiday decorations in Iceland, especially the power of lights in the otherwise gloomy long nights there, and especially the power of a Christmas tree.

I'm not sure what city we were in when we found this tree, but I remember the moment walking up to this city square and seeing it glowing, and I am pretty sure I cried. I'm certain I hugged mom. To me, it's not the tree itself, not the details of its decoration or the lights, but the feeling it represents, the effort to will kindness, warmth, and generosity into a world that is dark and cold. A reminder to be your best self, even in the hardest times.

I wanted to end this year on that note, so my christmas cake takes the shape of a warm, cheery, nostalgic Christmas tree. I decorated it with cookie ornaments, sets of which are currently on sale at Young Blood Boutique here in Atlanta.

I use an edible FoodWriter marker to draw on the cookies after using a food coloring "watercolor" wash

I use an edible FoodWriter marker to draw on the cookies after using a food coloring "watercolor" wash

Improving upon classic gingerbread cake meant adding some lightness to it and some extra fat to counteract its typical dryness. I tried to switch to cake flour for a more refined texture but the cake flour just could not handle the muscle of the molasses, and ended up gummy and collapsed. So the texture of this cake is somewhat coarse but fitting for the nostalgic, old-fashioned vibe I wanted. Thinking back to my cream cake lesson, I turned to sour cream to both lighten the texture and add some fat for moisture. Still, gingerbread is going to be a heavy cake no matter what due to the molasses, but this is by far the lightest and moistest gingerbread cake I have ever had.

did I buy this brand of molasses because it looks like a tiny liquor bottle? Yes. That is accurate.

did I buy this brand of molasses because it looks like a tiny liquor bottle? Yes. That is accurate.

incredibly moist!

incredibly moist!

Flavorwise, something had to be done to balance the overwhelming flavor of molasses. It's just so powerful. The little scoop of ground ginger most recipes call for just will not do. I swapped out that weak mess for some real, freshly grated ginger, along with a pinch of pepper and a shot of rum. Finally some flavor comrades who can step to molasses. 

This buttercream is exactly the same as the ermine I came up with a few cakes back, but now with white chocolate for an even creamier flavor. It's one of my favorite buttercreams, and has a sturdy, almost-pudding-like consistency that I knew would hold up under the heavy gingerbread.

ERMINE BUTTERCREAM

4 Tbsp flour

1/4 c milk

3/4 c heavy cream

1/2 c granulated sugar

1 c (6 oz) white chocolate, chopped

1 Tbsp vanilla extract

1/4 tsp salt

2 c unsalted butter, room temperature

3/4 c powdered sugar, or to taste

Combine milk and cream. Place flour and 1/3 c. of the milk/cream mixture in a small saucepan. Whisk constantly over low heat until mixture thickens. Add remaining liquid and sugar, boil over low heat for about 2 minutes until mixture is thick as paste and bubbling. Add white chocolate and stir until melted. Transfer to a small bowl and refrigerate until cool. Whip butter, salt, vanilla, and powdered sugar until light and fluffy. Add the cool pudding in small batches and whip until smooth and combined.  

I doubled the recipe for the cake and carved my stacked cakes into a smooth Christmas tree with a rice krispy treat top, then frosted it and wrapped it in pink fondant. Cookies were applied with melted chocolate so they'd be nice and secure while I transported the cake to the party.

I baked off some tiny meringue cookies that were also glued on with melted chocolate and painted with edible gold and pastel watercolors. Tiny royal icing dots for lights and a few ribbons and bows tied it altogether (groan).

I brought this to my friend's amazing holiday party and it made me so happy to cut it up. Every piece ended up with its own assortment of cookies and it made such a delightful dessert plate. Sometimes people ask me how I can stand to cut up my creations, but I tell you it is my favorite part--dividing up this little cake of happiness I've made for everyone who wants it.

GINGERBREAD CAKE

2 c (250 g) all-purpose flour

1 tsp (6 g) baking soda

2 tsp (5 g) cinnamon

1/4 tsp ground cloves

1/4 tsp freshly ground pepper

3/4 c (180 ml) molasses

3/4 c (180 ml) whole milk

2 tbsp dark rum

1/2 c (107 g) white sugar

1/2 c (1 stick) unsalted butter, room temperature

1/2 tsp salt

1 tbsp freshly grated ginger

1 egg

2 yolks

1/2 c (112 g) sour cream

Preheat oven to 350 degrees F.

Combine milk and rum in a microwave-safe bowl or measuring pitcher and heat for about one minute, until very hot but not boiling. Add molasses and stir, set aside.

Whisk flour with baking soda, cinnamon, cloves, and pepper in a small bowl and set aside.

Cream soft butter with sugar, salt, and grated ginger until fluffy, about three minutes. Add egg and yolks, then sour cream, and beat for another three minutes. Pour half of the molasses mixture in gradually, continuing to beat, then half of the flour mixture. Finish beating mixture with remaining liquid then flour mixture.

Divide batter into prepared pans and bake for about 25 to 35 minutes, depending on the size of your pans. Cakes are done when center is set and springs back when pressed. Cool cakes, level, split, and fill. 


a cut up cake is my favorite cake

a cut up cake is my favorite cake

Raspberry Pavlova with Cinnamon Spiced Whipped Cream by Molly Brodak

I did it, I solved your holiday dinner party dessert problem. 

This is a showstopping dessert that is also very easy to make. Most importantly, it tastes like heaven. Truly, it is one of my favorite desserts to eat and I have never served it to someone who didn't like it. It's also gluten-free and relatively low fat, for a dessert anyway.

If you've never had pavlova before, brace yourself. You are in for something completely new. It's an iridescent dessert--shifting, dazzling, impossible to capture from just one angle. What looks at first--if you glance at the recipe--like a simple meringue is totally different from either the dried crunch puffs of meringue cookies or the foamy mounds of pie-topping meringue. It transcends all that noise.

this photo should be ILLEGAL

this photo should be ILLEGAL

Let me try to describe it. You have a crisp, delicate shell that might remind you of a meringue cookie, but not even a touch of denseness or chalkiness. Under the shell, a marshmallowy center that serves as the perfect foil to the wisp of crunch from the shell. Combined with a thick, tart raspberry sauce and an unexpected warm spice note from the cinnamon whipped cream, the dessert has a heady dose of flavor to match the otherworldly texture. It all melts in your mouth in a delectable instant, the best instant of your dinner, if I do say so myself.

The secret magic? A bit of cornstarch. And vinegar. Oh vinegar, you miracle worker! Is there nothing you can't do?

A touch of vinegar helps egg whites whip up nice and firm. But add more than a touch, and you've got real structure here, a density builds as the egg whites begin to shrink and tighten, while a crust from the heat forms and pulls away from the moist center. tl;dr version? It's a miracle of science.

delicious plate of science miracles

delicious plate of science miracles

Pavlova recipes are a dime a dozen as they are common treats in the UK, New Zealand, and Australia. The recipe has an intriguing and much debated history; how it came to be associated with the ballerina Anna Pavlova is still hotly contested by food historians. In order to elevate this pav from everyday to transcendent, I tinkered with the recipe until I struck upon the perfect sugar and vinegar ratios and restyled the finished product into an impressive cake-like centerpiece. 

A few notes on planning this dessert: you can make the meringue cakes up to a day in advance as long as you keep them tightly sealed in a container--any moisture from the air and you will lose the crunch of the shell. They are also definitely delicate, and are very likely to break in moving them, but don't worry--if you plan to stack them, no one will notice the cracks since it's all going to be cut apart anyway. Assemble everything at the last of all possible minutes, since the raspberry sauce and whipped cream are going to work to soften the crunch of the shell. It's great to even assemble it at the table immediately before serving--quite the spectacle. 

You don't need any special ingredients for this recipe, except for maybe caster or superfine sugar, although that can be easily made by whizzing granulated sugar in a food processor for about 30 seconds until fine.

The whipped cream I've paired with this pav is infused with flavor by gently simmering cinnamon sticks in it which produces a far superior texture and taste than if one were to just dump ground cinnamon into the cream. Super simple, super tasty. Same goes for the raspberry sauce, which is as easy as tossing a bag of frozen raspberries into a food processor, et voila.

simmer until cinnamon-y enough for you

simmer until cinnamon-y enough for you

To get smooth pavlovas, you've got to beat your meringue low and slow at first to create an even foam structure in your whites. Skipping right to high speed whipping will result in large bubbles in your egg whites which will cause cracks and gaps in your pavs. Don't rush through the process. I always make this with a handheld mixer but it certainly could be made in a stand mixer if you think your arm will get tired after holding it up for 15 minutes or so. 

it's ready to bake when it is as thick as marshmallow creme

it's ready to bake when it is as thick as marshmallow creme

I traced three 6" circles onto the back of my parchment to make 3 rounds for my "cake," although two larger circles is just as nice. There's also nothing like individual servings for everyone at your dinner party--all are wonderful. 

poof babies

poof babies

This is one of those set-it-and-forget-it recipes. Bake for about 1 hr 20 min, then turn the oven off, and just forget it. You can just leave those puppies in there for hours while you get the rest of your holiday party together. 

Just one more nearly-indecent photo if you are not convinced yet to make this beauty tonight.


Raspberry Pavlova with Cinnamon Spiced Whipped Cream

8 large egg whites, cold

pinch salt

2 tsp white vinegar

2 tsp vanilla extract or one vanilla bean, scraped

2 c (400 g) caster sugar

1 1/4 tsp cornstarch

for the raspberry sauce:

12 oz. bag of frozen raspberries

sugar to taste

fresh raspberries for garnish

for the whipped cream:

1 quart heavy whipping cream

3 to 4 cinnamon sticks

pinch nutmeg 

pinch cloves

2 Tbsp. caster or superfine sugar

1/4 c. powdered sugar

Preheat oven to 250 degrees F and line a baking sheet with parchment paper with circles traced on the back as guides for pavlova layers or individual cakes.

Whisk sugar and cornstarch in a small bowl until evenly mixed. Combine vinegar and vanilla extract or bean scrapings in a small bowl. Wipe a large glass or metal bowl and beaters with a paper towel soaked with a bit of white vinegar. Whip egg whites with a pinch of salt on low for three minutes, and increase to medium speed until whites become a uniform foam with minimal large bubbles. Increase speed to high and gradually add sugar mixture until mixture is thick, glossy, and holds medium-soft peaks (this can take up to 15 minutes). Add vinegar and vanilla, mix until combined. Scoop mixture onto sheet and smooth tops. Bake for 1 hour and 20 minutes for 6-8 inch circles, or 1 hour for smaller circles. Once time is up, turn off the oven and allow pavlovas to cool completely before removing from the oven (at least two hours).  

To make the raspberry sauce, allow frozen raspberries to thaw about halfway and pulse in a food processor or blender until smooth. Add sugar to taste. Strain most of the raspberry seeds out through a fine sieve. 

To make the whipped cream, simmer cream and spices on the stovetop for about 20 minutes. Remove and discard cinnamon sticks. Remove from stovetop, pour into a clean metal or glass bowl, cover, and refrigerate until completely cold. Add caster sugar and vanilla extract or vanilla bean scrapings and whip to soft peaks, then add powdered sugar and whip to firm peaks. 

Assemble pavlova by dolloping whipped cream on each layer and drizzling with raspberry sauce. Garnish with fresh raspberries.

those beautiful pink ceramic bowls by Lenneke Wispelwey

those beautiful pink ceramic bowls by Lenneke Wispelwey

jfc

Cream Cake with Browned Buttercream by Molly Brodak

Imagine if whipped cream had a baby with white cake.

Well she did, and her child is named is cream cake, and cream cake just became the boss of this here treatland.

This is a whole new kind of white cake. It's not not angel food cake, not buttermilk cake, it's cream cake. Rich, moist, tender, flavorful white cake that tastes like cream pudding. You see, my standard cake mix requires a lot of yolks for moistness and stability, but since egg yolks are not allowed in a real white cake, I had to come up with a substitute.

Egg whites provide structure for white cake but they are very, very drying. Any typical white sponge cake--angel food or otherwise--come uncannily close in texture to an actual kitchen sponge, and seem to require some other niceties to make them tolerable--whipped cream, fruit, compote, sauce, I don't know. 

So I moved towards dairy. Cream in particular--sour cream and my personal darling, heavy whipping cream. This cake really tastes like fresh cream. The texture is heavenly-soft, moist but not compact, and melts into satisfying creaminess.

It deserved a pretty presentation in an ikebana-inspired arrangement.

gold inside, gold outside

gold inside, gold outside

I tested dozens upon dozens of versions of this recipe--something close to 35. I mean, look at my tortured recipe notes.

I'll spare you every detail of every iteration, but one interesting highlight of the versioning is that I had to give up on making meringue. Whipping the whites into meringue frenzy and folding them in gently at the end, which is standard practice in white cakes, was holding my texture back from all it could achieve. It was always, well, spongey and somewhat dry with the whites whipped.

So I kept the whites un-merginued, and whipped them up just a little with vinegar for stability, then crammed as much dairy into this cake as I could

dairy laannnd

dairy laannnd

I just kept pushing it--more cream, more sour cream, until I found the sweet spot between dry and collapsed. This sweet spot made a cake moist beyond moist, no syrup soak or other niceties needed, but still light open-crumbed. The batter is rather acidic and leavened with a generous and meticulously adjusted amount of baking powder. (Side note--if it's been a while since you bought fresh baking powder, treat yourself to a new batch since this cake relies almost completely on chemical leaveners to rise since no creaming is involved.) It bakes up pretty evenly with no great dome because keeping the batter "low" kept it moist.  

Although the batter is quick and simple to whip up since creaming is removed from the process, you're going to experience some weirdness with this recipe, and this weirdness includes beating oil into flour to made a dough in order to create some structure. Also, for the frosting--steel yourself--some weird butter stuff. 

The story with this buttercream starts with trying to improve ABC--otherwise known as American Buttercream to bakers. That buttercream you've probably made: just butter and powdered sugar, a little milk or something. It's the simplest buttercream but has a bad reputation for being homely and too sweet, a little chalky or gritty thanks to the powdered sugar, and unspecial. I wanted to make it special, so I brought in my dearest secret baking star: browned butter.

Because of the quantity of butter here, you will end up clarifying some of it as you wait for it to brown. Don't worry. Your cooled brown butter will look like an insane weird mess at first, with nutso layers of solid butter, browned butter bits, and sweetened clarified butter underneath. Try to not be upset. See how it all whips up nicely? Trust me, the memory of the upsetting gloppy oddness with be all forgotten when you taste this fluffy buttercream.

So what does browned butter buttercream taste like?

"What is the flavor of this?" my boo asked me while tasting this out of the bowl. "I can't figure out why this is good, it's just so good. It's like, the flavor of tastiness. I can't stop eating it." Yes love, the flavor of tastiness, this is browned butter. You just have to try it to see. The melted butter also affords us an opportunity to add some melted sugar to the mix so that we can reduce the powdered sugar in this ABC to help solve some of its...homeliness. (You still want some powdered sugar for the starch and opacity, but taste it before adding because you can adjust the sweetness to your liking.)

BROWNED BUTTERCREAM

1 c. sugar

1/3 c. water

1 c. (2 sticks) unsalted butter to brown

1 c. (2 sticks) unsalted butter to cream, room temperature

3/4 tsp. fine sea salt or kosher salt

2 tsp. vanilla extract or 1 vanilla bean, scraped

1/4 to 1/2 c. powdered sugar

Combine water and sugar in a heat-safe bowl or measuring cup and microwave until sugar is dissolved into a smooth, thick sugar syrup. Melt 1 c. butter in a large saucepan over medium heat until browned, stirring with a heat-proof spatula to prevent burnt spots. Butter is perfectly browned when it smells nutty and is dark brown--remove from heat quickly as it can burn fast. Slowly pour in sugar syrup and mix until combined (be careful, it will bubble and steam). Transfer mixture to heat-proof bowl and refrigerate for about an hour or until butter is just barely solidified. If it becomes too cold and hard, allow to return to room temperature before using in the next stage. Whip remaining butter until light and fluffy, then add the browned butter mixture in stages. Add powdered sugar, salt, and vanilla, and beat until pale and fluffy, for at least 5 minutes. 


Now, I decided to attempt an ikebana-inspired design by transforming the cake into a hammered metal bowl full of some sugar flowers I had in storage. Any opportunity to show of one great gobsmacker peony is one I will take.

creamcake5.JPG

This recipe makes a hearty amount of batter, perfectly suited to three 8" or 9" cake pans. I don't recommend using smaller/deeper pans for this cake as the batter can fail to rise and you will end up with dense, gummy layers. If you don't have three pans or you don't want to bake off all of this batter, remember cake batter is something you an easily freeze for several months if stored in an air-tight container.


CREAM CAKE

350 g. cake flour (White Lily)

3 1/4 tsp. aluminum-free baking powder

5 large egg whites

400 g. sugar

1  tsp. white vinegar

1 tsp. fine sea salt or kosher salt

1 1/5 c. heavy whipping cream

155 g. sour cream

2 Tbsp. vanilla extract or one vanilla bean, scraped

2/3 c. canola or vegetable oil


Preheat oven to 350 degrees F. Grease and flour three 8” or 9” round pans, and/or line bottoms with parchment paper.

Whisk flour and baking powder together thoroughly in a large bowl and set aside. Beat egg whites, sugar, vanilla, salt and vinegar for one minute (use a timer) on medium high until mixture is thick. In a separate bowl or large measuring pitcher, beat heavy cream and sour cream until smooth and no lumps of sour cream remain. Mix egg white mixture on low while adding in cream/sour cream gradually. Beat for an additional 30 seconds.

Add oil to the flour mixture and beat until a thick dough forms. Add 1/3 of the liquid mixture and beat until smooth and lump-free. Repeat with the remaining 2/3rds, scraping the bottom of the bowl and making sure no lumps remain.

Divide batter among three greased and floured 8" or 9" pans and tap on the counter to remove large air bubbles. Bake for 20-30 minutes until centers are fully set and spring back when pressed. Allow to cool for 15 minutes in the pan, then level, fill, and frost.

ooh wee!

ooh wee!