
This is it y’all, this is the cookie recipe.
The one I’ve been working on for two years.
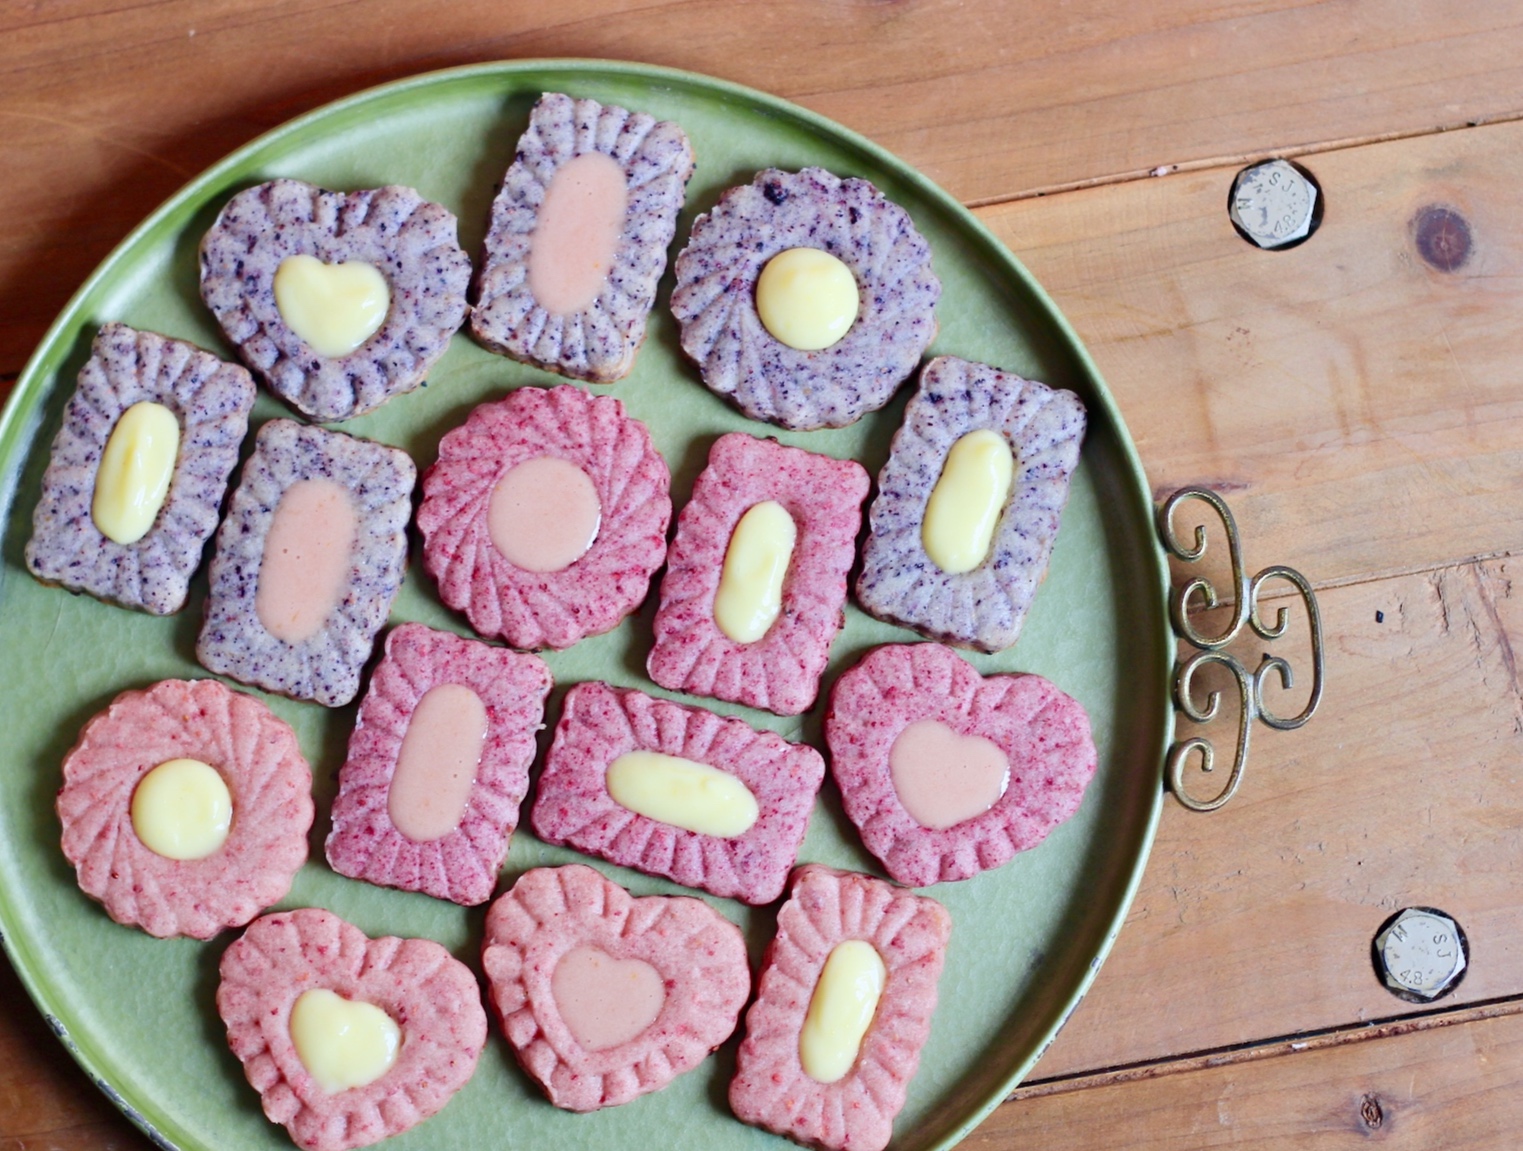
My beloved dough is all dressed up for spring here with tangy berry and lemon flavors and I couldn’t be happier about how these turned out.
This recipe makes a perfect cut out cookie that is tender yet keeps any shape you cut it into. Some bakers simply use shortbread for their cut out cookies since, without any eggs or leavener, shortbread always keeps its shape. But this is no crisp, crumbly shortbread—this is a soft cookie with a tender crumb. And it’s all thanks to a couple of key techniques and ingredients, the most important of which is cream cheese.
Replacing some of the butter in a basic cut-out cookie recipe with cream cheese allows the cookies to stay soft and moist while minimizing spread. Plus the slight acidity of cream cheese acts as an extra tenderizer, ensuring these cookies have a smooth, soft mouthfeel and none of the dry flouriness that ordinary rolled doughs have. Just make sure you’re using real, full-fat cream cheese blocks and not the spreadable kind that comes in tubs. A fellow pastry chef told me that in France his colleagues call cream cheese, a newish product to them there, “Philadelphia” and praise its wonders—in Spain and Mexico it’s called queso filadelfia. It’s really a unique cheese when you think about it—it’s not exactly like other soft cheeses, and the particular fillers it uses (gelatin, xanthan gum, guar or carob gums) give it a special consistency that makes it both creamy/spreadable and able to keep its shape.
I developed this recipe because I really wanted a cut-out cookie that tasted as good as it looked. I’ve tasted plenty of fancy decorated cookies in my life and hooo boy, some people just do not care how their cookies taste, I can tell you that for sure. Especially in our image-soaked Instagram-era of baking where carefully edited photos are often valued over, you know, flavor, I wanted to make sure my cookies could walk the walk.
This dough is truly foolproof. It is very easy to work with, versatile, and tastes even better than all-butter cookie dough in my opinion. Follow a couple of my temperature techniques below and you can accomplish anything—ANYthing—with this dough.
Since I had lemons and blood oranges laying around, I decided to make a curd of each—honestly they are both great, but the lemon curd is really a knockout.
![[heart eyes emoji here]](https://images.squarespace-cdn.com/content/v1/56a8dd090ab377c47eeeae77/1551550763003-N00BVDHIFRWYUF2XH3X8/Screen+Shot+2019-03-02+at+12.07.40+PM.png)
[heart eyes emoji here]
Here I’ve simply added fruit powder to the dough for a pop of color and intense flavor—pairing the cookies with tart lemon and orange curd makes them an incredibly fun and flavorful cookie. To make a plain version of these cookies, just omit the fruit powder. Or try an added 1/3 c. of cocoa powder for the best chocolate cookies you’ve ever tasted.
Side note: never listen to a recipe that tells you to “substitute” some flour for cocoa powder to make something chocolate. That’s insane. Cocoa powder is made of dried cocoa solids…it is not a grain, and it behaves very differently from flour in a recipe. Just because both are powdery and dry doesn’t mean you can substitute one for the other. This dough recipe is receptive enough to allow up to 1/3 c. of any low-moisture addition—cocoa, fruit powder, spices, herbs, chopped nuts, heck, go crazy.
Freeze dried berries are easy to find in the grocery store now (Trader Joe’s consistently has great freeze dried fruit options), although certainly you can find them online too in bulk. I used raspberries, strawberries and blueberries here, and I’ve also used peaches, apples, and mangos to great effect with regards to flavor (not so much with color). My mini food processor is perfect for the job of pulverizing the freeze dried berries into powder. If you don’t have a food processor, just beat/roll the berries in a ziplock bag with your rolling pin until finely crushed. DON’T FORGET to look for the little inedible silica packet that often comes in freeze dried fruit packages and remove it before whizzing everything together! I have made this idiotic mistake a few times when I’m in a hurry and have had to throw out entire batches of fruit powder once I saw the mangled silica packet buried in the powder.

The only common errors that can happen with this dough are (1) not mixing the cream cheese and the butter well enough and (2) not pulling the cookies from the oven at the right time (more on that later). Since the two ingredients have different consistencies and usually different temperatures, you can sometimes get lumps of cream cheese in your dough if you don’t scrape the bowl well or mix long enough. Here I’ve stopped mixing too early so you can see the lumps.
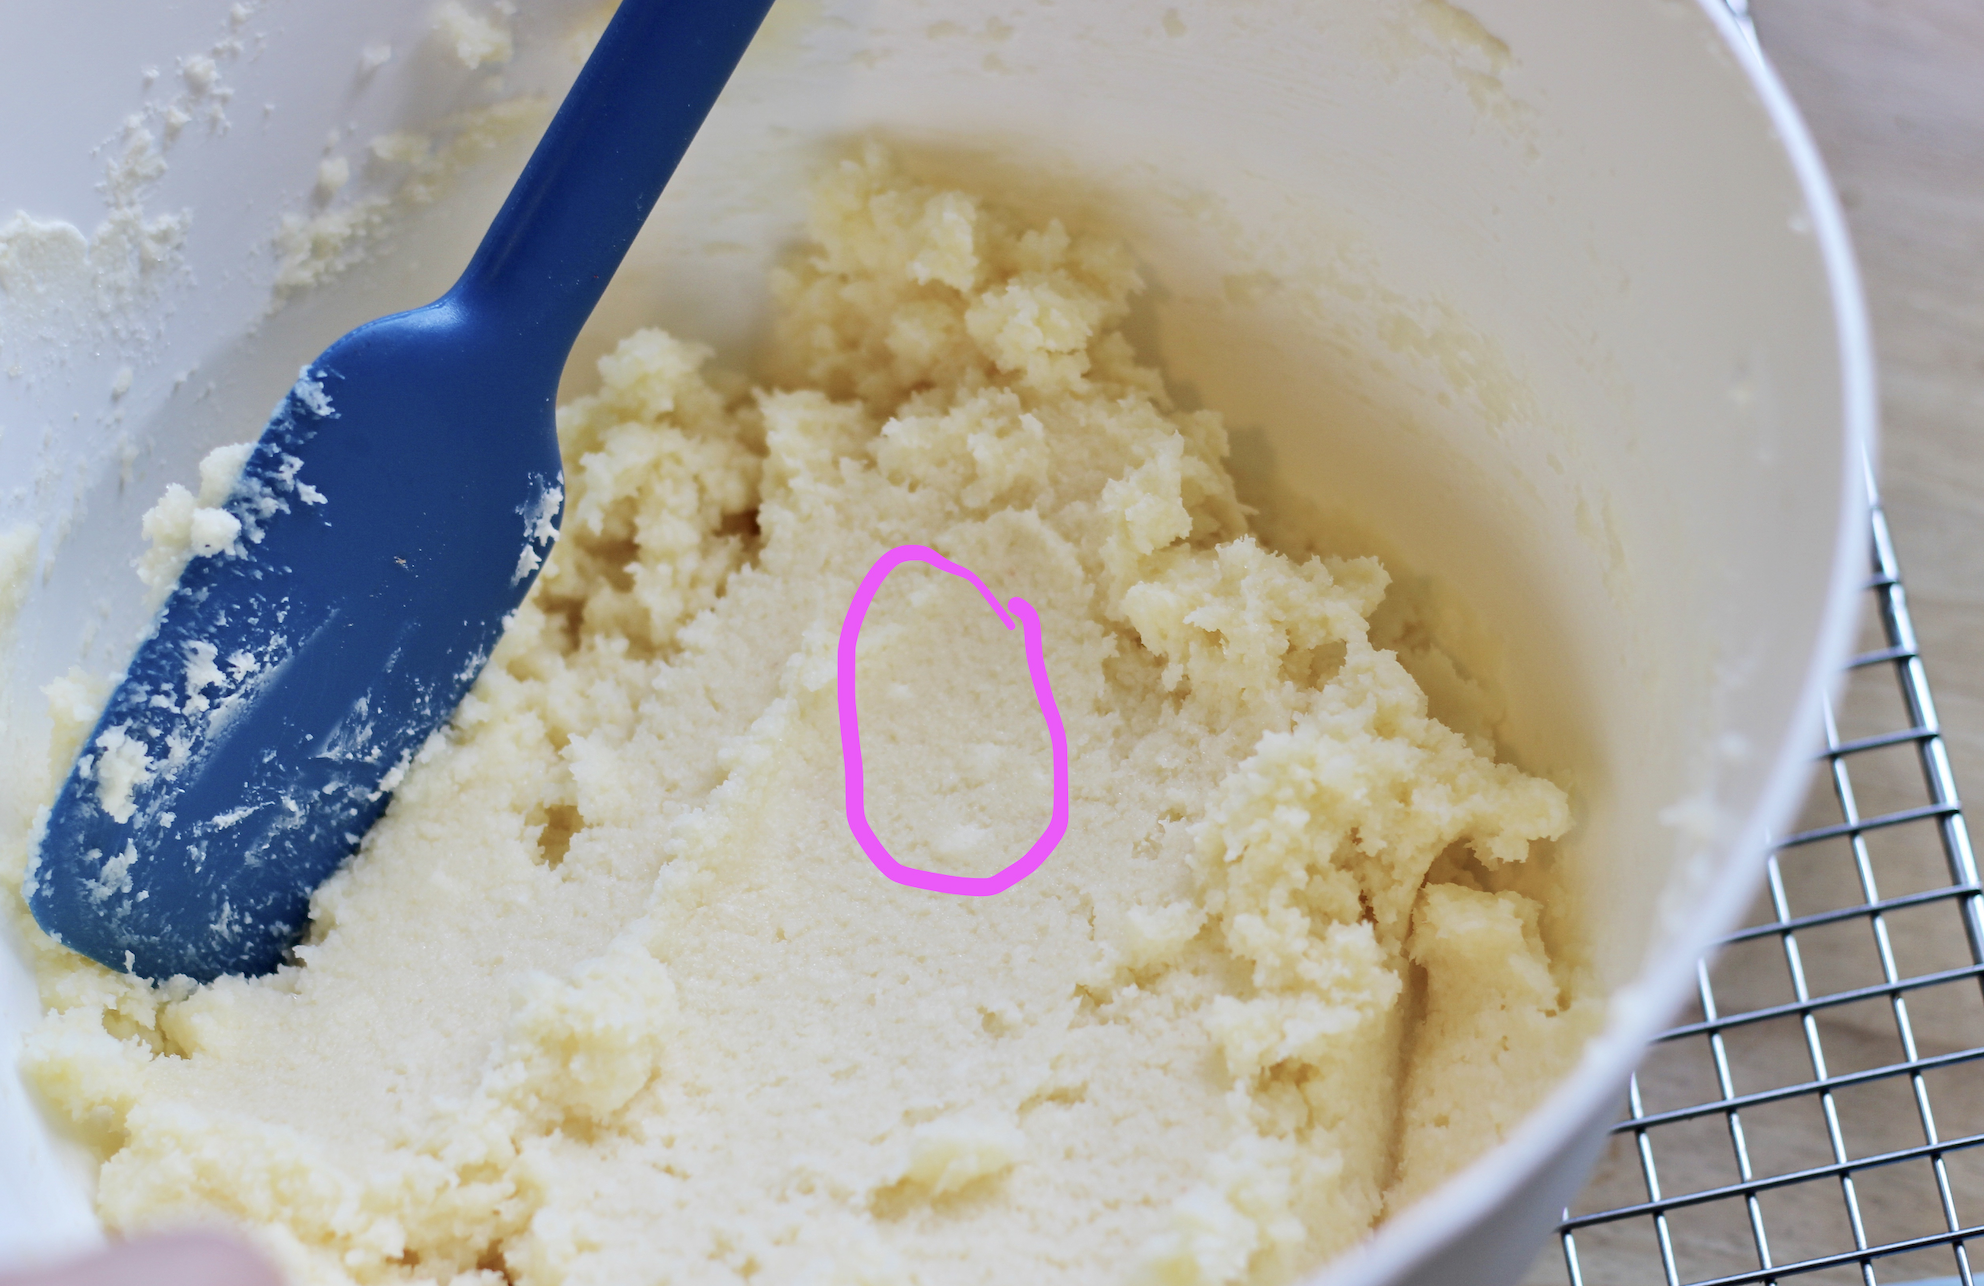
see them lumps
Keep mixing until the butter and cream cheese are uniform, but do not overmix. You don’t want to cream this mixture—it would add too much air to these cookies, which would only make them drier and more likely to spread. It should stay “wet” looking and un-fluffy, like this. It kinda looks like hummus to me.
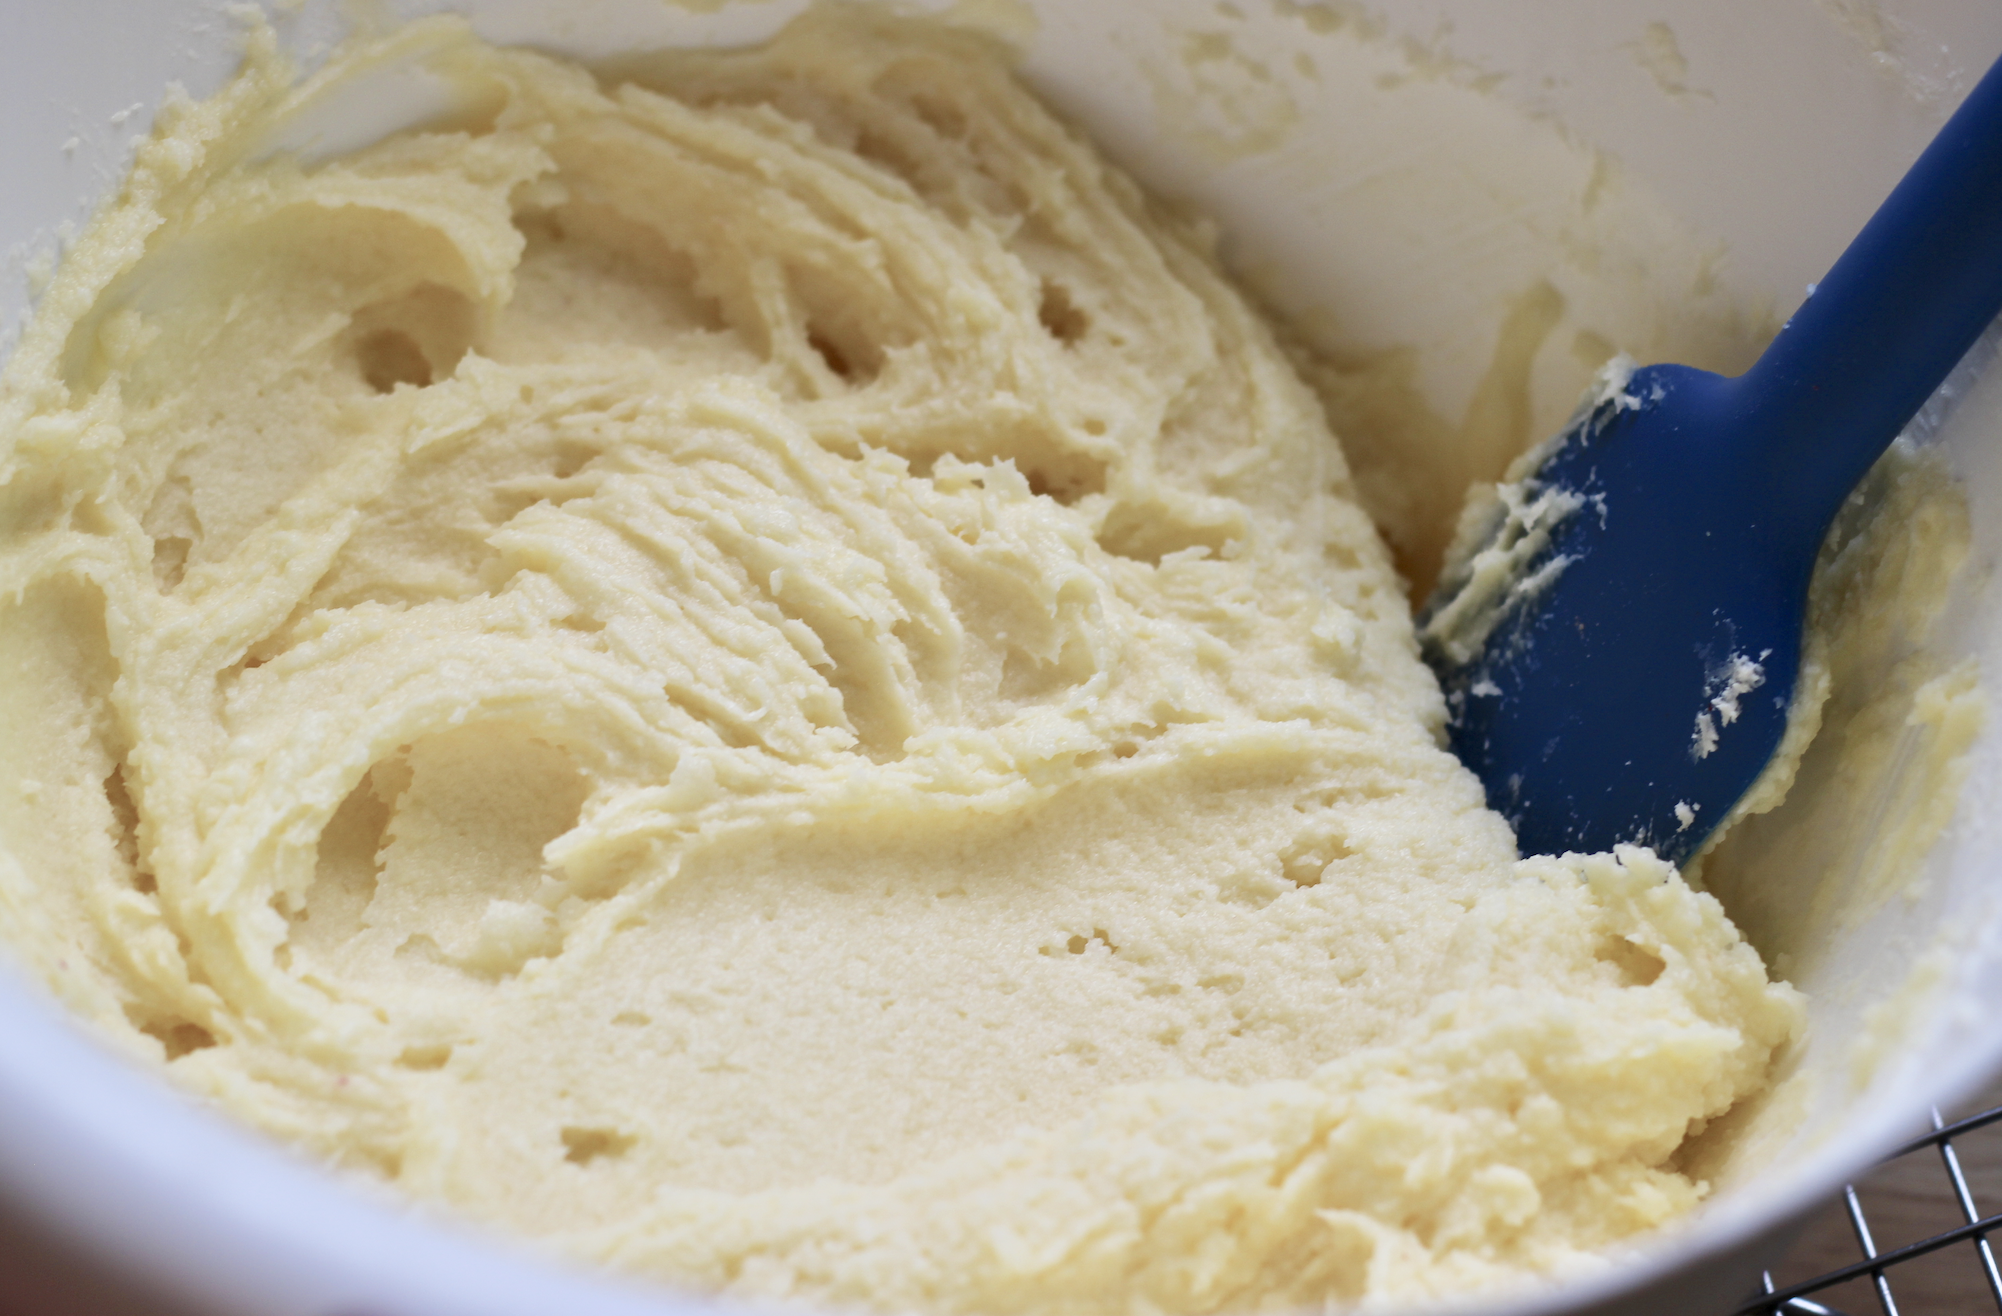
lumpless
I used these adorable Thumbprint Cookie Cutter Stamps from Williams Sonoma that are ideal for creating sharp edges along with a perfect little well in the center for the lemon curd (lazy? Just use pre-made jam instead!). Or you could just make thumbprint cookies the old fashioned way—with an actual thumbprint—either way, these cookies are going to taste fantastic.

Adding a touch of heavy cream to citrus curd makes it a bit more opaque, giving the color more saturation—plus it adds a touch of extra creaminess. I like tasty salted butter in my curd, but feel free to use unsalted if you prefer. Try to make sure you’re not letting any egg whites get into your mixture as you separate your eggs, since it is usually these errant whites that end up cooking and ruining your smooth curd with icky lumps. This recipe will make more curd than you need for the cookies, but not more than you need, you know, in your life in general.
LEMON CURD
5 large egg yolks
200 g (1 cup) granulated sugar
zest and juice of 4 lemons
113 g (1 stick) salted butter, cold, cubed
1/2 tsp (one splash) heavy cream
Bring about a cup of water to a simmer in a small saucepan. Whisk yolks and sugar in a metal or glass heatproof bowl and place over simmering water. Whisk for about a minute, until the yolks lighten, then add zest and juice. Whisk for 8 minutes, or until the mixture is thickened. Stir in butter, one piece at a time, until fully incorporated. Strain mixture into a small bowl and allow to cool to room temperature, then cover and place in fridge to chill.
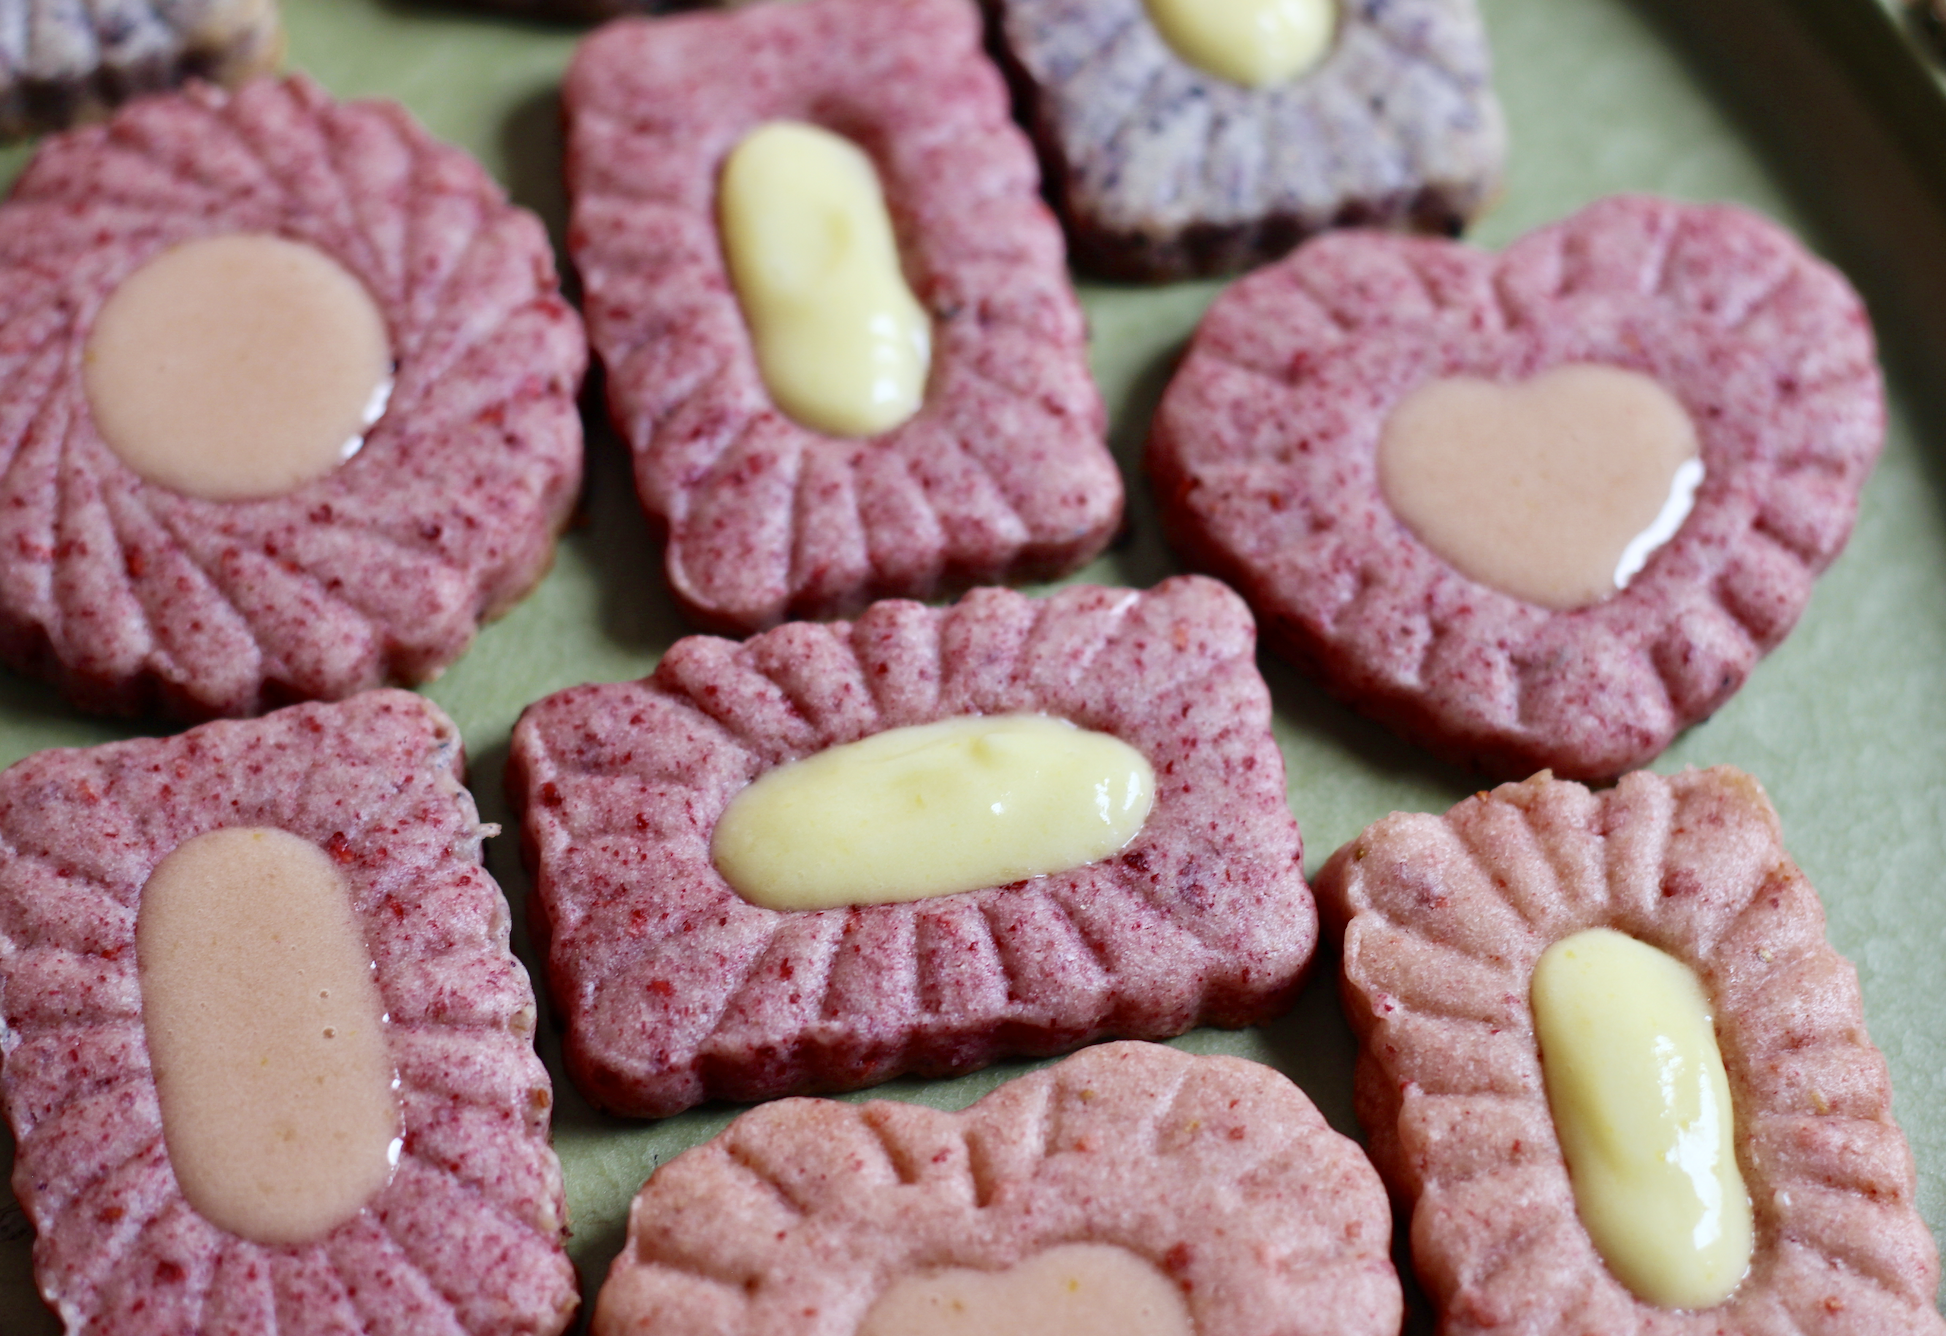
You can see my blood orange curd was looser than my lemon curd—both consistencies worked just fine
Now that we’ve got that chillin in the fridge, it’s cookie time. This recipe as written below is a half batch; I always double the amounts you see here. I halved it because I imagine most people just don’t need as much dough as I usually need. On the other hand, this dough stays perfect in the freezer so I highly recommend just doubling it and freezing the extra dough into sheets and saving it in your freezer for the next time you feel like baking off a batch…
A quick note on rolling out dough. I don’t recommend using any flour whatsoever to roll this dough out—it already has the perfect amount of flour in it, and adding flour to the outside of a raw cookie can make the baked cookie taste floury and overcooked. Instead of rolling on a floured surface, use wax paper. My rolling pin never touches my dough! Here’s my technique:
Cut a long piece of wax paper, a bit longer than your cookie sheet. Place the rested dough on the wax paper and allow a margin of the paper to fall over the side of the table or counter you are rolling on. Then cover the dough with another sheet of wax paper and start to roll the dough, unsticking and repositioning the top sheet of wax paper as needed (I do this after each roll). Hold the bottom sheet of wax paper in place by pressing your legs or tummy against the lip of the wax paper and the edge of the table or counter. It’s a bit odd, but this is the best way to keep the wax paper from sliding around as you roll out the dough. Keeping the dough sheet on the wax paper also makes it super easy to pick up and transfer onto your baking sheet to freeze before cutting out shapes.
I also use perfection strips to keep my dough a consistent thickness. They work much better for me than the spacer rings you can buy for rolling pins, since I’m a klutz and I can never seem to keep the rings from rolling over my dough and messing up the thickness.

Once the dough is fully rolled out, cover the dough sheet with plastic wrap and place in the freezer to chill until firm. All cookies I bake I cut straight from the frozen sheets of dough then pop immediately into the oven. You’ll get less spread and sharper edges by cutting and baking from frozen dough. Just be sure to peel off the wax paper as well as the plastic wrap and the cookies will come off your cutters easily and won’t lose their shape as you transfer them to your cookie sheet.
Now, you’ve got to be careful on timing here. The cream cheese and the fruit powder both work to mask the usual visual cues that tell you when a cookies is done—dry top, brown edges. The cookies will puff slightly as they bake, then start to settle. It is once they start to settle that you want to pull them. You’ll notice slight browning on the bottom edge of the cookie, but other than that, the cookies will not change color much—which is great for these fruity beauties.


gobble
BERRY COOKIES
1/2 tsp aluminum-free baking powder
400 g all-purpose flour
113 g (1/2 of an 8 oz package) cream cheese (not low-fat)
226 g (2 sticks) unsalted butter, softened
225 g granulated sugar
1/2 tsp fine sea or kosher salt
1 tsp vanilla extract
1/8 tsp almond extract
pinch citric acid (optional)
1 large egg yolk, room temperature
1/3 c freeze-dried strawberry, blueberry or raspberry powder (about 2 c. of sliced freeze-dried fruit will grind down to about 1/3 c.)
Whisk together the flour and baking powder in a small bowl and set aside. Using a hand mixer, mix butter and cream cheese on low until fully combined and no lumps of cream cheese remain. Add sugar, salt, extracts, and citric acid and mix until just incorporated. Add the yolks and mix again until just incorporated, then repeat with the fruit powder. Remove dough ball from bowl and knead a few times in your hands to make sure the flour is fully incorporated. Divide into two balls and flatten into discs. Wrap well in plastic wrap and allow to chill in the fridge for about 20 minutes—until it is rested and firm but not rock hard. Roll out each disc between sheets of wax paper then freeze dough sheets if using a regular cookie cutter, or cut shapes immediately if using the cookie cutter/stamps with plungers. Freeze cookies for at least 15 minutes before baking.
When you're ready to bake, preheat your oven to 350 degrees F. Line cookie sheets with parchment or silicone baking mats. Remove dough from freezer, cut shapes directly from frozen dough sheets, and bake frozen shapes immediately on cold or room temperature cookie sheets lined with parchment paper. If shapes become soft as you work with them, be sure to refreeze before baking. Bake for 8-12 minutes. Cookies will not brown much due to the cream cheese, so just look at their bottom edges for slight browning where the cookies touch the cookie sheet/parchment/silpat.
Allow to cool completely, then frost and fill with chilled lemon curd.

SO pretty and SO YUMMY