chocolate

Chocolate Poppyseed Graham Shortbread + Modeling Chocolate Tutorial by Molly Brodak

Screen Shot 2018-08-06 at 3.23.25 PM.png

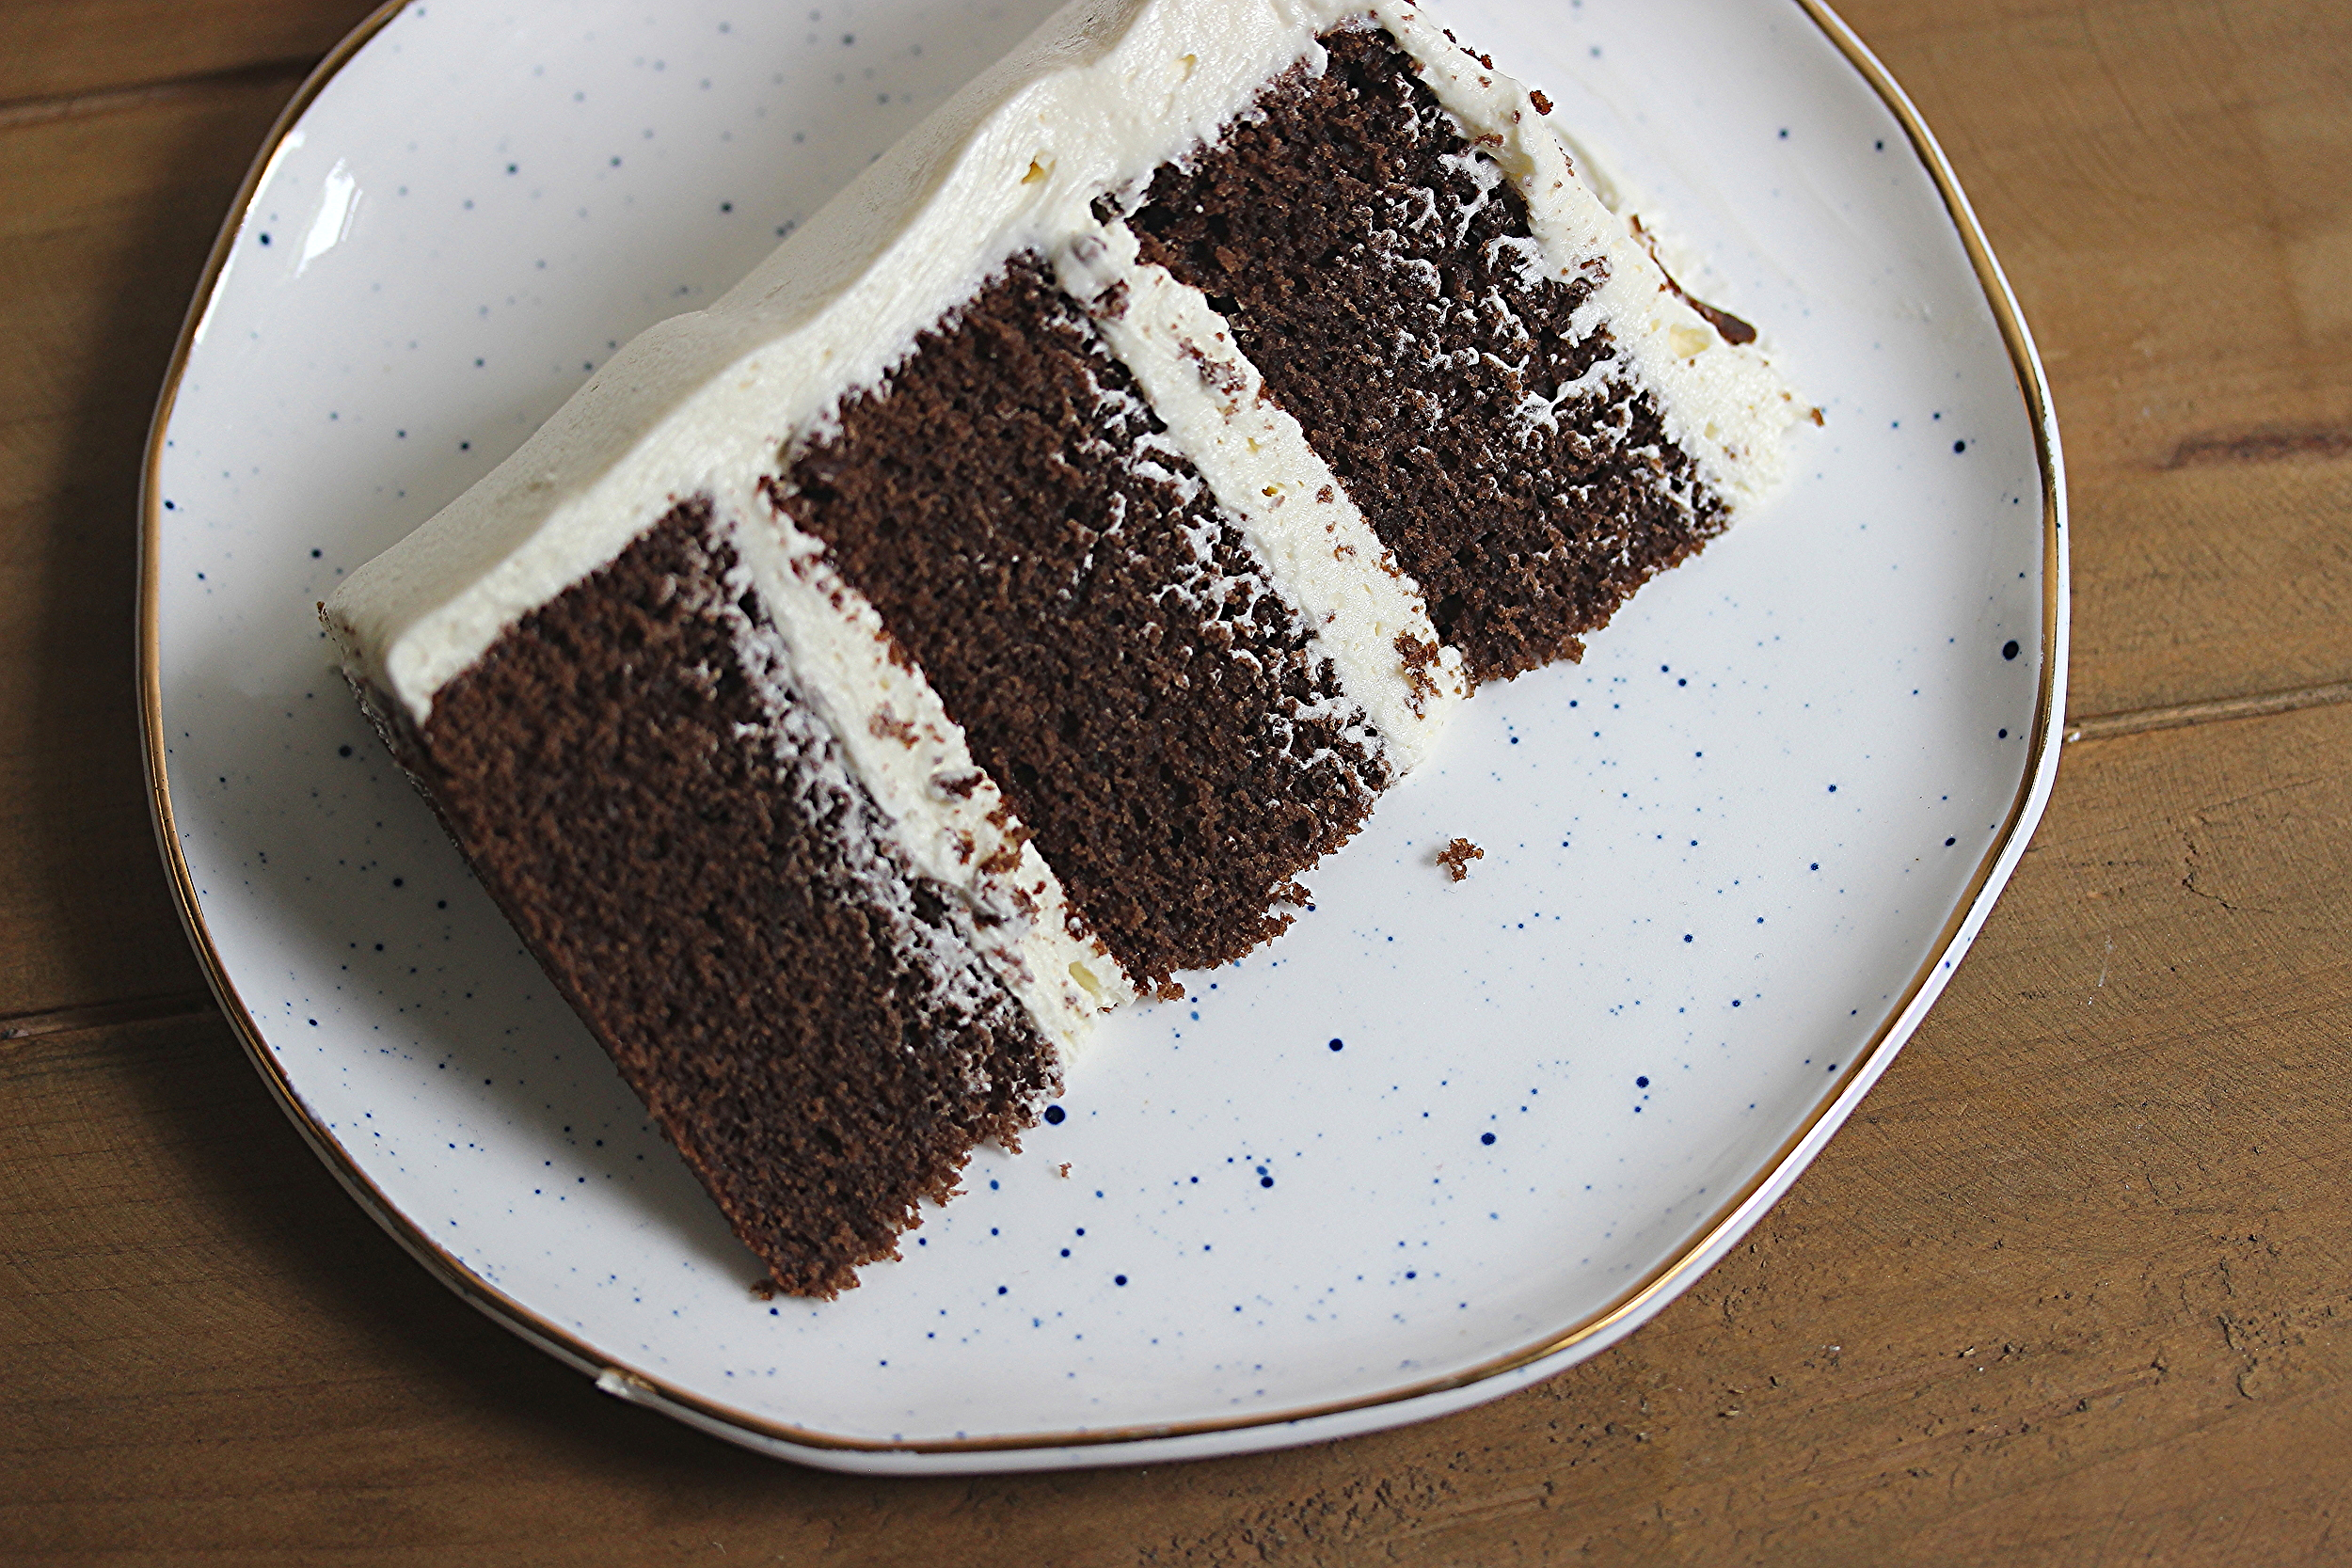
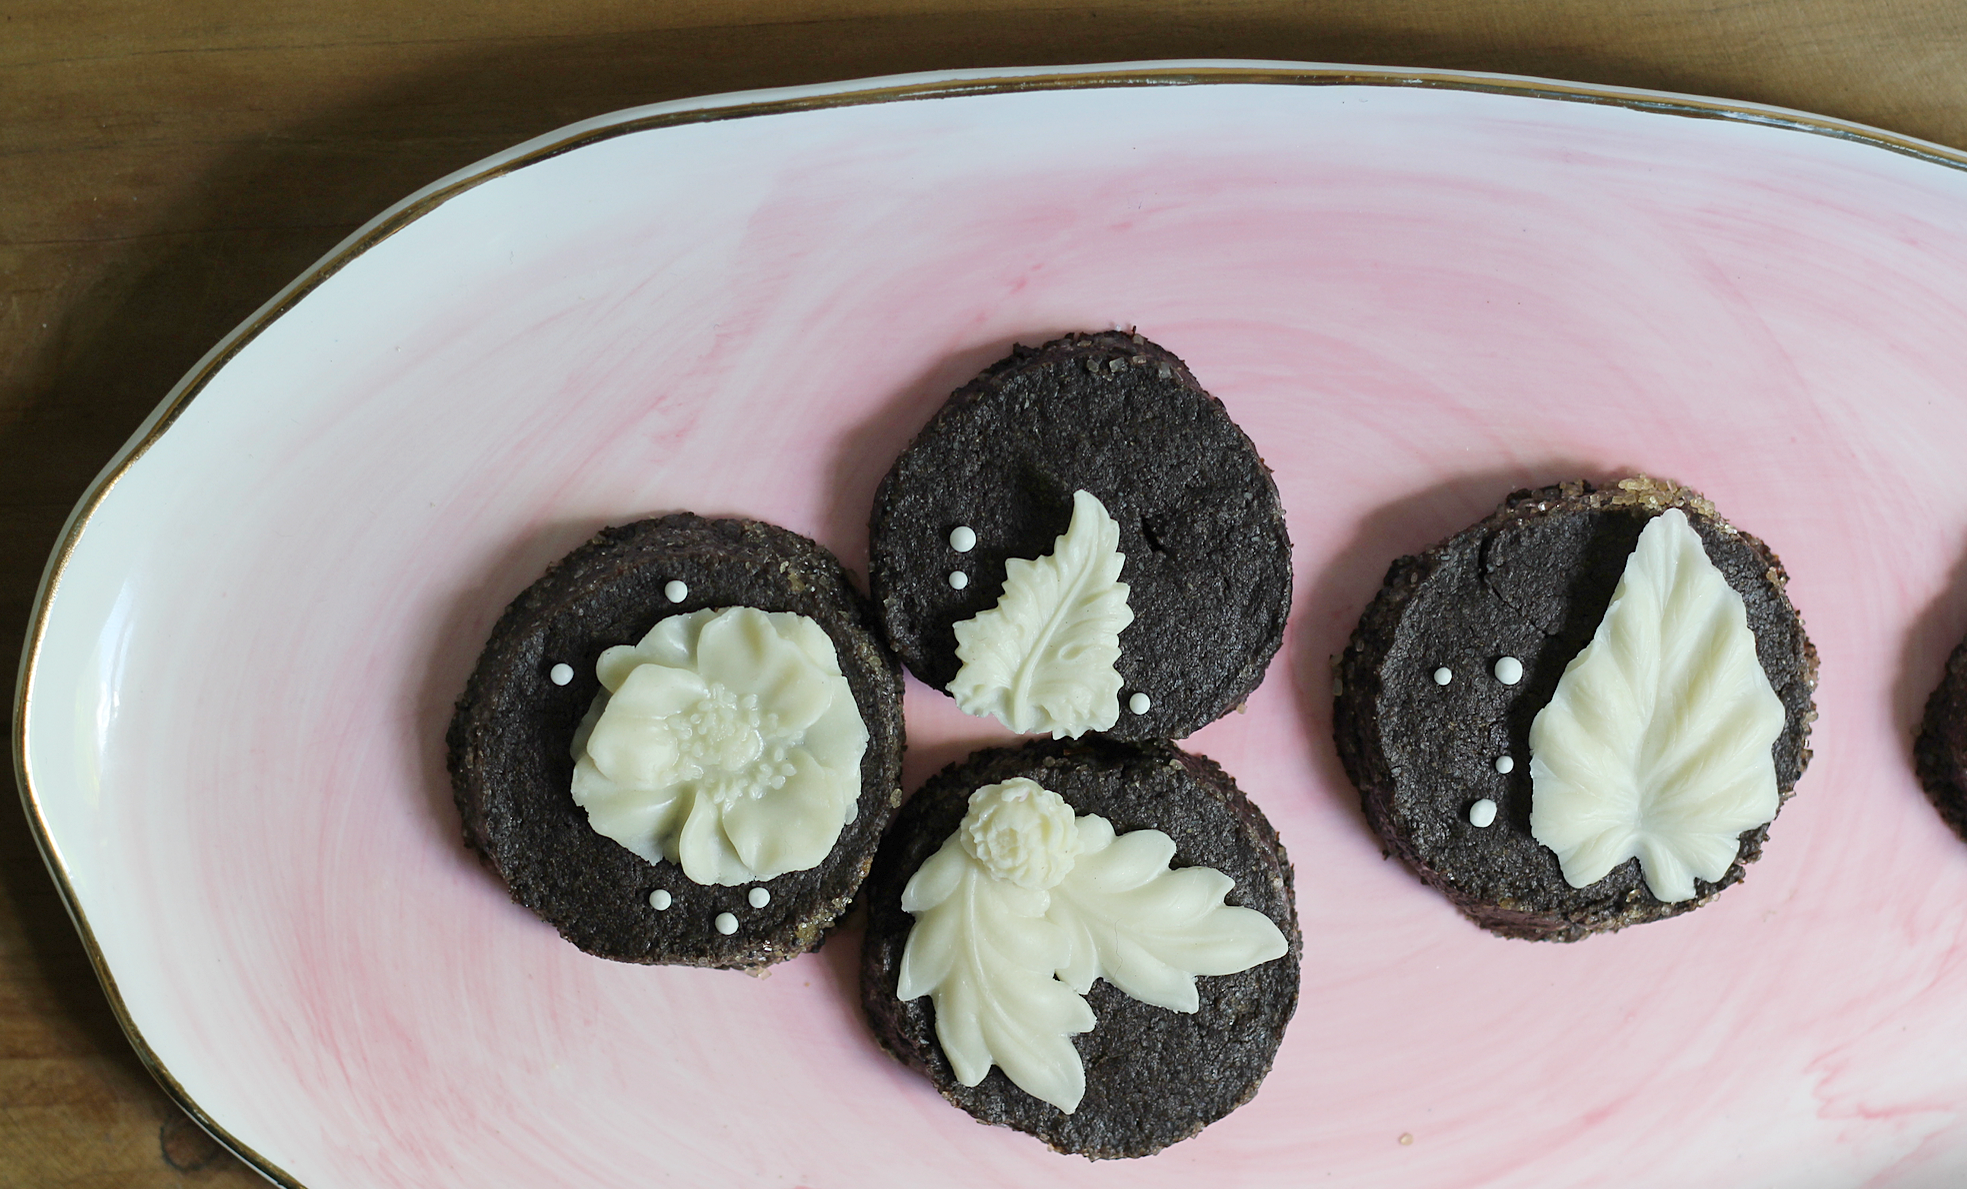
After a season of cakes, I am ready for something with a little more texture to it, something crunchy and rich. These cookies have an unbelievably addictiveness to them and I think it's down to the texture: crumbly, tender shortbread with bursts of crispy poppyseeds and crunchy sanding sugar on the edges, not to mention the incredible flavor from Banner Butter. The graham flour, which I'll explain more about below, provides a lovely, homey flavor and also adds another dimension of texture for a truly multi-textural experience. They are salty and rich with dark chocolate flavor, perfect for paring with coffee or, as I did here, a bit of white chocolate. They are also exceptionally easy to make and have only one (ONE) annoying step (grating frozen butter), which I think is impressive for how delicious they turn out.

oh my god

oh my god

Let's start with the modeling chocolate.

Now, modeling chocolate, if you don't know, is a miracle. It's as pliable as fondant, perfect for using with silicone molds, sculpting, rolling out and cutting, or just messing around with, but unlike fondant it is DELICIOUS. 

Unlike fondant, which is evil to put on cookies, it is delicious.

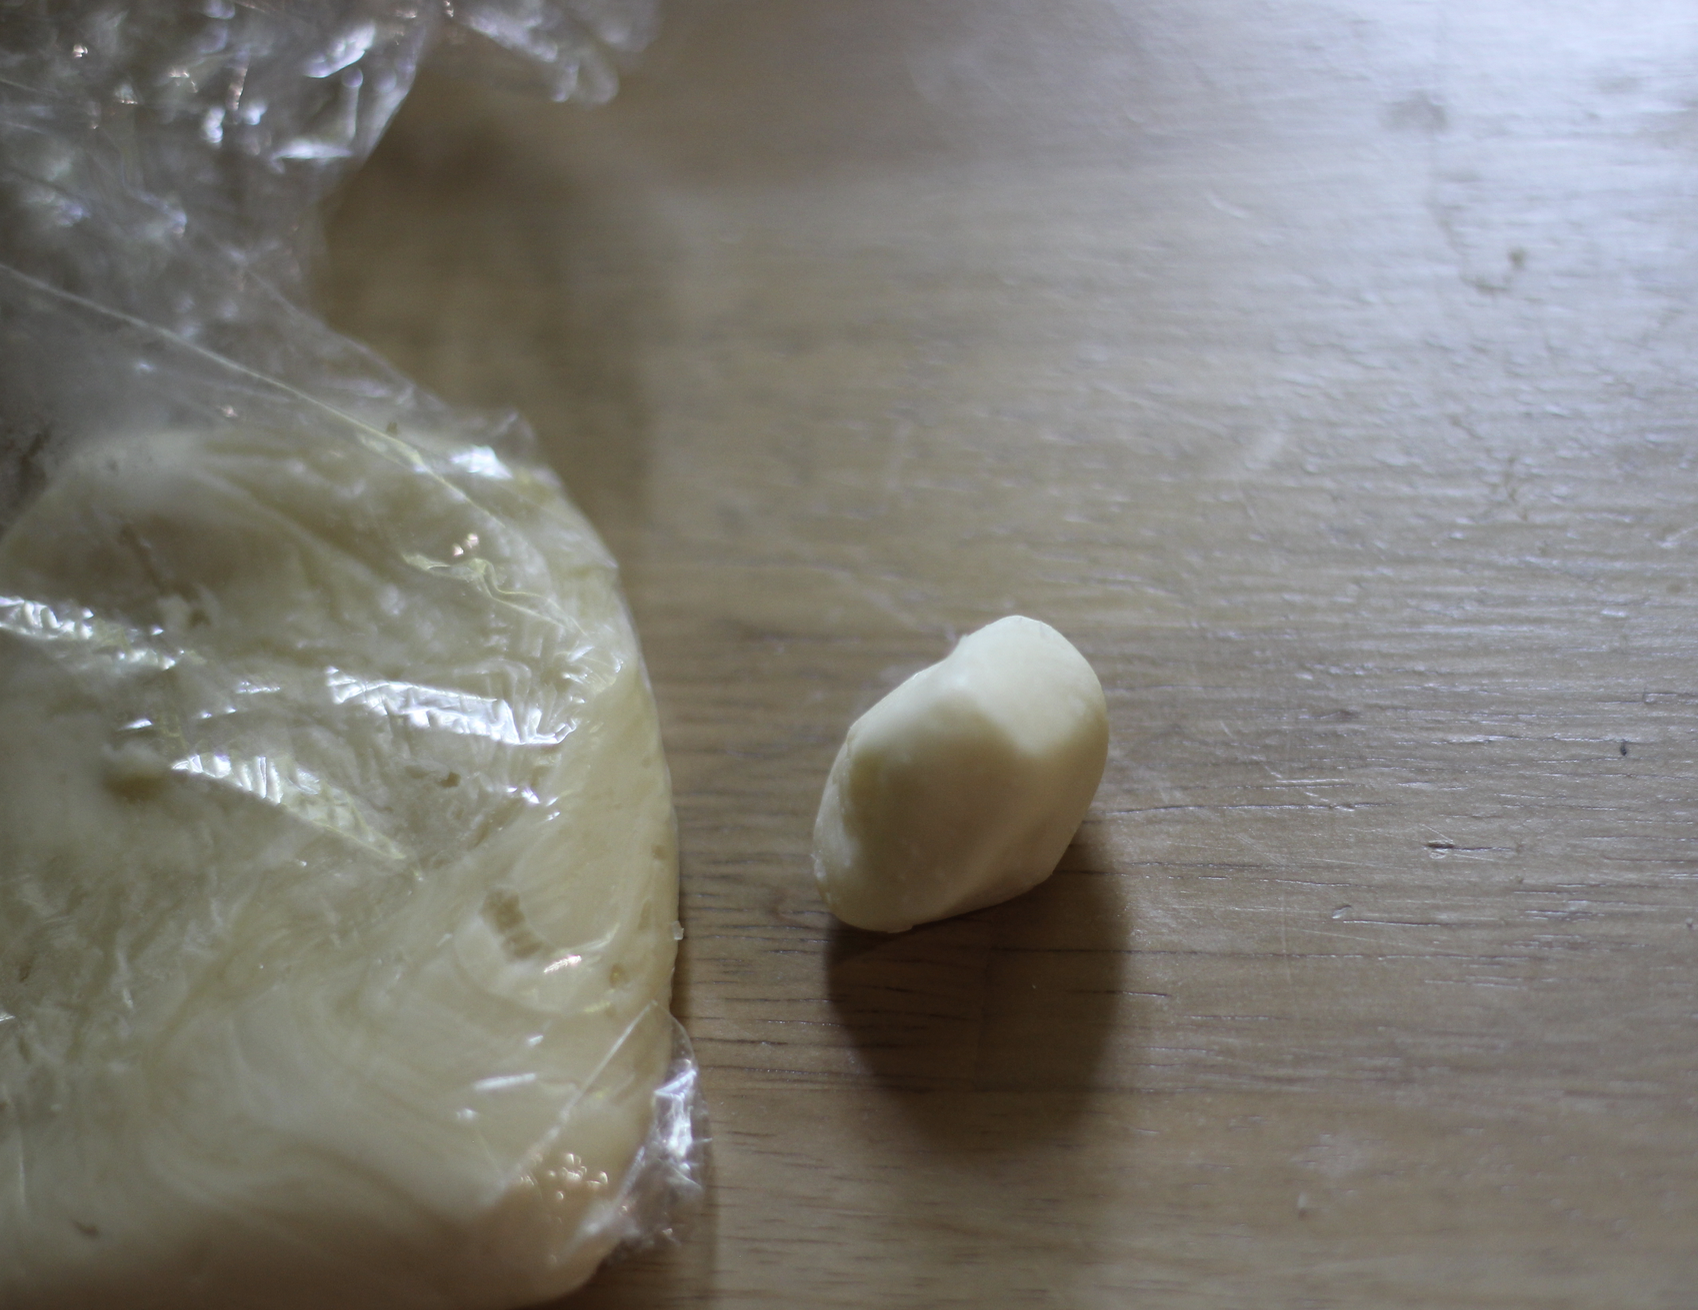
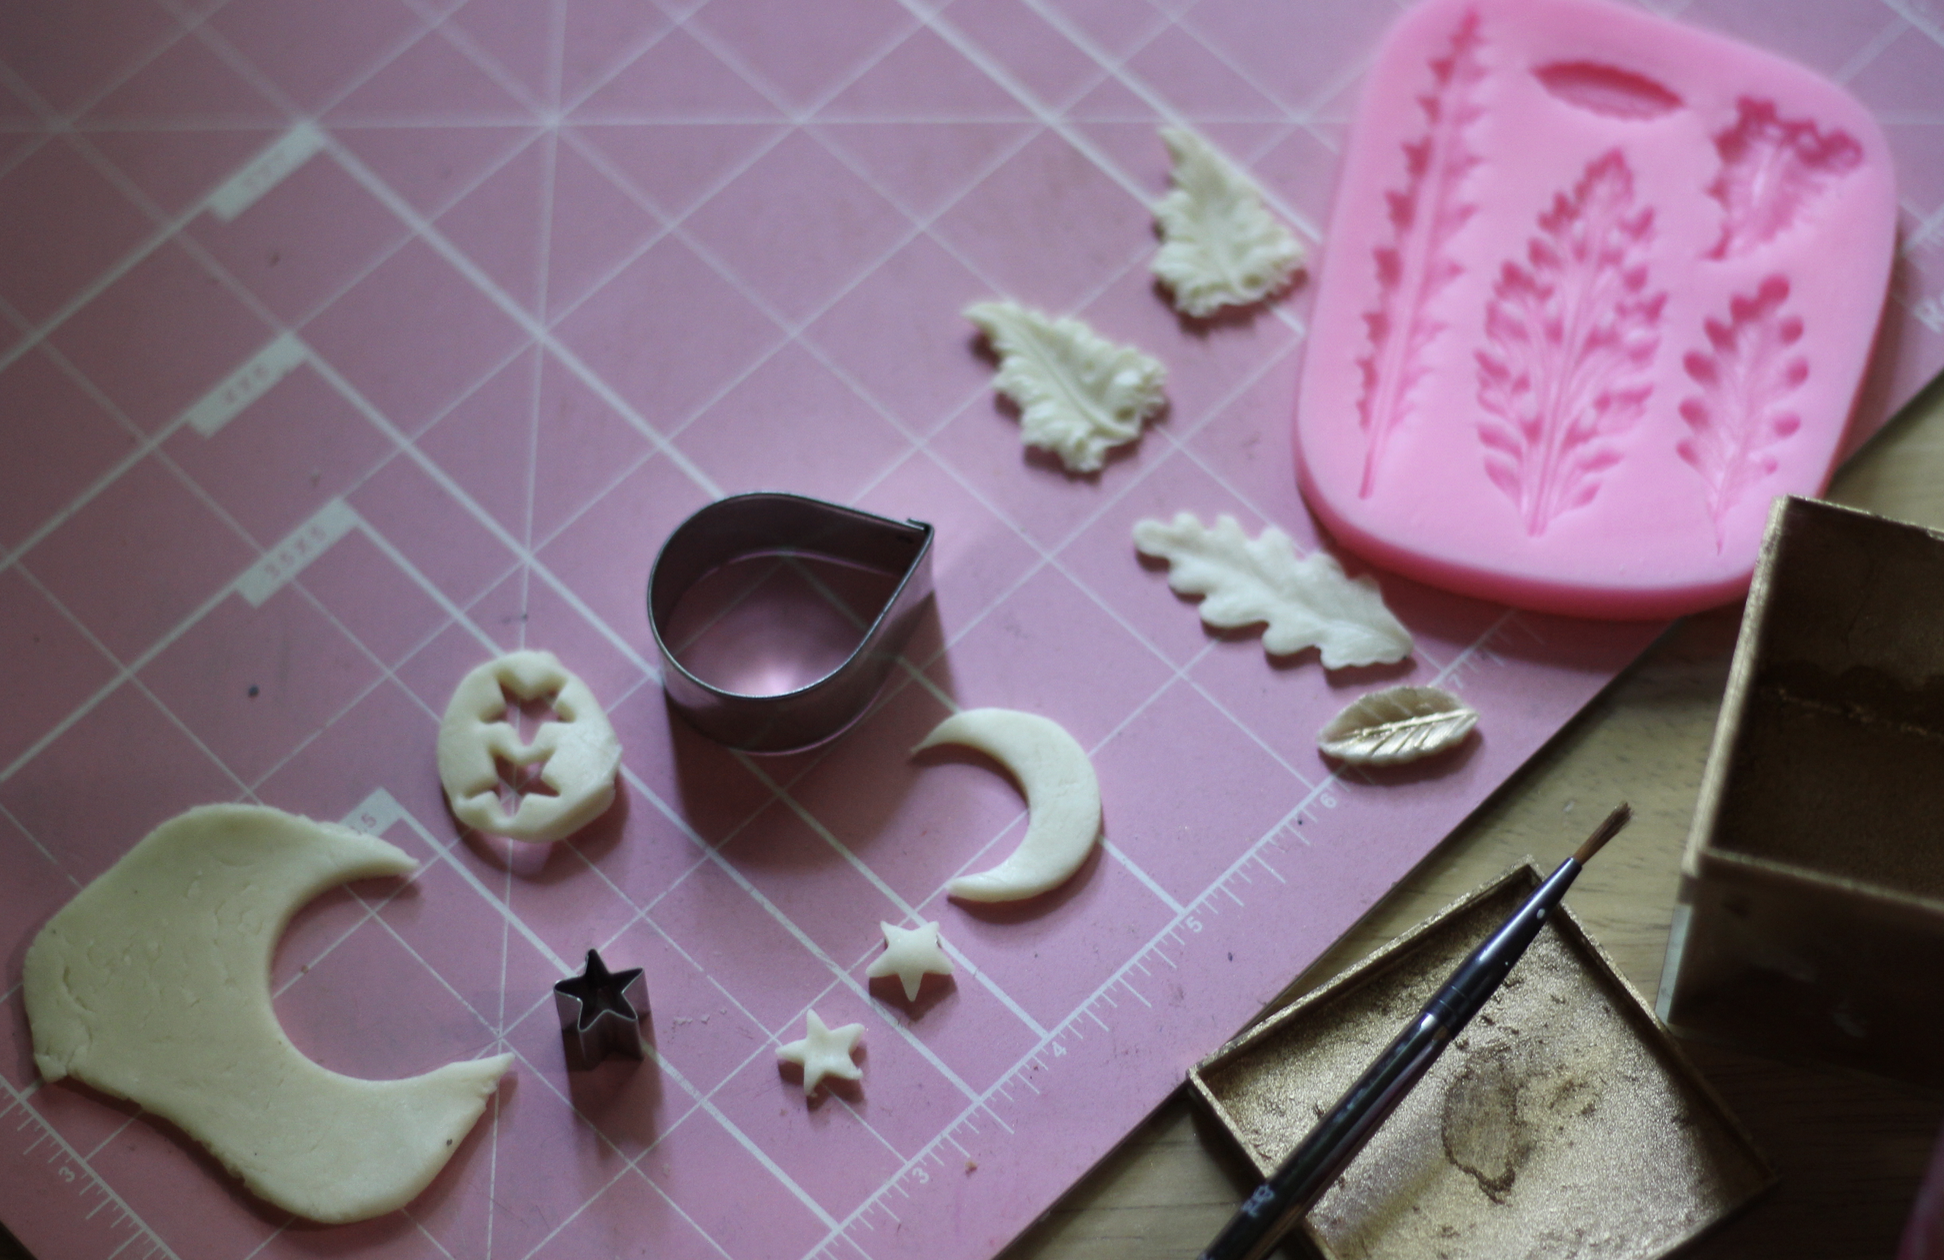
Even if you don't have any cool food-grade silicone molds sitting around to press the modeling chocolate into beautiful decorations, you can still roll it out and make some beautiful designs with a knife or small cookie cutter if you want. You can even brush it with edible luster dust for a fancy finish. Stored in a sealed container, it should last a long time, reviving with a bit of warmth from your hands, and can be used for all kinds of fun baking projects down the line, so I recommend having some on hand.

I'm not even going to give you a recipe for it since there is no way to top Cake Paper Party's chart and instructions. My only change is that I highly recommend using Guittard's Choc-Au-Lait chips for your white chocolate version and nothing else. They are, as I mentioned a few posts back, the only edible white chocolate chips on the market in my opinion. I found them recently at Whole Foods, so you might try that if you're not willing to wait for an online order.

So basically you just melt the white chocolate chips, then mix in the correct amount of corn syrup for the consistency you want. Be quick and gentle when folding in the corn syrup. As soon as the mixture has the consistency of peanut butter, STOP. There may still be streaks of corn syrup--it's ok. Let it all cool for at least two hours.  Knead once cool, and the mixture should incorporate to a smooth, play-dough like consistency. 

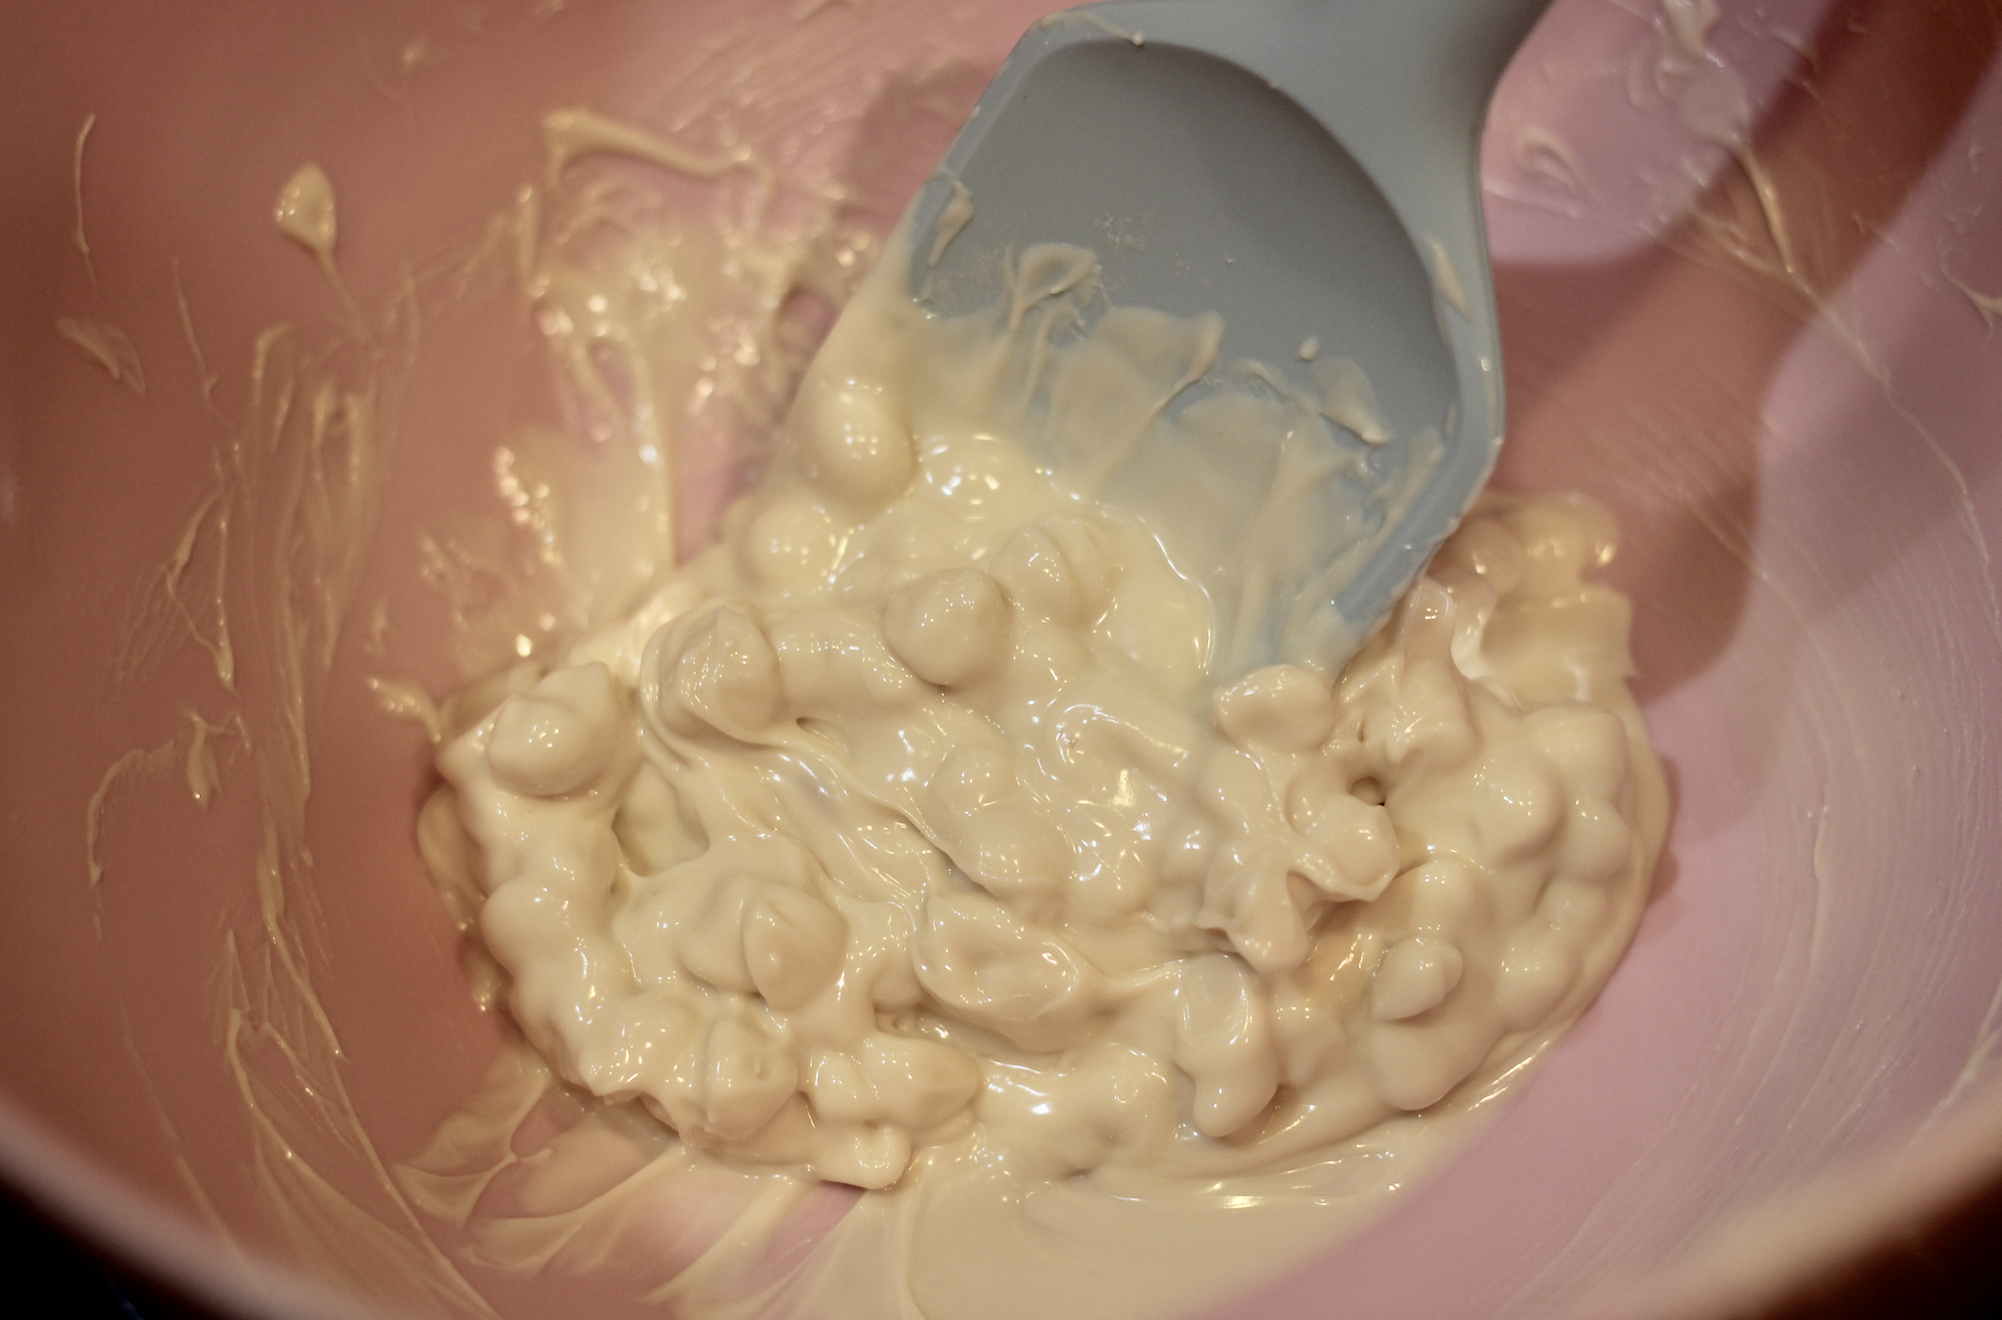
See the first photo here? That's as far as you should go when microwaving white chocolate to melt it. Stop while you still have large chunks, then just stir until the chunks melt. Heating your white chocolate chips in the microwave beyond this point only leads to despair. Trust me.

In general, be careful of overworking modeling chocolate. If it gets too warm from your hands, it can break into an oily mess. There is a way to fix this though, so don't toss it. I really think these cookies are even better with a smidge of the creamy white chocolate on top, so even if you didn't want to mess with all this I would still throw in some rough-chopped chunks of white chocolate into this shortbread, or drizzle some melted on top for a very easy fix.

Screen Shot 2018-08-06 at 3.23.14 PM.png

Now onto the cookies themselves. We've covered shortbread already, and this one has some changes from that recipe (which I still think is the best all-around vanilla shortbread out there) due to the cocoa powder and this cultured butter I want to use.

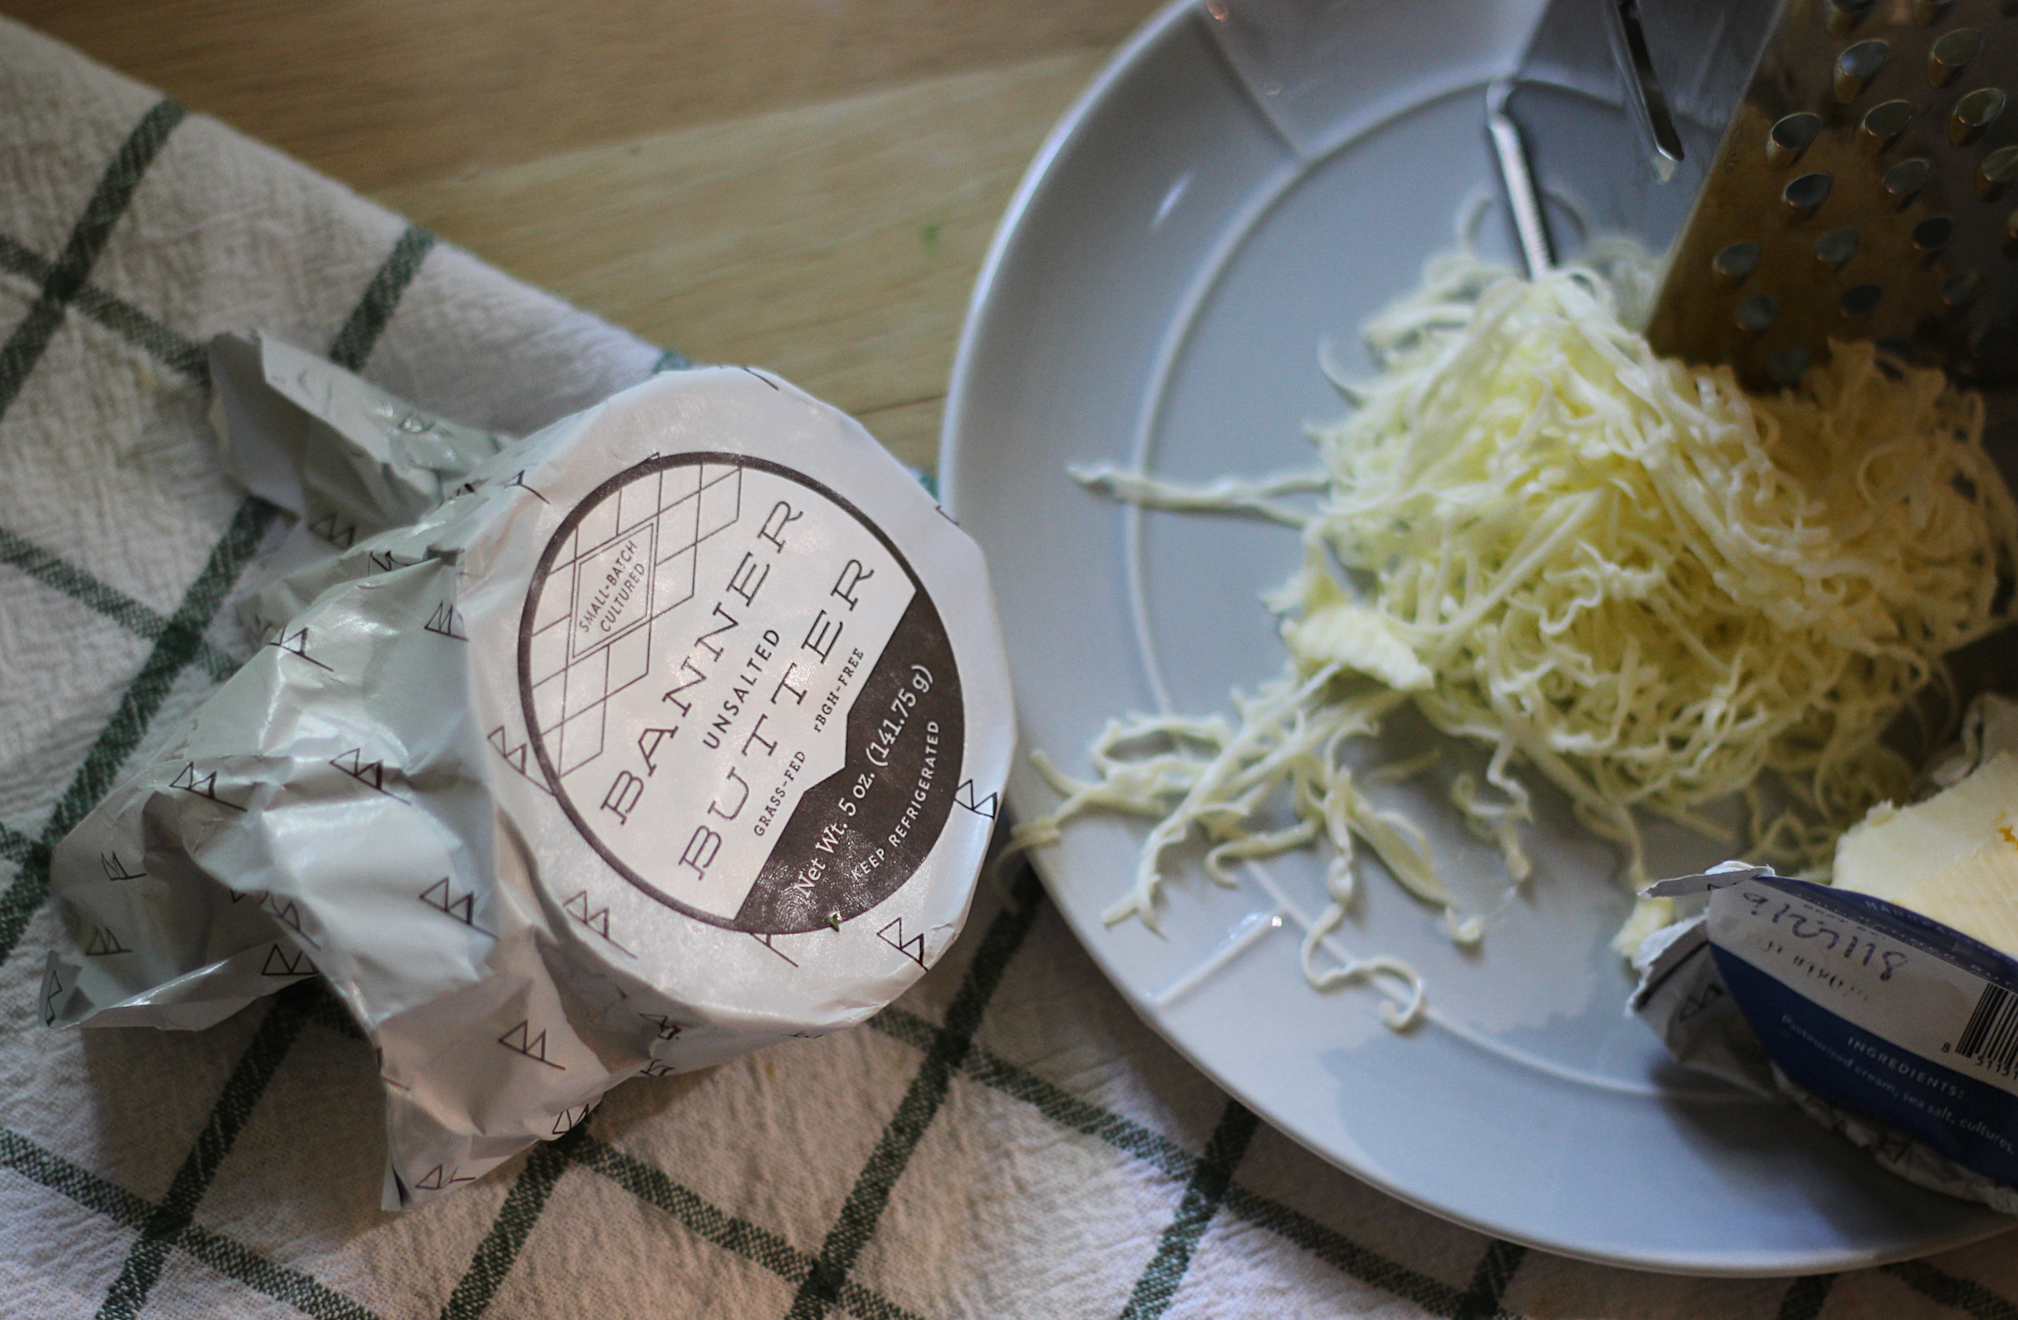
I am IN LOVE with Atlanta's own Banner Butter, and I knew it would shine in this shortbread. If you can't find Banner, be sure to use some other kind of cultured butter as a substitute, like Plugra, Lurpak, or a local butter if you can find it. The slight tang to this butter gives the cookies a subtle buttermilky flavor, and the rich fat content is important to the recipe proportions.

Screen Shot 2018-08-06 at 3.20.52 PM.png

You can keep a log or two of this dough in the freezer forever, and whip it out any time you need a quick cookie for your guests. Or yourself. Just whip out your log and slice. Ok sorry, I had to. I'll stop saying "log" now.

chop your log (SORRY) with a knife warmed over the stovetop for easy slicing. And don't use a marble cutting board. Why would such a thing even exist

chop your log (SORRY) with a knife warmed over the stovetop for easy slicing. And don't use a marble cutting board. Why would such a thing even exist

Graham flour is the same thing as whole wheat pastry flour, but it is not exactly the same thing as whole wheat flour. Named for who else but the 19th C Presbyterian minister who railed against bread made with white flour (he called it "tortured") and masturbation (he called it "Self-Pollution"), graham flour is milled from the same soft wheat that cake flour is made from and it is unsifted, unlike whole wheat flour. The grain's outer hull is ground more coarsely, and yet the inner kernel is finer than whole wheat flour, so what you end up with is a light, not dense, crumb while still benefitting from the texture of the whole grain particles. It also has that nutty taste that will remind you of a graham cracker, which makes a nice base for the chocolate and acidic butter here to play against.


Chocolate Poppyseed Graham Shortbread

230 g (8 oz, two sticks) frozen and grated unsalted cultured butter

1 tsp. fine sea salt

2 Tbsp. poppyseeds

1 tsp. vanilla extract

125 g. powdered sugar

280 g. (2 c.) Graham flour 

38 g. (1/3 c.) dark cocoa powder (I always use Hershey’s Special Dark)

2 egg yolks, room temperature

Coarse demerara sugar, for sanding

Place butter in freezer for at least two hours, preferably overnight. Once butter is rock-hard, grate quickly using a box grater into a large bowl, re-freezing the butter if it starts to soften. Chop up the last few chunks rather than grating down to your thumbs.

Sprinkle salt and poppyseeds over grated butter then return to freezer for at least 20 minutes. Meanwhile, whisk powdered sugar, flour, and cocoa powder together in a small bowl. Once butter is chilled, add flour mixture and quickly toss with your hands (use disposable gloves for this part if you have them). Then, add the egg yolks and vanilla and quickly mash and squeeze dough until it comes together. It may be streaky with chunks of butter. Squeeze just until it holds together, then separate into two balls and place onto plastic wrap. Work the balls into logs and roll tightly using the wrap. If dough becomes soft and warm, allow to chill before proceeding. Unwrap, the re-roll the logs in coarse Demerara sugar, then wrap tightly. Place the two logs into the freezer to chill overnight or until completely solid, at least four hours. 

Heat oven to 375 degrees F, slice dough into ¼ inch discs, and bake for about 12 minutes on a parchment-lined tray. Cool completely before storing.

Seen here piped with celestial royal icing designs

Seen here piped with celestial royal icing designs

Vegan Chocolate Cake by Molly Brodak

Happy Birthday to me! 

I visited my mom and sister recently back home in Michigan and mom made for me my favorite birthday cake she used to make when I was little: wacky cake.

Wacky cake is apparently a recipe created in the 40s when home bakers were rationing on account of World War II. It requires no eggs, no butter, and no milk. It's "wacky" because the recipe traditionally calls for you to make three wells in the dry mix--one for vanilla extract, one for oil, and the last for vinegar. Then you cover the whole thing with water, stir with a fork, and bake. 

Now, to be honest there's no real science behind this method, it seems to me just a clever way to make a recipe memorable. It really makes no difference to the outcome of the cake if you make the three little wells or not, as wacky-cake pros like my mom know.

Essentially, this is a great vegan cake, and with this inspiration in mind, I created a recipe for a very similar chocolate vegan cake. It's extremely soft, with a loose, wiggly crumb and incredible lightness. I like this even better than non-vegan chocolate cake, plus it brings back memories of home.

yes I am eating it with my hands

yes I am eating it with my hands

Now, the fact that wacky cake is usually baked as a sheet cake tells you something. This cake is SO tender that it is hard to work with...it's a terrible candidate for carving, and is so delicate it is hard to slice and tort, or even move the layers around unless you are very deft with cake-moving. I recommend baking this cake, too, in a 8x8 pan or as cupcakes. It doesn't have much structure because of the low protein content in this recipe. This recipe can easily be doubled for a 9x13 or similar larger pan.

painting with buttercream!

painting with buttercream!

Of course, thinking about what can be done with a sheet cake without having to carve it or slice it, I thought about a painting. I created this Spring-inspired "oil" painting using vegan margarine-based buttercream and created a fondant frame for it out of a mold I made from a fantastic old framed mirror in my bedroom. 

I painted the frame with edible gold coloring and dusted it with cocoa powder to antique it slightly. 

most of the frame was held up with rolled foil (you can see it in this pic) since I didn't want to waste a ton of fondant

most of the frame was held up with rolled foil (you can see it in this pic) since I didn't want to waste a ton of fondant

I altered the basic wacky cake recipe to boost flavor and add richness. I promise the addition of coffee will not impart any coffee flavor to the cake, just deepen the chocolate taste (trust me, I'm not a big coffee fan so I wouldn't do this if the coffee flavor was detectable). Starbucks (and lots of other retailers) now make fantastic microground instant coffee that is miles away from those horrible crystals your parents used to drink--these are perfect for this recipe. Any cocoa powder will do--my favorite grocery store cocoa powder is Hershey's Special Dark, but feel free to use your fancy high quality cocoa powder if you have it. Dutch-process cocoa is better in this recipe than natural cocoa because it will make a richer, darker cake and the acidity of natural cocoa is not needed since we have plenty of other acidic ingredients here, but natural (such as regular Hershey's cocoa powder) will substitute ok.

Bonus: all you need for this recipe is a whisk!

Vegan Chocolate Cake

1 c. unsweetened soy or nut milk of your choice

1 packet microground instant coffee or espresso (to make one cup)

1 tsp. apple cider vinegar

3/4 c. (160 g.) sugar

1/2 tsp. salt

1/3 c. vegetable or canola oil

1 tsp. vanilla extract

1 c. (133 g.) all-purpose flour

1/3 c. (34 g.) Dutched cocoa powder (Hershey’s Special Dark or KAF Black Cocoa work great)

3/4 tsp. (4 g.) baking soda

1/2 tsp. (2 g.) baking powder

Preheat oven to 350 degrees F and lightly grease and flour 8x8 baking pan or line cupcake pan with liners. Heat nondairy milk until warm in microwave; stir in coffee powder until dissolved. Add vinegar and set aside. Whisk flour, cocoa, baking soda, and baking powder in a small bowl until thoroughly mixed. In a larger bowl, combine milk mixture with sugar, oil, vanilla, and salt, and whisk until lightly frothy. Add dry mixture in two batches, and whisk. Mixture can have small lumps. Pour into prepared pans and bake for about 18-22 minutes or until center is set. Allow to cool completely before icing with your favorite frosting.

art saved my life. thanks for another year!

art saved my life. thanks for another year!

Perfect Chocolate Cake by Molly Brodak

Let me just get this out of the way right off the bat: I don't really like chocolate cake. It's always just a little wrong somehow--too dry, not chocolately enough (just, you know, chocolate-colored), too rich, too sweet, too something.

I needed to make my peace with chocolate cake.

There are so many kinds of chocolate cake out there. Americans prefer a sweet, soft, light cake--like the box mix. In fact, box mix seems to be the standard to which all homemade cakes are measured, strangely. It's a texture thing. American cakes have to be light and moist, which is tough for butter-happy homebakers (butter is a huge factor in why homemade cakes are often dry--more on this later).

Australian chocolate cake is mud cake--dense, rich, almost brownie-like to us. And in Europe, most chocolate cake is either a flourless torte or it's dry as a hard sponge--and why it's often soaked in liquor syrup or simply meant to be dunked in tea. There's a place for all of it.

I had a very specific set of criteria for the perfect chocolate cake: it has to be very flavorful, first of all, and it has to be moist but not dense. It has to have a fine, velvety crumb, with a soft but sturdy texture so it can be stacked, carved, and covered in heavy ganache and fondant. Most American chocolate cake recipes are great for cupcakes or sheetcake that does not get torted and carved--it has an open and squiggly crumb that is deliciously soft but terrible for tall, stacked cakes.

I normally trim my cakes but I didn't need to with this one

I normally trim my cakes but I didn't need to with this one

We're going to need cake flour for softness, a bit of sour cream, both cocoa powder and melted chocolate for the best flavor, and mostly oil instead of butter. Butter, while I love it to death, has a higher water content than oil (obviously) and also has those pesky solids--the whey--that harden the cake's sugar-fat-flour bonds. A thousand recipes later, balance was finally achieved.

The recipe starts with the melted-sugar method of which I am such a fan, and to the hot sugar the chocolate is added, so no extra melting step is required, conveniently. I decided to add the sour cream to the whipped cream that gets folded in and the end and it helped to keep the cake light and flavor-balanced.

This is not how most people make cake

This is not how most people make cake

The recipe is dairy and egg heavy, so swapping in some gluten-free flour is going to work just fine, but a non-dairy, egg-less version I believe would not be possible. You also have a good bit of sugar here, so make sure you are using unsweetened chocolate and not semi-sweet as a substitute. The espresso powder is optional but definitely boosts flavor, and I promise does not impart a coffee taste. 

the most velvety, moist crumb EVER

the most velvety, moist crumb EVER

Just to be sure I'd found tough-yet-tender perfection, I made an extra tall cake with custard buttercream and wrapped it in a heavy and dramatic molded fondant design.

Look at this piece! I made a silicone mold of a vintage wooden architectural detail I'd found in my mold-making madness that I knew would be absolutely killer on a cake. Typically fondant molds are little, fussy affairs, made from jewelry findings and meant to be arranged judiciously as appliques. This mold, on the other hand, makes the cake in one fell swoop.

I die

I die

This recipe makes a LOT of cake--about 9 cups of batter, so feel free to halve it if you are only making a small cake. It will fit four 9" pans generously, or--as I have done here with this cake--two 3" deep 6" pans and two regular 4" pans. I can't recommend enough to get yourself some deep cake pans rather than the standard piddly shallow ones. You'll save space in your oven, since more layers can come out of one pan, and they help prevent overcooking/dry cakes. Using a flower nail or heating core in the center of a deep pan will ensure your cakes cook evenly.

This cake takes a syrup soak really well, and I highly recommend it, since all chocolate cake is prone to drying due to the chocolate itself. Just make a simple syrup, add the flavoring or extract or liquor of your choice, and brush or squeeze on before icing.


Perfect Chocolate Cake

14.2 oz. cake flour (I use White Lily)

16 g. (about 4 tsp) aluminum-free baking powder 

1 oz. (about 1/2 c.) Dutched process cocoa powder (Hershey’s Special Dark or KAF Black Cocoa are great)

3/4 c. heavy cream

1/4 c. sour cream

21 oz. (about 3 c.) granulated sugar

2/3 c. water

2 tsp. instant espresso powder

4 oz. unsweetened chocolate, chopped finely

2/3 c. plus 3 Tbsp. canola oil

4 Tbsp. unsalted butter, softened to room temp

1 tsp. salt

1 Tbsp. vanilla extract

6 yolks, room temp

4 eggs, room temp

Preheat oven to 350 degrees and prepare pans. With a hand mixer, mix the flour, baking powder, and cocoa powder thoroughly, until no lumps remain (do not skip this step, it is especially important with cocoa and cake flour which both tend to clump). Rinse beaters and use to whip cream in a cold bowl to soft peaks, add sour cream and whip to firm peaks. Place whipped cream in the fridge. Chop chocolate finely.

In a saucepan, heat sugar, water, and espresso powder over medium heat until most of the sugar is dissolved. Stir frequently or use your hand mixer to speed up the process (be careful that the cord is kept away from the burner). Do not allow mix to boil. Once the sugar is mostly dissolved, pour into a large bowl and add chocolate, mixing until smooth. Add salt, vanilla, oil, and butter and mix until smooth. Sprinkle 1/3 of the flour mix into the wet ingredients and mix well on low, then gradually add the rest but do not overbeat. Set mixer aside and grab a spatula and whisk. At this point, the mixture should be warm but not too hot to touch--If your sugar mixture is still very hot, allow it to cool--you don't want to cook your eggs.

Add the yolks next, two at a time, mixing in by hand with whisk, then the eggs. Don't be tempted to reach for your electric mixer. Just be patient. They incorporate better if they are room temperature instead of cold from the fridge. Then gently fold whip cream into the mixture with a spatula until completely combined. Pour into prepared pans and tap them hard several times on the counter to release large air bubbles. Bake anywhere from 20--45 minutes depending on your pan sizes and depth. Cakes are done when their centers spring back, they no longer jiggle when moved, and the edges just begin to pull away from the sides. I don't recommend poking anything into your cakes to test doneness--just a quick press with your finger in the center will tell you all you need to know. Deep pans will also cause the tops to split (see my photo) which is another good indication of doneness. Cool, level, and split cakes, then soak with simple syrup and frost.