Apple Pie Cake with Salted Caramel Sauce by Molly Brodak

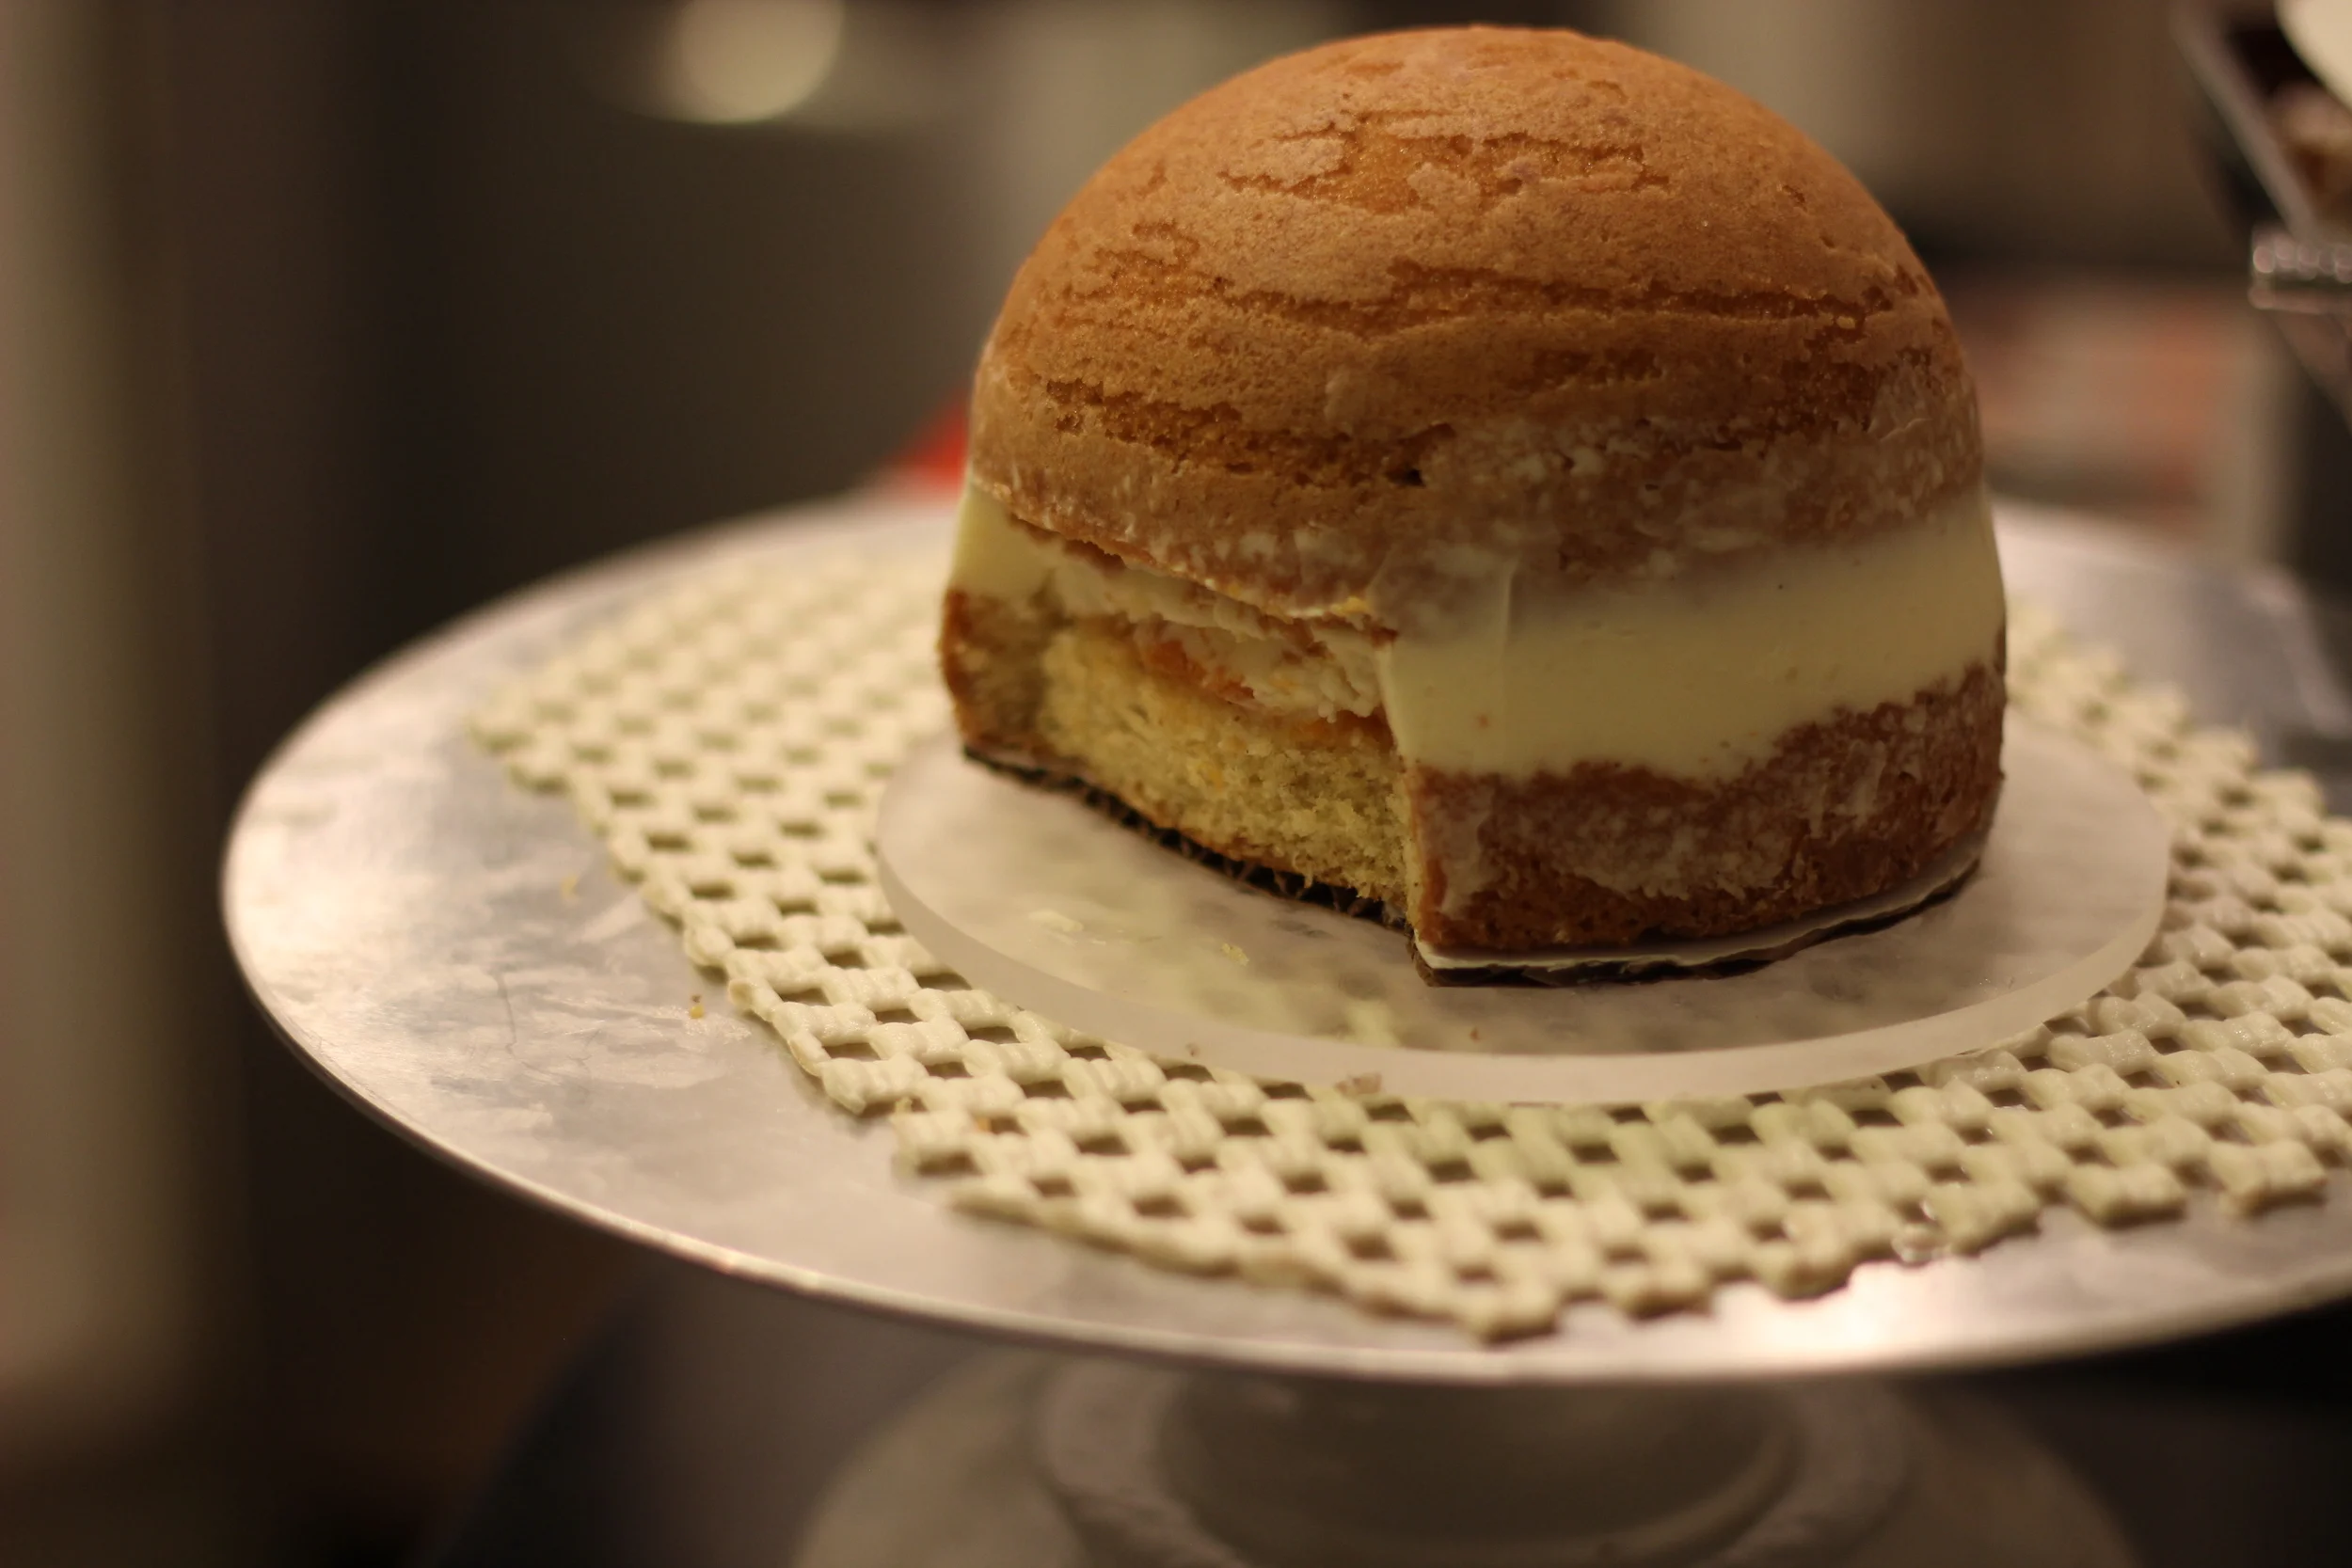
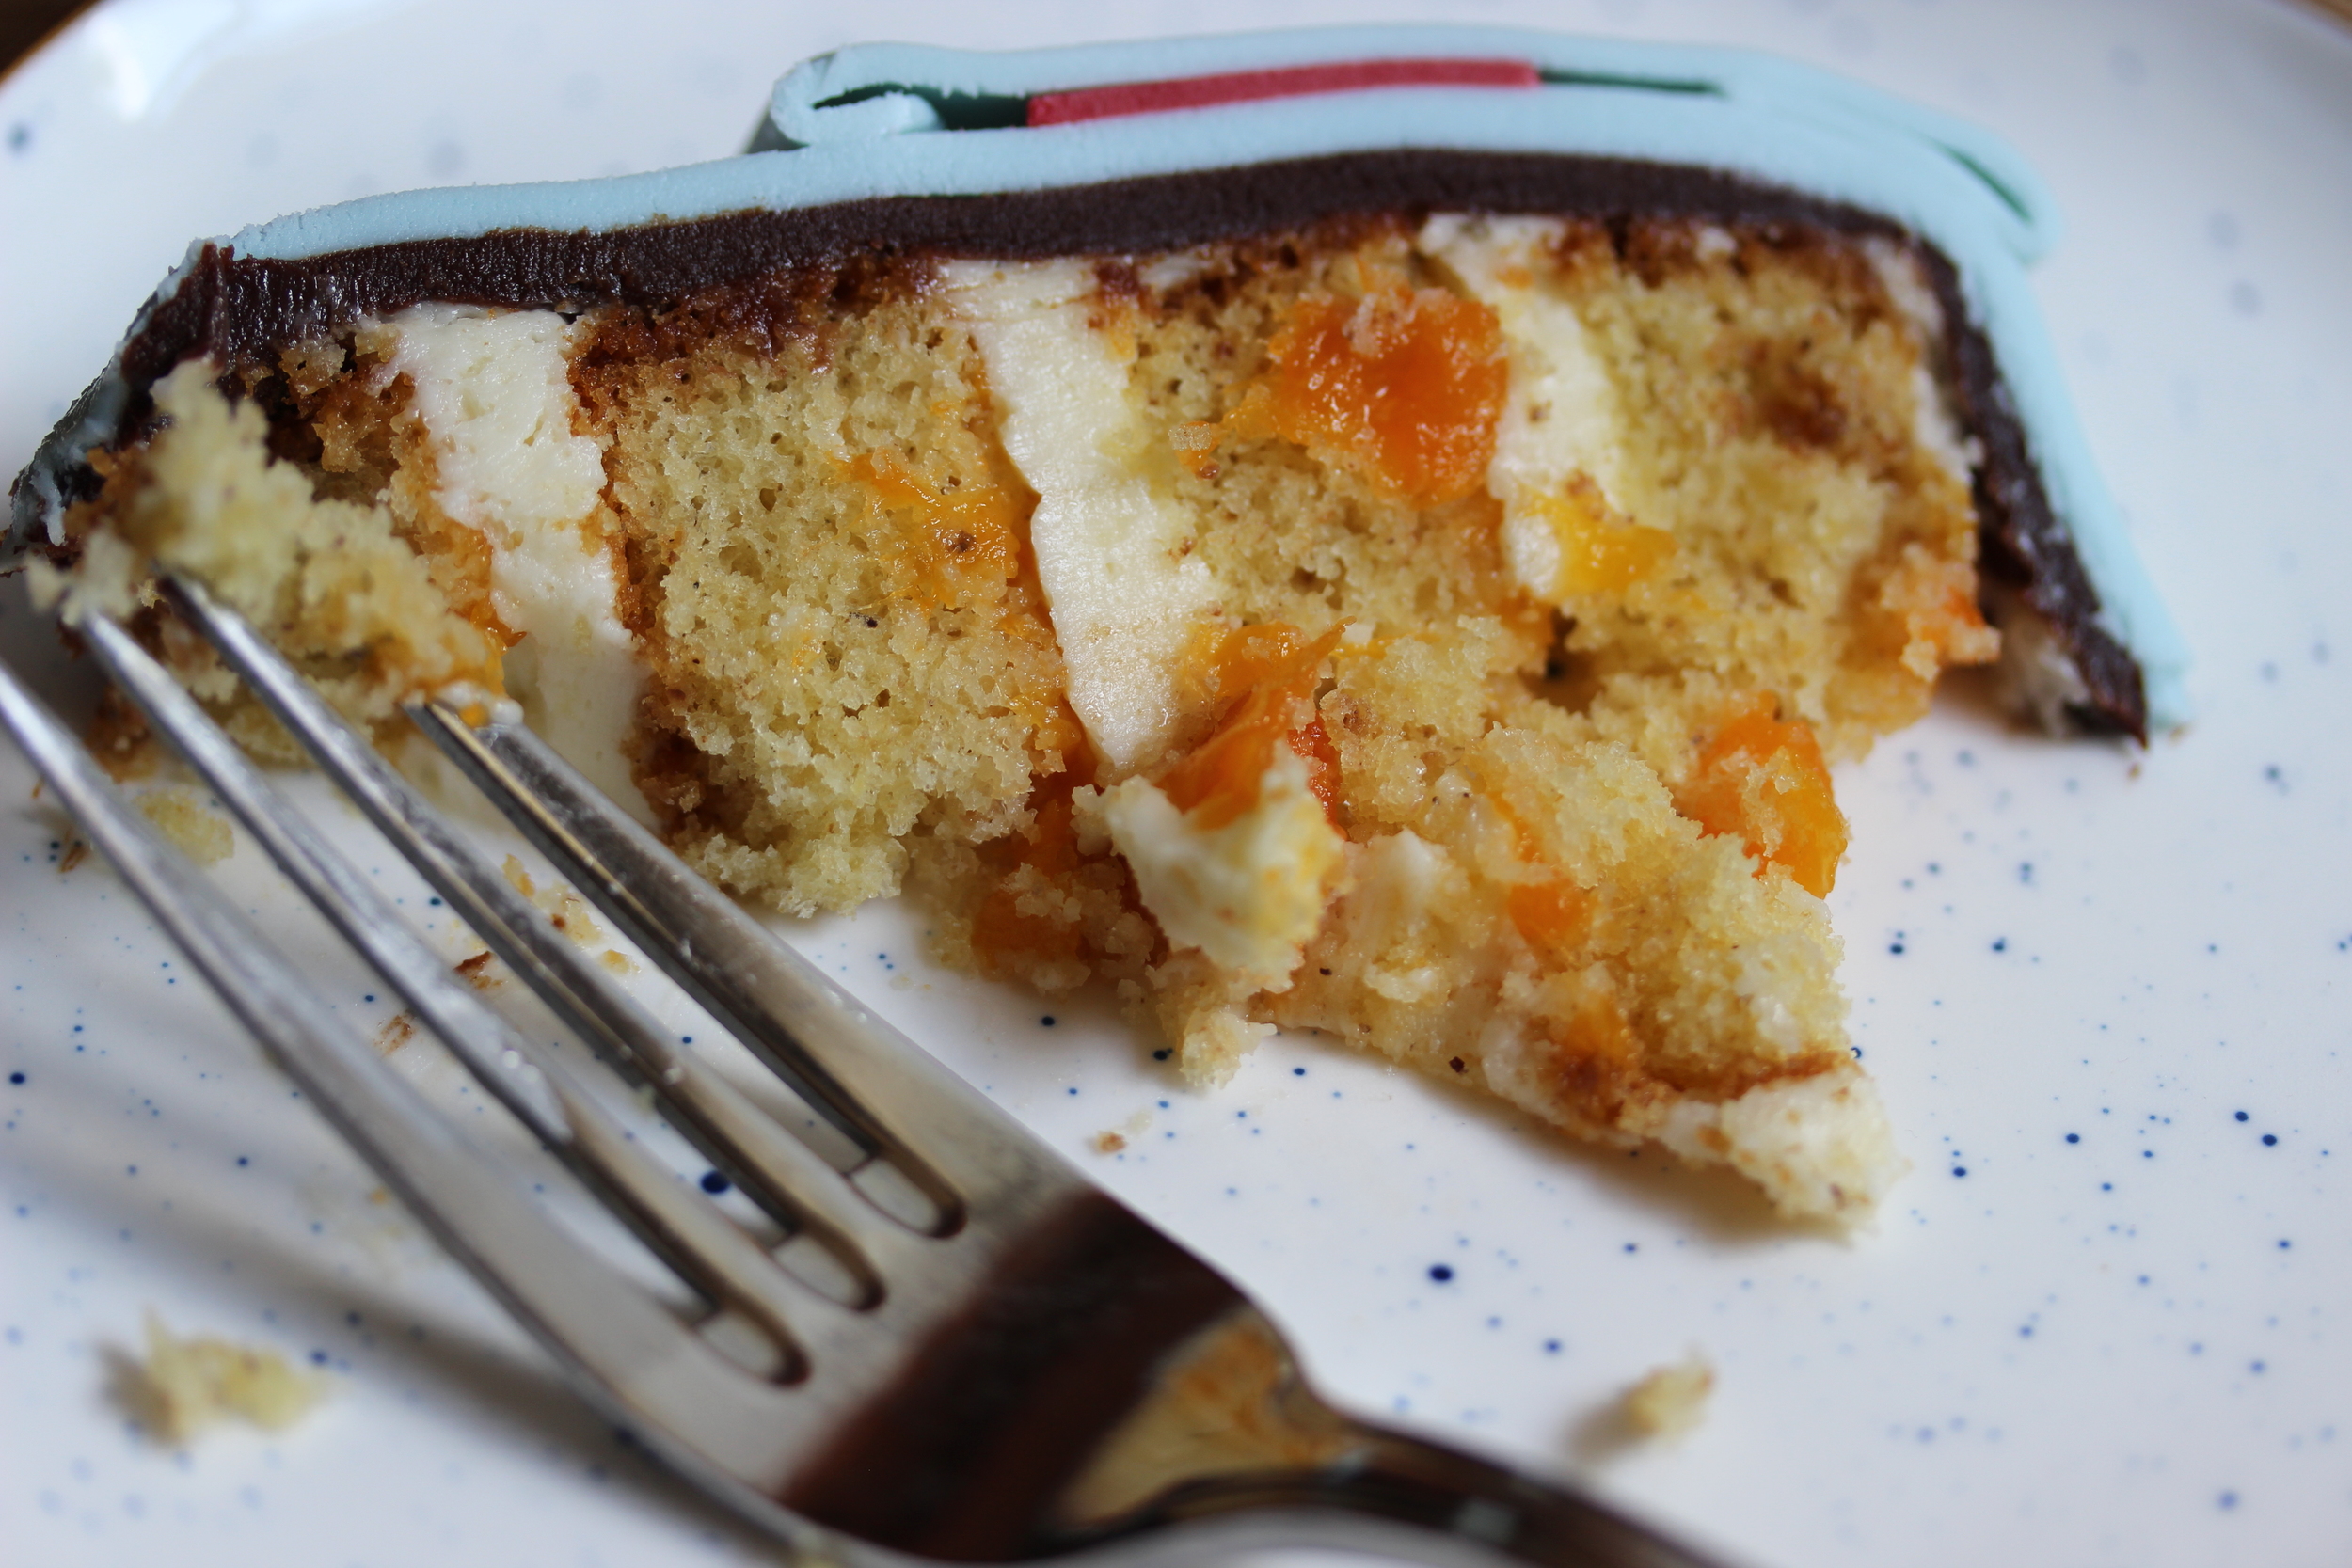
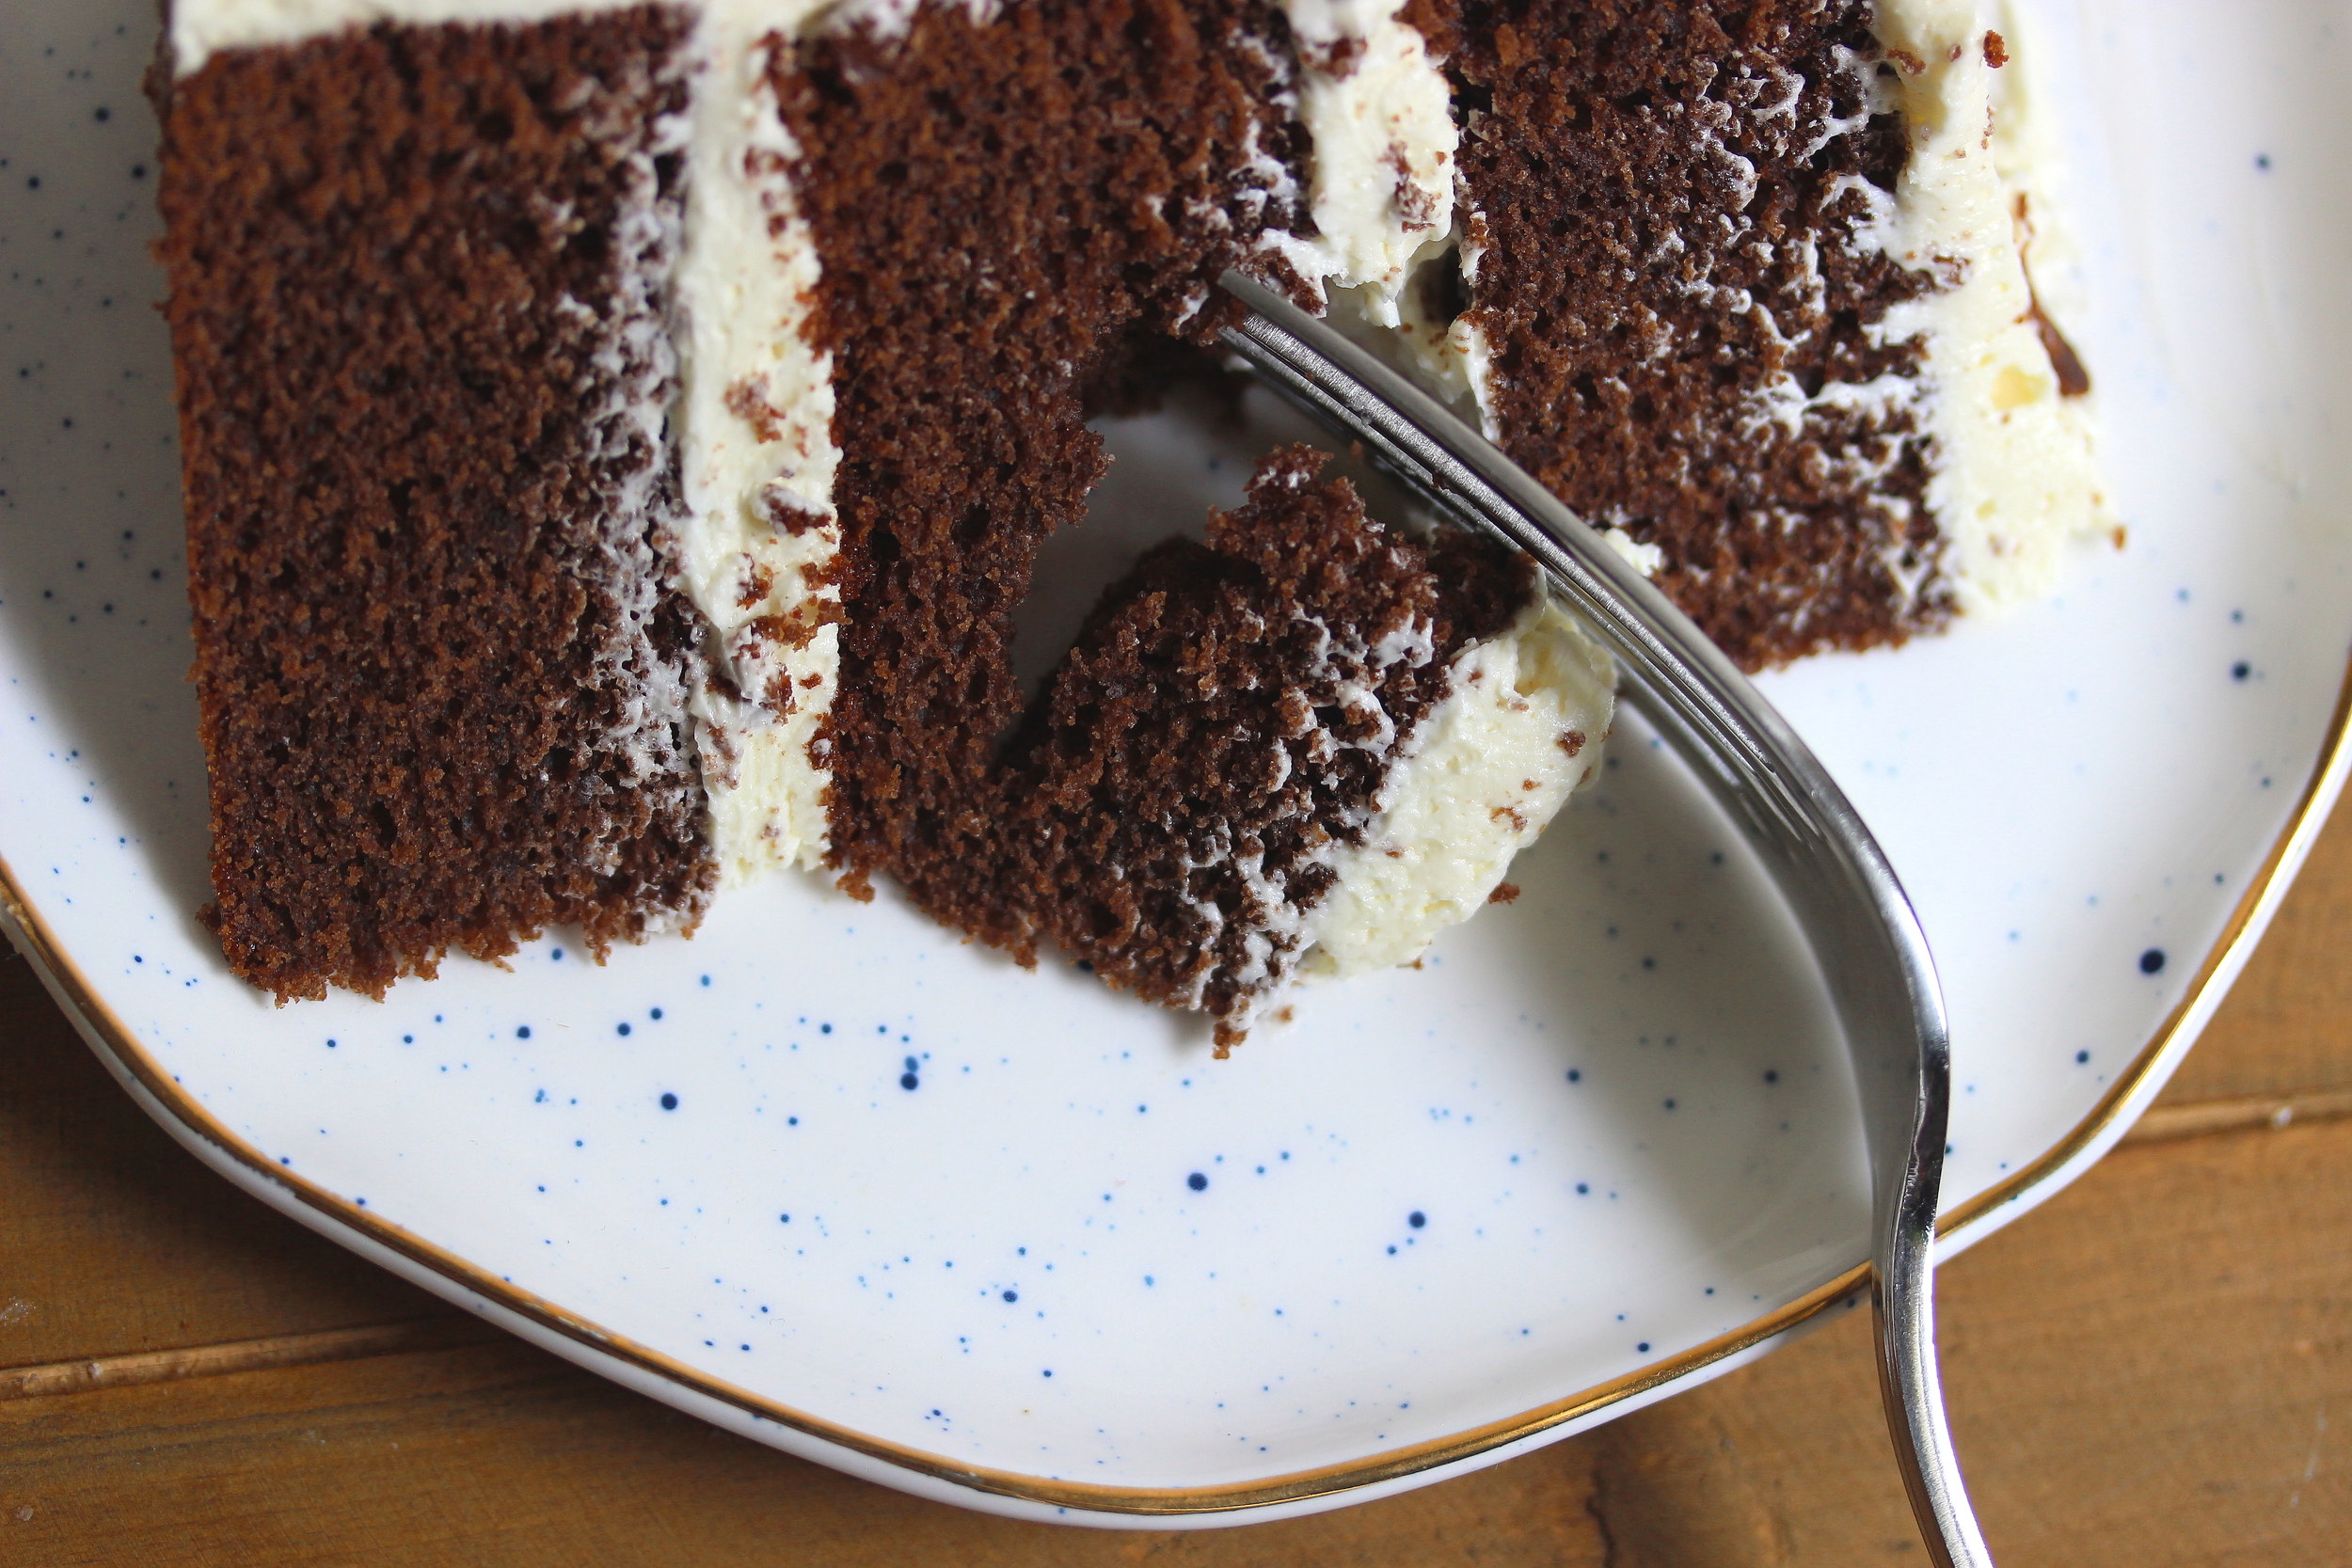
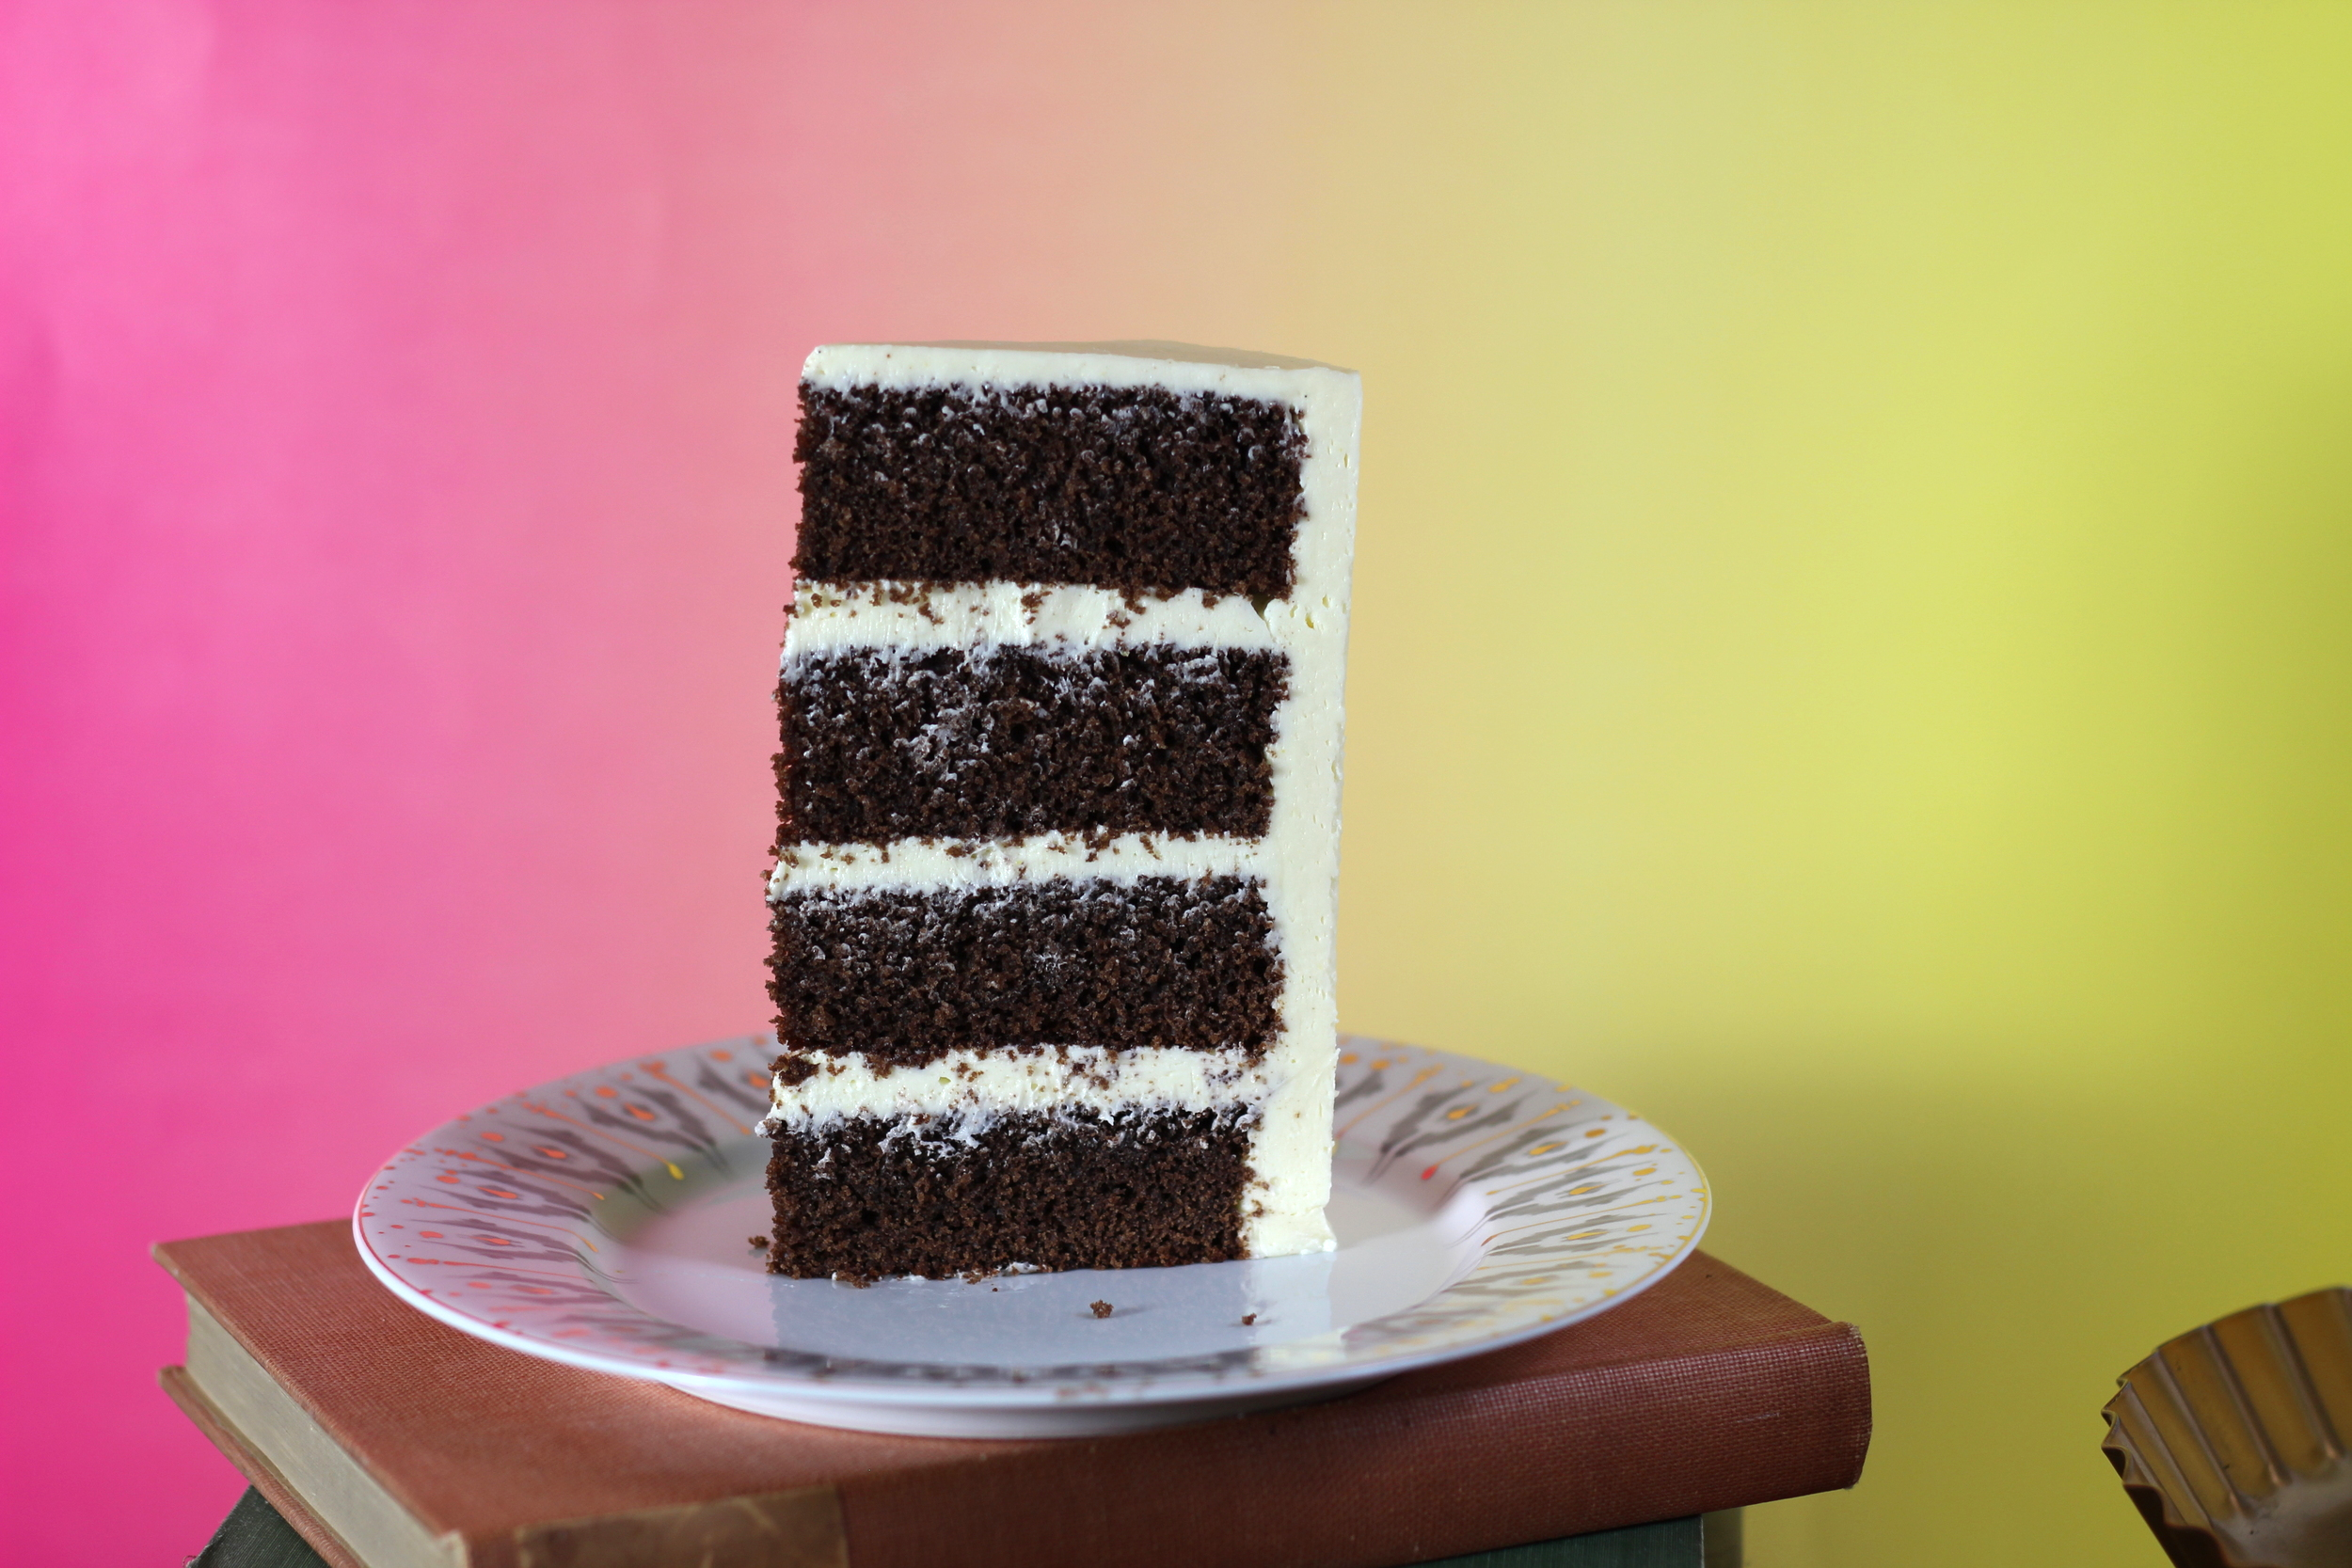
That's right, I said Apple Pie Cake. It's a cake filled with apple pie filling. 

It's not that grody pie-baked-inside-cake monstrosity trotted out this time of year as a testament to America's top rank in Stuffership. This is a lovely, custardy cake with a layer of apples baked in the exact way I bake them for pie. It's the best of both worlds, and the caramel sauce is just the...caramel sauce on the cake.

Obviously you should serve this warm.

This is, so far, the easiest cake recipe I have posted this year. And you don't even need to plug in your mixer--all you'll need is a whisk!

Apple-wise, you can of course sub in your favorite pie apples, but trust me that a combo of Golden Delicious and Granny Smith makes the best pie filling on the planet--the Grannies provide the flavor and the Goldens offer the perfect baked apple texture (firm yet yielding). You can also use all Grannies if you like a tarter apple flavor but the filling won't be as tender.

Besides a tube pan with removable bottom to ensure the cake and apples are cooked thoroughly, the key piece of equipment here is a mandoline, which will make quick work of your apples and ensure the slices are all uniform. I'm a huge fan of my Benriner, which is has been an absolute all-star in my kitchen for years and can be had for under $30. 

Be sure to use one of these slicing safety gloves (that's what I do) or the little plastic finger guard that comes with the mandolin, because those thick slices of apple move off the blade faster than you might expect, and it's an utterly unnecessary tragedy to sacrifice your fingerprints to a cake.

Now, this caramel sauce is something you're just going to want to have on hand at all times, you know, like you might have mustard or soy sauce or whatever things you consider essential to a refrigerator. It is so, so easy to make and it's so, so good. 

Side note: don't ever listen to a recipe for caramel that asks for brown sugar. You'll end up with molasses goop, not caramel. The only way to make caramel is to caramelize sugar then add some butter/cream to it. Same goes for sweetened condensed milk...I will never understand the reasoning behind "caramel" recipes that ask for it. I just feel like it just doesn't get any sweeter than sugar, so the addition of sweetened condensed milk is just overkill.

real recognize real

real recognize real

Watch the caramel vigilantly--the difference between perfectly caramelized sugar and burnt sugar is just a few seconds. It's ok to err on the side of lighter caramel if you're afraid of burning it, but the more you push your caramel to the edge of burning, the better flavor you'll have. The addition of a squidge of lemon juice in caramel? That's what the french lady did at the candy shop where I used to work, and I feel it's safe to assume whatever french ladies do to their caramel is deeply correct. 


APPLE PIE CAKE WITH SALTED CARAMEL SAUCE

4 medium apples, peeled, cored, and sliced into 1/4 inch slices (2 Granny Smith & 2 Golden Delicious)

2 Tbsp (25 g) packed brown sugar

1/2 tsp ground cinnamon

1/8 tsp ground nutmeg

1 tsp freshly squeezed lemon juice

1 c (130 g) all-purpose flour

1 1/4 tsp (5 g) aluminum-free baking powder

3 large eggs, room temperature

1 large yolk, room temperature

2 Tbsp milk

1 tsp white vinegar

1/2 tsp salt

1 1/4 c (260 g) sugar

1 tsp vanilla extract

12 Tbsp unsalted butter, melted and cooled

for the salted caramel sauce:

1 c (200 g) sugar

1/2 c heavy cream

6 Tbsp unsalted butter, cut up

1 tsp salt

1/2 tsp freshly squeezed lemon juice


Preheat oven to 350 degrees F.

Peel, core, and quarter apples, then slice on mandolin into 1/4" slices. Toss slices with brown sugar, lemon juice, cinnamon and nutmeg, and set aside.

Whisk flour and baking powder together thoroughly and set aside.

Grease and flour tube pan with removable bottom, or use baking spray. Whisk eggs, yolk, milk, vinegar, and salt until pale and slightly frothy. Add sugar and vanilla, and whisk. Add half of the flour mixture and whisk until smooth, then half the melted butter, then the remaining half of the flour and then the melted butter, whisking thoroughly between additions. 

Pour 1/3 of the batter into the pan. Place all of the apple slices horizontally onto the bottom layer of batter, stacking tightly and evenly around the pan. Top the apples with the remaining batter, smooth top. Bake for 40-50 minutes until golden brown and the cake center springs back when pressed.

Prepare the caramel sauce while the cake is baking. Melt the sugar in a medium saucepan, swirling occasionally to prevent burning. As soon as the sugar is melted, watch for the caramel to turn a rich, dark amber color and begin to smoke slightly. Add butter cubes immediately and mix. Once the butter is fully incorporated, drizzle in the cream slowly and mix. Allow the caramel to bubble and rise for about one minute. Remove from heat, stir in lemon juice and salt, and transfer to a heatproof bowl. Cover tightly once cooled and store in the fridge for up to two weeks.

And then, you know what to do.

Vanilla Rye Cake with Ermine Buttercream by Molly Brodak

This is a special cake.

I know, I know, I always say that about my cakes. But I really mean it this time. You have never tasted a cake quite like this before.

In fact, my photo shoot with the finished cake kept getting interrupted as I stole away to snack on this beaut. And I can tell you, that does not usually happen--usually I am sick of the cake I'm working on by the time I'm done with it. But this one I could not stop tasting.

The taste of rye balances so well with the intense vanilla flavor in the recipe for a really captivating and homey--yet elegant dessert.

You have to make this cake.

gah

gah

Yes you're going to need to get yourself some rye flour. I tested this recipe with both dark and light rye flour, and found the flavor difference negligible. The texture difference, on the other hand, was dramatic--the dark rye flour had an unpleasant whole-grain chunkiness that I could not abide in my cake.

The good news is that light rye flour is easier to find anyway--I picked up mine at my local farmer's market (just called "whole rye flour"). Rye, turns out, is a lovely flour for cakes with its low gluten and more of the complex sugars called pentosans, which allow the cake to absorb more liquid (hence the extra dairy and oil in this cake)--making it super moist. These sugars also break apart easily when disturbed so your crumb will be very fine and short, and you will notice how little resistance the cake gives you when you cut it.

What to do with your extra rye flour? I've heard, although I have not tried it, that rye flour works well as dry shampoo. Worth a shot?

I've learned a lot about rye since I started working on this recipe. The main illusion of which I was disabused during this process was related to flavor. What I thought was "rye bread flavor" didn't come from rye flour at all, but from caraway seeds. 

Caraway seeds are tough little bastards. MINUTES of whizzing around my mini food processor could not reduce these buggers to dust. I resorted to my mortar and pestle, which worked pretty well, although they resisted me as much as they could. Or, you know, just buy ground caraway seeds.

Oh I haven't even gotten to the ermine yet. Richer and creamier in mouthfeel than Swiss Meringue Buttercream but just as silky, and even easier. It's not too different from the custard buttercream a few posts back, but rather than a custard we have more of a pudding--no eggs. Ermine has a long history in American sweetcraft--it was the original frosting used for red velvet cakes. If you have a handle on making roux, you'll have no trouble with this. Just whisk, whisk, whisk, as you add the cream/milk so you won't have lumps.

roux goo

roux goo

It has a rich, fully body so it is perfect under fondant and pipes beautifully. It also tastes WONDERFUL. Seriously. If you've never had ermine, you owe it to yourself to try it. You might never go back.

it frosts up so smooth! 

it frosts up so smooth! 

Ermine Buttercream

4 Tbsp. flour

1/4 c. milk

3/4 c. heavy cream

1/2 c. granulated sugar

1 Tbsp. vanilla extract

1/4 tsp. salt

2 c. unsalted butter, room temperature

3/4 c. powdered sugar, or to taste

Combine milk and cream. Place flour and 1/3 c. of the milk/cream mixture in a small saucepan. Whisk constantly over low heat until mixture thickens. Add remaining liquid and sugar, boil over low heat for about 2 minutes until mixture is thick as paste and bubbling. Transfer to a small bowl and refrigerate until cool. Whip butter, salt, vanilla, and powdered sugar until light and fluffy. Add the cool pudding in small batches and whip until smooth and combined.  

If you don't like frosting because it's too sweet, or because you just don't like a mouthful of butter, try this buttercream--it is a revelation.

I highly recommend trimming this cake since the rye flour makes an especially tough/dark "rind"

I highly recommend trimming this cake since the rye flour makes an especially tough/dark "rind"

I finished this cake with hand painted fondant design that was inspired by this transitional time between summer and fall. A few touches of gold, a little fondant ribbon, and my heart is all aswole.


Vanilla Rye Cake

3/4 c. (88 g.) cake flour (White Lily)

1 c. (105 g.) light rye flour

1 3/4 tsp. (6 g.) aluminum-free baking powder

4 Tbsp. butter, softened

1 1/2 c. (310 g.) sugar

1 1/2 tsp. caraway seeds, ground finely

1/3 c. canola or vegetable oil

2 Tbsp. vanilla extract or one vanilla bean, scraped

3 yolks

2 eggs

1/2 tsp. salt

1/3 c. buttermilk

1/2 c. heavy whipping cream

Preheat oven to 350 degrees F.

Whisk flours and baking powder together thoroughly and set aside. Whip heavy cream to stiff peaks and set aside in the refrigerator. Whip butter, caraway seeds, and sugar until light and fluffy, then add oil, vanilla extract or vanilla beans, and salt and whip until combined. Add yolks, then eggs, one at a time, and beat until uniform and fluffy. Add buttermilk and mix until incorporated. Sprinkle in 1/3 of the dry ingredients and mix until combined, then add the rest and mix until just combined. Fold in whipped cream.

Divide batter among two or three greased and floured 8" or 9" pans and tap on the counter to remove large air bubbles. Bake for 30-40 minutes until centers are fully set and spring back when pressed. Allow to cool completely in the pan, then split, fill, and frost.

Honey Pepper Pistachio Brittle by Molly Brodak

Brittle is one of those dusty dinosaurs I pass up in the candy shop. Who wants that overly-sweet and dull filling-puller anymore? Those flavorless untoasted, unsalted peanuts staring at you from their sugar-glass tombs like a thousand sad eyes? Yeah no. It's the bottom of candy mountain.

Maybe it is because we are just starting to dip our toes into nostalgia-inducing autumn that I decided to dust off this codger candy and figure out how to update it a little, maybe even make it delicious.

First off, peanuts are out. Of course I have to admit I have a personal bias against peanuts and peanut butter because I find the entire peanut-flavor-world gross, but also there are just so many much more flavorful and interesting nuts worth employing in candy making. I tested this recipe with hazelnuts, pistachios and pecans and all were fantastic, so feel free to swap in your star nut.

pecans are my other star nut

pecans are my other star nut

I also tested this recipe with more nuts so that it looked like old fashioned peanut brittle, with the candy just serving as a thin mortar holding together a tightly-packed cobblestone street of nuts. But it was too nutty for me; it tasted like someone accidentally got a little sugar syrup into the nut bowl, so I pulled back and made it somewhat more proportionally akin to chocolate bark or toffee with inclusions. But you can definitely increase the nuts here if you want your nutty cobblestone street.

beauts

beauts

So onto the brittle. In order to make this hard candy less tooth-breaking and more, well, brittle, we add baking soda, which presents challenges. Side note--don't ever let anyone tell you that baking soda "adds bubbles" to candy/cake/whatever--it doesn't add any bubbles, just expands the air bubbles already present in any liquid/batter. Without it, our brittle would be as hard as a rock, so really we want a lot of baking soda for a nice light crunch. But baking soda also, you know, tastes like baking soda. Adding too much and you'll get that horribly bitter bite, the unmistakable baking soda error. But don't worry, that's not this--I use a little more baking soda than most recipes, but not so much that you can taste it.

We want an ideal nut, a good crispy texture, and lots of flavor. Most brittle recipes use a proportion of 2:1 white sugar and corn syrup, as the syrup helps stabilize the sugar crystallization. It's necessary, but flavorless--it's a no brainer then to sub honey for corn syrup as it imparts that beautiful, fragrant honey flavor, which is so nice with pistachios.

Butterwise, I noticed a lot of brittle recipes are surprisingly light on this key element--just a couple tablespoons. I doubled the amount so the brittle tastes noticeably buttery instead of just sugary. Pushing the butter envelope too far resulted in heavy, greasy candy, so it seems four tablespoons was the limit.

shoutout to the baking mat company that doesn't know the difference between the words urban and urbane

shoutout to the baking mat company that doesn't know the difference between the words urban and urbane

Pepper adds a savory note and a slight kick that is so welcome in super sweet candy--it's going to seem like a lot of pepper when you're grinding it out but I promise it's right. A pinch of cinnamon is there just to help scaffold that pepper in the flavor profile with some warmth, but feel free to add more if you want a distinct cinnamon flavor. 

grind, stunt, go hard

grind, stunt, go hard

It's buttery, crunchy, amazingly flavorful, andIt's a pretty simple recipe, and yes you will need a candy thermometer (this is mine), but don't be intimidated. The incredibly addictive candy you'll have on your hands makes a perfect movie snack or the ideal gift--great for your gluten-free friends, and can be made vegan by swapping in vegan margarine. If a staunch brittle-hater like me can be converted into the kind of maniac who stashes a ziplock baggie of this stuff on her nightstand, you know it's a new day for this granny candy.

the pecan version is equally delicious

the pecan version is equally delicious

Honey Pepper Pistachio Brittle

Makes about 1 pound of candy

1 1/2 c. (300 g.) sugar

1/4 c. (85 g.) honey

1/4 c. (60 g.) water

4 Tbsp. (60 g.) unsalted butter, cut into cubes

1 tsp. (3 g.) vanilla extract

1 tsp. (5 g.) baking soda

1/4 tsp. (1 g.) ground cinnamon

1/2 tsp. (3 g.) fine sea salt

1/4 tsp. (1 g.) freshly ground black pepper

1 c. (125 g.) roasted and salted pistachios

Spray a baking sheet with nonstick cooking spray or line with a silicone baking mat. Stir together baking soda, cinnamon, salt, and pepper in a small bowl. Place butter and vanilla extract into a small bowl and place both bowls, along with the nuts, next to your stovetop.

In a heavy saucepan, bring water, sugar, and honey to a rolling boil over medium high heat and clip in your thermometer. Stirring occasionally with a silicone spatula, cook to 260 degrees F (hard ball stage) which may take 10 to 15 minutes. Add vanilla and butter, then nuts, stirring to mix thoroughly. 

Cook for another 10 to 15 minutes until mixture reaches 305 degrees F (hard crack stage). Remove from heat and mix in the baking soda mixture, stirring vigorously until the candy expands and foams uniformly. Quickly pour the candy onto the prepared baking sheet and spread lightly with a spatula so the mixture is even--but don't squish it around too much or you will pop all the precious bubbles that make your brittle crunchy. Allow to cool for about an hour and break into bite sized pieces. Be sure to store in an airtight container or the candy will lose its crunch.

all of this was gone in 24 hrs

all of this was gone in 24 hrs

The Pinnacle of Shortbread Mountain by Molly Brodak

I realized recently I have been doing so much cake-work in my sweetcraft practice. Time to get back to basics. The most basic of all basics, shortbread, which is, if executed well, hardly basic. 

Recipes for shortbread should be, well, pretty short--this is a recipe about butter, and if you start mucking things up with bips and babs (chocolate, lavender, caramel, etc) you're not really doing shortbread. Shortbread's purpose begins and ends with chauffeuring butter to your palate.

I wanted to create a shortbread recipe that would ensure the most toasty, buttery flavor possible while maintaining an exceptionally tender texture, not overly sandy, dull, or pasty. (Almost) as always, a little bit of extra work makes a dessert that is enormously more extraordinary. We've got three different sugars, two different butters, two different flours, a resting period, and a bit of egg yolk coming down the line--still, it's a very easy recipe.

Let's start with butter, as we should. It makes sense to want to reach for a really expensive, European high-fat/cultured butter for a recipe like this. And, indeed, we will. But as most bakers will tell you, you can't always swap in your Plugra for your standard American butter. It has a slightly higher fat content, less water, and is often cultured (making it slightly acidic), all of which affects recipes substantially. Rest assured this recipe is adjusted for Euro-butter factors.

We're also going to to use browned butter for half of the total butter requirements. All-browned butter in a shortbread recipe would create a butter a little too solid, since so much more water is evaporated from browning the butter, little is left to create steam/rise in the dough. But we really, really want those little flavor bits that browned butter imparts, so a balance must be struck.

look at those precious chunks of browned milk solids!

look at those precious chunks of browned milk solids!

With our higher-fat Euro butter in play, we need to make some adjustments to the flour. Cake flour has the ability to absorb more liquids than all-purpose flour, but using all cake flour can leave you with a chalky shortbread. All purpose with a small portion of cake flour gives us the right texture and prevents the shortbread from becoming greasy due to the extra fat. Definitely use your scale here; in one test batch I added just half an ounce more flour and the resulting shortbread was too dry.

Often a little bit of starch is also added to the dough in order to help soak up some of that fat, and give the shortbread a silky tenderness. This is where our mix of sugars comes in. White sugar melts fast and will create the right structure for the starches and proteins, powdered sugar adds a silkiness thanks to the cornstarch, and brown sugar just for that light molasses-y flavor.

All that's left, ingredient wise, is some egg yolk. Purists would balk at adding egg to shortbread, but purists would also be too busy choking on a mouthful of their powdery sand cakes that explode into dust upon biting into them to admit that the old fashioned recipe for shortbread needs a little more structure, a little more protein in order to make it flaky and tender instead of a dust bomb. Just half an egg yolk; a full yolk would prevent shortbread from being "short" enough (refers to the extremely fine/melting crumb). Trust me, you'll see.

I also knew that, as with many other cookie recipes, letting the dough rest would result in a more flavorful shortbread. Unrested, you are baking flour particles next to butter particles in your dough, which is fine. But rested, you are baking butter-soaked flour particles, which is great. I tested the recipe at three stages--unrested, rested for two hours, and rested overnight. Guess which one tasted best.

The unrested dough tasted mostly like flour. Both rested doughs tasted fantastically buttery and complex. Texture-wise, they weren't that different; the unrested dough was slightly chalkier.

The good news is that the batch rested for two hours tasted pretty great, almost as great as the 24-hr shortbread, so if you are in a hurry you'll still come out ahead with just a little resting.

they don't look very different, but they sure tasted different

they don't look very different, but they sure tasted different

Thick shortbread is better than thin shortbread if you want a truly tender bite instead of just a crisp one. Double baking the shortbread a la biscotti will give you the most beautifully browned and crisp exterior; I highly recommend it. I also recommend removing the center of your shortbread if using a round tart pan since the center will never really get cooked, and those pointed edges of each wedge will always break anyway (see my set up above; I use a metal biscuit cutter as a center stay). A rectangular pan also works great here, just make sure you are using a pan with a removable bottom as the shortbread is really delicate.

The Best Shortbread Ever

makes 12-14 wedges 

8 Tbsp (4 oz) salted cultured European-style butter, soft but cool (Plugra, Lurpak, etc)

8 Tbsp (4 oz) browned butter, cooled to semi-solid

1/4 c. (1.75 oz) packed light brown sugar

2 Tbsp (0.9 oz) sugar

2 Tbsp (0.5 oz) powdered sugar

1/2 large egg yolk

2 tsp vanilla extract or scraped vanilla bean

1/4 tsp salt

2 c. (9.5 oz) all-purpose flour

1/4 c. (1 oz) cake flour (I use White Lily)

1 Tbsp Demerara or sanding sugar for sprinkling

With a hand mixer, beat softened butters, sugars, salt, 1/2 egg yolk, and vanilla extract/beans until just combined and smooth, about 2 minutes (stop before mixture begins to fluff up). Add flours and beat just until dough comes together; do not over mix.

Press dough into a 8" tart pan or cheesecake pan with removable bottom and pat the top with wet fingers to smooth. Dock the dough with a fork and sprinkle demerara sugar on top. Cover and allow to rest in the fridge for at least 2 hours, preferably overnight.

Bake in an oven preheated to 275 degrees for 45 minutes. Remove from the oven and turn the heat up to 375. Allow shortbread to cool in the pan for 20 minutes, then cut into wedges and transfer carefully to a baking sheet lined with parchment paper and bake for an additional 15 minutes until toasted to a golden brown. Allow to cool completely before storing in an air-tight container.

possibly the most addictive thing on the planet

possibly the most addictive thing on the planet

Hazelnut Apricot Kokeshi Doll Cake by Molly Brodak

Hazelnuts are the diamonds of the nut world. My beloved pecans come in at a close second for baking purposes, but no other nut can touch the level of flavor that hazelnuts provide. They hold their own against the powerful flavor of chocolate, as any nutella lover knows, and have the brightest, sweetest, almost fruitiest flavor of any nut. 

This hazelnut cake, y'all, I have to admit--it's absolutely my favorite cake at the moment. It's secret? Three words for you: double-toasted hazelnut butter.

smells like angels

smells like angels

I was experimenting with hazelnuts for days before making this cake. I tried toasting them at different temps--high and fast, then low and slow--but the difference was minimal. I tried grinding them finer then coarser and adding the differently-sized chunks to the cake batter--the flavor was basically the same. I tried pan-frying them in butter, dry roasting, brining, candying--everything I could think of. But only one move gave me the intense flavor I was looking for, and it was so simple. 

I ground the lightly toasted hazelnuts in a food processor until a butter/paste formed, then spread that hazelnut butter onto a bit of foil and popped it in the toaster oven to toast again. The toasted hazelnut butter was otherworldly. Hazelnut butter is great on its own, but still had that dull raw nut flavor I dislike so much. This stuff was exactly what I was looking for--sweet, toasty, insanely flavorful--like someone had turned the hazelnut dial up to 11.

I added it to the cake batter, then paired the resulting hazelnut cake with an easy apricot compote. And honestly, I think you can just stop right there. The buttercream and ganache and fondant were necessary here to build the cake I wanted to make, but flavor-wise the hazelnut and apricot were perfect together. Although a very old-fashioned staple of Continental patisserie, apricots really have an almost tropical flavor, with more acid than the other stone fruits and the kind of brightness that works so perfectly with heavy, dark flavors. 

With a hearty amount of double-toasted hazelnut butter, I knew this cake would have plenty of structure going for it, so I wasn't going to need the butter portion of my usual butter-oil ratio that keeps my cakes both stable and moist. But I really wanted a toasty, buttery flavor here--clarified butter was the obvious solution.

Ridding our butter of those pesky milk solids and the water leaves us with pure butterfat, which will function as the perfect oil in our cake and add a buttery, toasty flavor.

Of course you can buy clarified butter, or ghee, to cut down your prep time, but homemade is better here since you can keep your butter cooking until the solids are cooked very dark, almost burnt, and the clarified butter will have that fantastically nutty browned-butter flavor to add even more depth to this cake. I highly recommend making a large batch of clarified butter and saving the remainder in the fridge for other purposes since it is such a flavorful and versatile cooking oil.

Since I was in middle school I have loved kokeshi, traditional wooden dolls carved from a single block of wood found primarily in Northern Japan with a legacy that dates back to the Edo period.  I love their simplicity and tranquility. Other than carving the head and a little handpainting on the fondant, I knew this shape would be a pretty simple but interesting design for even a beginner to pull off.

I think it would make a fantastic birthday cake for a girl. Next time I'm going to try an even more minimal approach, keeping it all wood-grain toned with just a few accents of paint as the older style kokeshi are made.

the head was supported by a cardboard round cut to shape, and a bubble-tea straw through the body kept the head in place

the head was supported by a cardboard round cut to shape, and a bubble-tea straw through the body kept the head in place

head awaiting fondant

head awaiting fondant

I used a 5" Fat Daddio's half-sphere pan and a stack of 6" rounds for the body, and buttercreamed and ganached it all together and handpainted a pine needle motif on her kimono. 

awaiting paint. Her hair was shined up with a coat of confectioner's glaze.

awaiting paint. Her hair was shined up with a coat of confectioner's glaze.

such a sweet face! literally!

such a sweet face! literally!

Hazelnut Apricot Cake

makes two 8" layers

4 ripe fresh apricots, peeled and diced finely

1 Tbsp. sugar

7.1 oz. cake flour (I use White Lily)

8 g. (about 2 tsp) aluminum-free baking powder

1/2 c. heavy cream

10.5 oz. (about 1.5 c.) granulated sugar

1/3 c. water

1/2 c. (4 oz) clarified butter

1/2 tsp. salt

1 tsp. vanilla extract

3 yolks, room temp

2 eggs, room temp

1 c. toasted and peeled hazelnuts (try to remove all of the skins, as the skins will add bitterness to your hazelnut butter)

Preheat oven to 350 degrees and prepare pans by greasing and flouring them. With a hand mixer, mix the flour and baking powder thoroughly in a small bowl until no lumps remain. Rinse beaters and use to whip cream in a cold bowl to firm peaks. Place whipped cream in the fridge. 

Prepare apricot compote by placing finely-chopped apricots into a small saucepan with 1 tablespoon of sugar. Cook over low heat for about 15 minutes or until rendered down to half volume and mixture is thick and gelled. Allow to cool in the fridge.

Place hazelnuts in a food processor and grind until a paste forms (1 cup of hazelnuts will reduce down to about 1/2 cup of hazelnut butter). Continue grinding until mostly smooth. Spread hazelnut butter onto a piece of foil, and place into toaster oven (or under the broiler in a regular oven, but a toaster oven works really well for this purpose). Toast until golden brown, stirring and flipping the chunks of hazelnut butter around to evenly toast and prevent burning. Set aside to cool.

In a saucepan, heat sugar and water over medium heat until most of the sugar is dissolved. Stir frequently or use your hand mixer to speed up the process (be careful that the cord is kept away from the burner). Do not allow mix to boil. Once the sugar is mostly dissolved, pour into a large bowl and add clarified butter, salt, and vanilla, mixing until smooth.  Sprinkle 1/3 of the flour mix into the wet ingredients and mix well on low, then gradually add the rest but do not overbeat. Set mixer aside and grab a spatula and whisk. At this point, the mixture should be warm but not too hot to touch--If your sugar mixture is still very hot, allow it to cool--you don't want to cook your eggs.

Add the yolks next, one at a time, mixing in by hand with whisk, then the eggs. Mix in the hazelnut butter for just a few seconds with your mixer. Then gently fold whip cream into the mixture with a spatula until completely combined. Pour into prepared pans and tap them hard several times on the counter to release large air bubbles. Bake anywhere from 20--40 minutes depending on your pan sizes and depth. Cakes are done when their centers spring back, they no longer jiggle when moved, and the edges just begin to pull away from the sides. I don't recommend poking anything into your cakes to test doneness--just a quick press with your finger in the center will tell you all you need to know. Cool, level, and split cakes if desired. Spread cooled cakes with apricot compote and frost if desired with buttercream, ganache, or both.

Peach Buttermilk Cake by Molly Brodak

This terrible thing happened to my tree, which is where our story starts. My spindly but well-loved peach tree.

I planted this peach tree in our front yard myself. I nurtured it, fed it, checked on its growth and progress obsessively. I documented its budding, flowering, and fruiting. I selectively pruned away 60% of the green peaches to make sure the remaining fruit would be large and flavorful. I monitored their progress for months. 

Phone photos evidence my mania.

Then, I found one underdeveloped little peach on the lawn, half-gnawed. I was enraged. Little nibbly bites meant squirrels.

I festooned the tree with yards and yards of bird netting and secured it. Just for good measure, I sprayed all of the now-protected peaches with hot pepper spray which is supposed to burn the devil out of any little sneaky rodent mouths.

I checked on my peaches almost every day

I checked on my peaches almost every day

The peaches kept disappearing. One morning, I found only three remained. More netting, more spray, and yes--I resorted to watching from the porch. 

Soon the netting stakes were uprooted and every last peach was gone. Every. Single. Peach. Eaten by squirrels.

I admit it--I cried. I had been delightfully counting my proverbial chickens before they proverbially hatched, planning all the wonderful things I would make with those peaches. I started to plan my defenses for next year, which, I assure you, will be no mere cosmetic application of nets and staking. I'm going to build a goddamn fortress around this tree. And I will have homegrown Georgia peaches--next year.

Fortunately for me, LOTS of good people in Georgia grow fantastic peaches mere miles from my doorstep, so acquiring local peaches was no epic task.

Thank you Pearson Farm

Thank you Pearson Farm

This is one of the things I would have made with my peaches. Turns out, peaches from just down the road are just as tasty in this buttermilk cake.

Although many cake recipes use a touch of buttermilk as a tenderizer, this cake has a wonderfully pronounced buttermilk flavor because it simply has more. It tastes so buttermilky it reminds me of biscuits! So it pairs well with the sweet and fragrant flavor of fresh peaches. Often I will cook down a fruit I plan to incorporate into a cake batter (like strawberries, for example) to remove some of the water from the fruit and intensify its flavor, but I knew cooking these peaches would have destroyed their fresh taste and was also unnecessary, since they are already very intensely flavorful. 

There is a lot of liquid in this cake, so a 50/50 mix of cake flour (I always use White Lily) and all-purpose flour will help keep the cake's structure intact. I recommend cooking this cake fully and allowing it to cool completely in the pan, as it is a delicate cake and can't take rough or rushed handling. A small amount of cornstarch in the batter helps to keep inclusions (like peach chunks) from sinking to the bottom of the pan while the cakes rise. Still, some will fall to the bottom--if you chop your peaches finely there is less of a chance they will all settle downward.

I frosted this cake with my version of 7-minute, or cooked flour, buttercream (post on this soon) and outfitted her in dusty blue fondant and an ombre swath of pink gumpaste spray roses. It's funny...I'm not a huge fan of roses, but somehow when they are made very small I suddenly love them. I guess it is a cuteness thing. The wafer paper leaves add light and transparency to the arrangement, although I'm still woking on a good system for getting the wires to stick to the leaves--it's much more annoying than gumpaste leaves!

Peach Buttermilk Cake

6 oz. all-purpose flour

6 oz. cake flour (White Lily)

1 Tbsp. corn starch

2 1/2 tsp. baking powder

1/4 tsp. baking soda

12 Tbsp. butter, softened

12 oz. sugar

1/3 c. vegetable oil

1 tsp. salt

1 Tbsp. vanilla extract

4 eggs, room temperature

1 1/2 c. buttermilk

2 c. finely diced fresh peaches (about 3)

Preheat oven to 350 degrees F.

Mix or whisk dry ingredients thoroughly and set aside. Whip butter and sugar until light and fluffy, then add oil, vanilla extract, and salt and whip until combined. Add eggs, one at a time, and beat until uniform and fluffy. Sprinkle in 1/3 of the dry ingredients and mix until combined, then add the rest and mix until just combined. Mix in buttermilk until smooth. Fold in peaches.

Divide batter among two or three greased and floured 8" or 9" pans and gently smooth tops--do not tap pans to remove air bubbles. Bake for 30-40 minutes until centers are fully set and spring back when pressed--undercooking will result in a gummy texture. Allow to cool completely in the pan, then split, fill, and frost.

I dare you to come get this one, squirrel jerks

I dare you to come get this one, squirrel jerks


Perfect Chocolate Cake by Molly Brodak

Let me just get this out of the way right off the bat: I don't really like chocolate cake. It's always just a little wrong somehow--too dry, not chocolately enough (just, you know, chocolate-colored), too rich, too sweet, too something.

I needed to make my peace with chocolate cake.

There are so many kinds of chocolate cake out there. Americans prefer a sweet, soft, light cake--like the box mix. In fact, box mix seems to be the standard to which all homemade cakes are measured, strangely. It's a texture thing. American cakes have to be light and moist, which is tough for butter-happy homebakers (butter is a huge factor in why homemade cakes are often dry--more on this later).

Australian chocolate cake is mud cake--dense, rich, almost brownie-like to us. And in Europe, most chocolate cake is either a flourless torte or it's dry as a hard sponge--and why it's often soaked in liquor syrup or simply meant to be dunked in tea. There's a place for all of it.

I had a very specific set of criteria for the perfect chocolate cake: it has to be very flavorful, first of all, and it has to be moist but not dense. It has to have a fine, velvety crumb, with a soft but sturdy texture so it can be stacked, carved, and covered in heavy ganache and fondant. Most American chocolate cake recipes are great for cupcakes or sheetcake that does not get torted and carved--it has an open and squiggly crumb that is deliciously soft but terrible for tall, stacked cakes.

I normally trim my cakes but I didn't need to with this one

I normally trim my cakes but I didn't need to with this one

We're going to need cake flour for softness, a bit of sour cream, both cocoa powder and melted chocolate for the best flavor, and mostly oil instead of butter. Butter, while I love it to death, has a higher water content than oil (obviously) and also has those pesky solids--the whey--that harden the cake's sugar-fat-flour bonds. A thousand recipes later, balance was finally achieved.

The recipe starts with the melted-sugar method of which I am such a fan, and to the hot sugar the chocolate is added, so no extra melting step is required, conveniently. I decided to add the sour cream to the whipped cream that gets folded in and the end and it helped to keep the cake light and flavor-balanced.

This is not how most people make cake

This is not how most people make cake

The recipe is dairy and egg heavy, so swapping in some gluten-free flour is going to work just fine, but a non-dairy, egg-less version I believe would not be possible. You also have a good bit of sugar here, so make sure you are using unsweetened chocolate and not semi-sweet as a substitute. The espresso powder is optional but definitely boosts flavor, and I promise does not impart a coffee taste. 

the most velvety, moist crumb EVER

the most velvety, moist crumb EVER

Just to be sure I'd found tough-yet-tender perfection, I made an extra tall cake with custard buttercream and wrapped it in a heavy and dramatic molded fondant design.

Look at this piece! I made a silicone mold of a vintage wooden architectural detail I'd found in my mold-making madness that I knew would be absolutely killer on a cake. Typically fondant molds are little, fussy affairs, made from jewelry findings and meant to be arranged judiciously as appliques. This mold, on the other hand, makes the cake in one fell swoop.

I die

I die

This recipe makes a LOT of cake--about 9 cups of batter, so feel free to halve it if you are only making a small cake. It will fit four 9" pans generously, or--as I have done here with this cake--two 3" deep 6" pans and two regular 4" pans. I can't recommend enough to get yourself some deep cake pans rather than the standard piddly shallow ones. You'll save space in your oven, since more layers can come out of one pan, and they help prevent overcooking/dry cakes. Using a flower nail or heating core in the center of a deep pan will ensure your cakes cook evenly.

This cake takes a syrup soak really well, and I highly recommend it, since all chocolate cake is prone to drying due to the chocolate itself. Just make a simple syrup, add the flavoring or extract or liquor of your choice, and brush or squeeze on before icing.


Perfect Chocolate Cake

14.2 oz. cake flour (I use White Lily)

16 g. (about 4 tsp) aluminum-free baking powder 

1 oz. (about 1/2 c.) Dutched process cocoa powder (Hershey’s Special Dark or KAF Black Cocoa are great)

3/4 c. heavy cream

1/4 c. sour cream

21 oz. (about 3 c.) granulated sugar

2/3 c. water

2 tsp. instant espresso powder

4 oz. unsweetened chocolate, chopped finely

2/3 c. plus 3 Tbsp. canola oil

4 Tbsp. unsalted butter, softened to room temp

1 tsp. salt

1 Tbsp. vanilla extract

6 yolks, room temp

4 eggs, room temp

Preheat oven to 350 degrees and prepare pans. With a hand mixer, mix the flour, baking powder, and cocoa powder thoroughly, until no lumps remain (do not skip this step, it is especially important with cocoa and cake flour which both tend to clump). Rinse beaters and use to whip cream in a cold bowl to soft peaks, add sour cream and whip to firm peaks. Place whipped cream in the fridge. Chop chocolate finely.

In a saucepan, heat sugar, water, and espresso powder over medium heat until most of the sugar is dissolved. Stir frequently or use your hand mixer to speed up the process (be careful that the cord is kept away from the burner). Do not allow mix to boil. Once the sugar is mostly dissolved, pour into a large bowl and add chocolate, mixing until smooth. Add salt, vanilla, oil, and butter and mix until smooth. Sprinkle 1/3 of the flour mix into the wet ingredients and mix well on low, then gradually add the rest but do not overbeat. Set mixer aside and grab a spatula and whisk. At this point, the mixture should be warm but not too hot to touch--If your sugar mixture is still very hot, allow it to cool--you don't want to cook your eggs.

Add the yolks next, two at a time, mixing in by hand with whisk, then the eggs. Don't be tempted to reach for your electric mixer. Just be patient. They incorporate better if they are room temperature instead of cold from the fridge. Then gently fold whip cream into the mixture with a spatula until completely combined. Pour into prepared pans and tap them hard several times on the counter to release large air bubbles. Bake anywhere from 20--45 minutes depending on your pan sizes and depth. Cakes are done when their centers spring back, they no longer jiggle when moved, and the edges just begin to pull away from the sides. I don't recommend poking anything into your cakes to test doneness--just a quick press with your finger in the center will tell you all you need to know. Deep pans will also cause the tops to split (see my photo) which is another good indication of doneness. Cool, level, and split cakes, then soak with simple syrup and frost.

One Buttercream to Rule Them All by Molly Brodak

It tastes like ice cream because it is ice cream, essentially. Custard to be exact. Just, not frozen.

This recipe is years in the making. I have tried every buttercream in every variation under the sun, searching for one that would be creamy, smooth, not too sweet, and yet sturdy enough to hold up under stacked cakes. Generally I give up on all the frostings and just make ganache.

Let's get to the heart of things. Bear with me--we need talk for a minute about the components of frosting--the very concept of frosting--in order to get at what we even want it to do. Along the way we'll run through the popular buttercreams and their issues.

We ask so much of frosting. Sealing in the cake's freshness and looking perfectly beautiful, It's supposed to be sweeter than the cake it frosts, but not sickly sweet. It's supposed to be both smooth and creamy yet fluffy. It's supposed to hold up under heavy stacked cakes, hold up in hot weather, hold up with all the dyes and flavors we add to it, hold up under heavy fondant and ganache, hold up to piping, freezing, defrosting, re-whipping, etc. etc. AND it has to be DELICIOUS. No wonder there are a million variations on a million recipes for the stuff--to accomplish all of these demands is no simple task for what is essentially a mere embellishment on a cake.

And so what is the theory, if you will, of its composition? We've got sugar for sure--either melted granulated sugar in a syrup, or powdered sugar (or both). The real debate, as you can see played out in the following paragraphs, is what body is best to transport this sugar to your palate. It's got to have a pleasingly fatty mouthfeel, a smooth and substantial texture, but not too heavy.

oh oh

oh oh

The first candidate is butter, obviously, hence the simple beauty of American buttercream. Whipped butter can for sure be fantastically fluffy, and the fattiness is perfect. But American buttercream is too sweet, and if you try to make it less sweet by leaving out some powdered sugar, it just tastes like solid butter. It's fine in a pinch, but not transcendent. Can be delicious if you add as much unsweetened chocolate to it as possible.

I'm not even going to mention the shortening version of American "butter"cream. Because, gross. The war is over my love, put the Crisco down.

How about something lighter, a little meringue? Swiss meringue buttercream (SMBC), the second most popular frosting, always bugged the everloving crap out of me. First of all, it's nonsensical to make a meringue and then completely deflate it by cramming a brick of butter into it. At least one person has realized that the entire meringue step is completely unnecessary. Nailing the emulsion between butter and sweetened egg whites is tricky because of the temperature difference--which is why there is almost always some form of encouragement in any SMBC recipe along the lines "when it turns to soup, don't worry, just keep whipping and it will come together!" If you haven't figured it out already, that "soup" is the remnant of the meringue you just spent all that time whipping up, which has now had 99% of its tiny bubbles popped. By hunks of butter. You might as well just pour sweetened egg whites into your butter from the get-go. Beyond that weirdness, it's delicate, prone to weeping, and has a creepy texture. Yes, creepy. It's too slick.

Italian meringue buttercream is somewhat better, since the egg whites are not cooked, cooled, then whipped up, but whipped first then stabilized with hot sugar. Still, it's a tricky meringue to perfect because of how you have to, you know, pour hot sugar into meringue and somehow not murder it. Also the subtle shine of this frosting puts me off, as if it contains gelatin.

The other half of eggs? French buttercream, with an egg yolk foam instead of an egg white meringue...well...nobody makes that one. It's good though, just very soft and yolky.

Pudding? German buttercream and cooked (flour) frostings...now we are getting somewhere. I've been fixated on these in the past six months, feeling like there is something perfect here if I can just get the ratios right. I love the full body of cooked flour (or seven-minute, or ermine, (such a great name!)) frosting, but the texture wasn't fluffy enough for me--it came out a little on the pasty side, and dull in flavor as glue unless a ton of sugar is added. It was the flour.

So, scratch the flour. That means there is one champion left on our list, the one who ultimately took the prize in every possible way: custard. About 40% custard to 60% whipped butter makes the perfect body for the perfect frosting.

We circle back to German buttercream. It's not a popular one because it's considered too soft to hold up to piping, and can have a yellowish tinge. 

Well. I am here to say I have solved all of these problems. I have solved buttercream, period, haha!

Light, delicious, AND obedient!

Light, delicious, AND obedient!

For now.

First off all, I saw several problems with the custard recipes in German buttercream. They were all made with yolks only and milk as the custard base. Obviously adding a whole egg or two is going to give us more lightness to balance out the heavy body and flavor of yolks. Swap some milk for heavy cream to add non-egg density and a lighter color. Thirdly, we are going to need two sugars here--granulated (for the custard) and powdered (to add to the butter). A balance of both means the perfect amount of sweetness/stability to the custard base and firmness for piping. And lastly--that utterly foolish last step in all recipes of adding small amounts of soft butter to the custard as you whip it--reverse that! Whip up your butter first to ultimate fluffiness, then add small amounts of custard. Duh. Now we have a frosting that is ridiculously perfect--light, fluffy, yet firm enough to pipe beautifully, not too sweet, perfectly rich (and because of the extra fat from the yolks and cream) carries flavors potently!

This is somewhat embarrassing to admit but I teared up a little the first time I tasted this recipe. You don't understand how long I have been dreaming of this frosting.

gasp

gasp

It doesn't break, it doesn't weep, it can easily be adjusted to your sweetness preference. Does it crust? No. But it's firm enough to cover with fondant anyway if you use the barrel wrap technique, which is what I almost always use (post on this soon!). 

Making the custard for this recipe will remind you of making pastry cream, except with cornstarch only and without the butter stirred in at the end. It will cool very firm, like unpleasant jiggly concrete, but that's ok, you don't want a lot of moisture in your buttercream or it will be too soft.

This frosting has an uncannily light texture while tasting rich and substantial. The flavor of fresh cream really shines here, which is why it reminds me so much of ice cream. And because you are heating the custard, it's a great application for flavor infusions, such as a split vanilla bean pod--or, where you can add your chocolate if making a chocolate version for seamless incorporation.

Onto it then. Yes it takes a bit of prep since you need your custard to cool completely before you can make your frosting, but I highly recommend doubling the custard part and keeping it on hand anytime you need to whip up some frosting--and, I don't really see a problem with having extra pastry cream on hand. It will last about three weeks in the fridge tightly sealed, and can be frozen for six months. 

Now, about that cake...this cake is ALSO something years in the making. A velvety, dense-crumbed, moist chocolate cake that is not even remotely heavy or dry, yet can be carved and stacked? Yes'm. But that recipe is for another post.

hello my love

hello my love

The fondant leaves and slim gold feathers I used to adorn this cake come from molds I sell on my Etsy shop from vintage pieces I have fiendishly collected over the years, if you wanted to know.

Custard Buttercream

aka the world's best buttercream

This recipe makes A LOT of buttercream--about 7 cups (enough to fill and frost two 8" cakes and then some). If you don't need that much right now, I recommend making the full custard amount, then freezing half of it for later use. Whip up your half-sized custard portion with half of the amount of butter and powdered sugar here.

8 oz. granulated sugar

1.5 oz. corn starch 

1 egg

2 yolks

1 c. whole milk

1 c. heavy cream

2 Tbsp vanilla extract

1 c. (two sticks) of salted butter

3 c. (six sticks) of unsalted butter

2 1/2 c. powdered sugar, or to taste

Whisk granulated sugar and cornstarch in a heat-proof bowl until well combined, then add egg and yolks and beat for 1 minute. Heat milk and cream on the stovetop until mixture starts to steam but not boil. Temper the egg mixture by mixing in a small amount of hot milk to eggs, gradually adding more until mixture is smooth, then pour contents back into the saucepan and cook for another minute, until the custard thickens and bubbles swampily. Remove from heat and strain custard through a fine sieve to catch any cooked egg bits. Mix in vanilla, press plastic wrap over the surface, and allow to cool in the fridge for at least 3 hours.

If the custard was cooled overnight or for longer than 3 hours, remove from fridge and allow to come to room temperature before using. Custard should be cool room temperature--not cold.

Whip butter until pale and fluffy, about 4-5 minutes. Add powdered sugar and whip for at least 1 more minute. Add spoonfuls of cooled custard to the butter and whip until completely combined. 

crying again now

crying again now